Reviewing the View Properties and Edit Properties Tools
All documents have
properties, whether they are saved in SharePoint document libraries or
not. Documents have filenames, created date and time, modified date and
time, author, and other tags attached to the document. SharePoint allows
document library administrators to define additional properties, which
are metadata fields, that will be stored in that document library.
Unlike some basic file properties, properties defined by metadata fields
may get stripped from the document if it is moved to a different
document library that doesn’t contain the same metadata columns. The
View Properties and Edit Properties tools allow users of the library to
see what information is available within the document library about the
document.
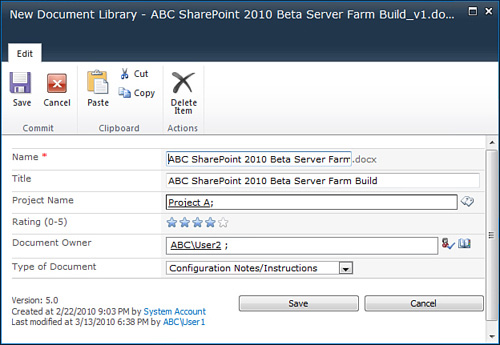
Figure 5
shows the Edit Properties window for a document stored in a document
library that has been customized with the addition of a Project Name
column, Ratings column, Document Owner column, and Type of Document
column. A SharePoint Server 2010 Enterprise document library has been
used for this example. The version number of the document is visible at
the bottom of the window and indicates that versioning is on for the
document library, and the Created and Last Modified date, time, and user
account information is also provided.
The
document library administrator chose to add several columns to better
categorize documents using metadata and to encourage user participation
by asking for users to rate the document. By adding a column titled
Document Owner that requires the entry of a domain user account name, it
is clearly defined who the ultimate authority is for that specific
document. Otherwise, the document library tracks who created the
document (or uploaded it) and who last modified it, but neither of these
people may actually be responsible for the document. By adding the Type
of Document column, a list of options is given to the user to choose
from, saving time and encouraging users to better define the type of
document because document names can be confusing and may actually give
little insight into the type of document it is.
Using the Version History Tool
The next row of buttons on
the toolbar includes the Version History, Document Permissions, and
Delete Document buttons, each of which is reviewed in this section. Note
that Version History will not be available unless versioning is enabled
for the document library (accessible through Document Library Settings,
Versioning Settings, and then choosing either Create Major Versioning
or Create Major and Minor (draft) Versions).
Version history shows the
different versions of a document in the library if versioning was
enabled in the library, and provides information about changes that were
made to the metadata of the document. Figure 6
shows a sample version history for a document with several major
versions. The topmost version is indicated as being the current published
major version, and the date and time modifications that took place are
clearly indicated, along with the logged-in user who made the changes,
the size of the document, and any comments added.
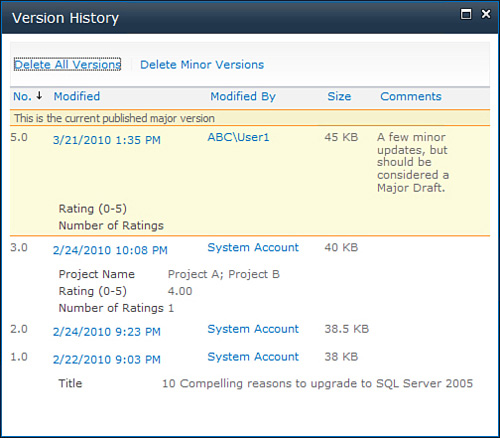
Each version has a drop-down
menu that provides the options to View, Restore, and either Unpublish or
Delete. The Restore tool will “promote” that version to be the latest
version by making a copy of the older version and incrementing the
number. Note that there are also tools to Delete All Versions and Delete
Minor Versions above the version listing.
Note
Versioning is such an
important feature in SharePoint 2010 that it is critical that
administrators and end users feel comfortable with working with major
and minor versions. They also must understand the importance of
following best practices of always checking out documents before working
on them, then checking them back in when complete, and deciding whether
the new version should be a minor or draft version (0.1, 0.2 version)
or a major or published version (1.0, 2.0 version). Comments should
always be added when checking a file back in to facilitate later review
of previous versions, if necessary.
Using the Document Permissions Tool
Document
permissions allow a user with sufficient permissions (members of the
Owners group by default) to modify the permissions applied to a specific
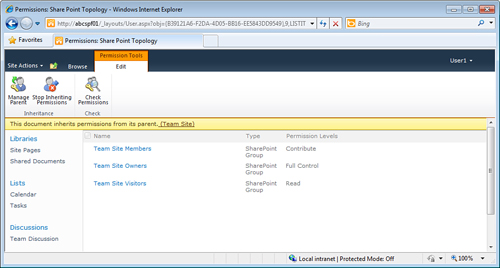
document. Figure 7
shows the Permission Tools page for a document in a document library in
SharePoint Foundation 2010. Note that underneath the Ribbon, a note
reads “This document inherits permissions from its parent,” which is the
default behavior. On the Ribbon itself are icons to Manage Parent, Stop
Inheriting Permissions, and Check Permissions.
If needed, the
document library administrator can grant unique permissions to this
specific document, but this should only be used when absolutely
necessary due to the added overhead and complexity of managing overly
customized document libraries. That said, a new addition to permissions
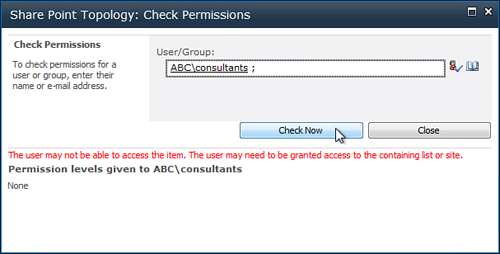
management is provided: the Check Permissions tool. Figure 8
shows the results of using the Check Permissions tool on a document
with customized permissions for the AD group Consultants. After the
Check Now button is clicked, the tool validates that ABC\Consultants
have no permissions to the document. This is especially useful if AD
groups are used to define permissions on a site level, because a
document library administrator might not know absolutely which users are
in which AD groups.
Using the Delete Button and Recycle Bins
The Delete button on the
Documents tab sends one or more documents to the Recycle Bin for the
document library. The ability in SharePoint 2010 document libraries to
check one or more items as being selected allows a user who has
contributor permissions or an administrator to easily delete a number of
items. Note that the Delete key on the keyboard can also be used.
After
the items are sent to the Recycle Bin, a member with full control
permissions can restore anyone’s items, or a member with contributor
permissions can restore items he has deleted. A member with read
permissions won’t have access to the Recycle Bin. An administrator with
site collection administrator privileges can access the Site Collection
Recycle Bin (otherwise known as the second-level Recycle Bin) that
contains items deleted from the End User Recycle Bin, or to see and
restore items still in the End User Recycle Bin.
Note that a farm
administrator needs to determine the base settings for the Recycle Bin
for the site collection in question. A farm administrator can access the
Web Application General Settings interface from the Central
Administration site to determine the following settings:
Recycle Bin Status On or Off.
The
amount of time after which to recycle items in the Recycle Bin. The
default is 30 days, and the number of days can be changed, or Never can
be checked.
The
percentage of live site quota allocated for the second stage deleted
items, with 50 percent being the default, or the Second Stage Recycle
Bin (otherwise known as the Site Collection Recycle Bin) can be turned
off.
This combination of tools has come a long way since SharePoint 2003, where there wasn’t a Recycle Bin at all!
