Changing the Addressing of a Subnet
In the course of DHCP administration, you might find it necessary to modify or completely change a subnet’s addressing.
If
you merely need to modify the range of a current scope, you can achieve
this task by changing the address range or exclusion ranges of the
subnet’s defined DHCP scope.
Important
Change
scope properties with care so as not to exclude active leases, and so
as not to include within the reconfigured scope any addresses on the
subnet that have been manually assigned to other computers. |
If you need to migrate
to a completely new scope, however, you must first add a new scope to
the DHCP server and then migrate to that new scope. To perform such a
migration, first create and activate the new scope, and then deactivate
the old scope. Do not delete the deactivated scope until the clients
have migrated to the new scope. To migrate clients, either wait for the
clients to automatically renew their leases (after 50 percent of the
configured scope lease time has elapsed) or manually renew clients by
executing the Ipconfig /release command followed by the Ipconfig /renew
command on the client computers. Once all clients have been moved or
forced to seek leases in another scope, you can safely delete the
inactive scope.
Tip
You
can enable conflict detection on the Advanced tab of the DHCP server
properties dialog box. This feature allows you to specify the number of
times the DHCP server will ping a given address on the network before
assigning that address to a client. If the ping receives a reply, the
address will not be assigned. This feature is useful, for example, if
you need to deploy a new DHCP server to replace one that has recently
failed. In this case, without the aid of an up-to-date DHCP server
database, conflict detection can ensure that currently active leases are
not assigned to other clients. |
Backing Up the DHCP Server Database
Maintaining a backup
of the DHCP database protects you from data loss if the DHCP database
is lost (for example, due to hard disk failure) or becomes corrupted.
The two backup
methods supported by the DHCP server are synchronous (automatic) backups
that occur automatically every 60 minutes and asynchronous (manual)
backups, performed using the Backup command in the DHCP console. Only
manual backups can be used to perform manual database restorations.
Automatic backups are used to restore the database only when the DHCP
service detects database corruption.
When a backup occurs, the entire DHCP database is saved, including the following:
All scopes, including superscopes and multicast scopes
Reservations
Leases
All options, including server options, scope options, reservation options, and class options
However, some DHCP data is
not saved in any type of backup. For example, credentials specified for
DNS dynamic update are not backed up with a manual or automatic backup.
(You can configure these credentials through the Advanced tab of DHCP
server properties.)
Performing a Manual Backup
To perform a manual
backup of the DHCP database, right-click the DHCP server icon in the
DHCP console, and then select Backup. To restore the DHCP database,
right-click the DHCP server icon in the DHCP console, and then select
Restore.
Backup Locations
The default DHCP
database manual backup path is \WINDOWS\System32\Dhcp\Backup. You can
change the database backup folder by selecting a different local folder
during a manual backup or by changing the backup folder location in the
DHCP server properties dialog box.
When planning your backup strategy, keep the following in mind:
When you perform manual backups, you don’t need to stop the DHCP service unless you’re moving your database to a new server.
The backup folder location must be a local path.
Migrating a DHCP Server
Migrating a DHCP
server from one server to another requires you to move the DHCP database
to the new server. To move the DHCP database, simply back it up and
then restore it to another location, as explained in the following
procedures.
To back up the DHCP database (at the source server), complete the following steps:
1. | Open the DHCP console.
|
2. | In the console tree, select the applicable DHCP server.
|
3. | From the Action menu, select Backup.
The Browse For Folder dialog box opens.
|
4. | Select the folder that will contain the backup DHCP database, and then click OK.
You must choose a local drive for the DHCP database backup folder.
|
5. | Stop the DHCP server.
This step prevents the server from assigning new address leases to clients after the database has been backed up.
|
6. | In the Services console, disable the DHCP Server service in the list of services.
To perform this task, launch the Services console and
double-click DHCP Server. In the DHCP Server Properties dialog box, from
the Startup Type drop-down list, select Disabled and click OK. This
setting prevents the DHCP server from starting after the database has
been transferred.
|
7. | Copy the folder that contains the backup DHCP database to the destination DHCP server.
|
To restore the DHCP database (at the destination server), complete the following steps:
1. | If you have not already installed the DHCP Server role, do so.
|
2. | Open the DHCP console.
|
3. | In the console tree, select the applicable DHCP server.
|
4. | From the Action menu, select Restore.
The Browse For Folder dialog box opens.
|
5. | In
the Browse For Folder dialog box, select the folder that contains the
backup DHCP database, and then click OK. If prompted to stop and restart
the service, click Yes.
The database you are restoring must have been created manually
using the Backup command on the DHCP console Action menu. Backups
created automatically by the DHCP service cannot be used to perform
manual database restorations.
|
Manually Compacting a DHCP Server
To support the
offline compaction and repair of Jet databases, such as the DHCP
database and the Windows Internet Name Service (WINS) database, Windows
Server 2003 includes the Jetpack.exe tool.
The DHCP Server service
performs dynamic Jet compaction of the DHCP database while the server is
online—which reduces the need to use Jetpack.exe for offline
compaction. However, offline compaction is a more efficient means of
defragmenting the DHCP database than is dynamic compaction.
You should plan to use
Jetpack.exe to compact a Jet database periodically whenever the database
grows beyond 30 MB. In addition, performing offline compaction is
recommended if you receive error messages indicating that the DHCP
database has become corrupted.
To manually compact or repair the DHCP database, complete the following steps:
1. | On a DHCP server computer, open a command prompt.
|
2. | Use the Jetpack.exe tool to perform offline compaction.
|
The correct syntax for Jetpack.exe is as follows:
jetpack database_name temporary_database_name
The following are example commands to compact the DHCP database:
cd WINDOWS\system32\dhcp
net stop dhcpserver
jetpack dhcp.mdb tmp.mdb
net start dhcpserver
Using Options Classes
An options class
is a way for the server to manage options provided to clients within a
scope. When an options class is added to the server, clients of that
class can be provided class-specific option types for their
configuration. Options classes can be of two types:
Vendor classes are used to assign vendor-specific options to clients identified as sharing a commonly defined vendor type.
User classes are used to assign options to clients identified as sharing a common need for similar DHCP options configuration.
You can view the
available options classes by selecting Define User Classes, Define
Vendor Classes, or Set Predefined Options from the server node shortcut
menu. By default, the options you can configure for a reservation,
scope, or server are those that belong to the DHCP Standard Options
vendor class and to the Default User Class user class.
Tip
In
Windows Server 2003, the DHCP server includes a predefined user class
named Default Routing And Remote Access class. Options within this class
apply only to clients that request an address configuration while
connecting to Routing And Remote Access. One such option that you are
likely to see on the exam is 051 Lease. By configuring this option, you
can assign shorter lease durations to your remote access clients than to
your other DHCP clients. |
Implementing User Classes
User classes allow
you to apply a particular configuration of DHCP options to any subset of
DHCP clients you define. To implement a user class, you first define
the class at the DHCP server by assigning an ID and set of options for
the class. Then you assign selected client computers to the class by
using the Ipconfig /setclassid command. When these clients subsequently
communicate with DHCP servers, they announce their class ID and inherit
the options of that class.
A
custom user class is helpful when you need to assign distinct options
to distinct sets of client computers. For example, your network might
require that clients with the security clearance to bypass the company
firewall be assigned a unique default gateway. In this example, you
could configure options to distribute the unique default gateway to the
security-exempt class.
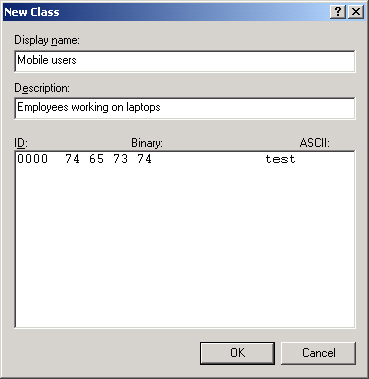
To create a custom or new
user class, right-click the DHCP server icon in the DHCP console and
select Define User Classes, as shown in Figure 6.

You then need to set
an ID string for the class. You designate this class ID string when you
first create the class in the DHCP console, as shown in Figure 7. After defining a new class and specifying an ID string for that class, you can then set desired options for that class.
Finally,
for the desired computers to inherit the options of the new class, you
need to set the class ID of appropriate client computers to match the ID
you have defined for that class at the DHCP server. You can achieve
this task by executing the Ipconfig /setclassid command at a command
prompt at each client computer. The user class option permits only one
class ID to be used for identifying clients. In other words, each client
computer can be identified as a member of only a single user class at
the DHCP server.
To create a new user or vendor class, complete the following steps:
1. | Open the DHCP console.
|
2. | In the console tree, select the applicable DHCP server.
|
3. | From the Action menu, select one of the following:
To create a new user class, select Define User Classes. To create a new vendor class, select Define Vendor Classes.
|
4. | Click Add.
The New Class dialog box opens.
|
5. | In the Display Name text box, provide a friendly name for the class. Optionally, fill in the Description text box.
|
6. | In
the ID text box, set the same binary or ASCII string that matches the
DHCP class ID string that is either implemented or set at member
clients.
|
7. | Click OK and then Close to return to the DHCP console.
|
To set DHCP class ID information at a client computer, complete the following steps:
1. | At a DHCP-enabled client computer running Windows 2000, Microsoft Windows XP, or Windows Server 2003, open a command prompt.
|
2. | Use the Ipconfig /setclassid command to set the DHCP class ID the client uses when obtaining its lease from the DHCP server.
You can use the Ipconfig /setclassid command as demonstrated in
the following example command, which sets an ASCII string (MyNewClassId)
as the DHCP class ID string for the local area network (LAN) connection
in use at the client computer:
C:\>ipconfig /setclassid "Local Area Connection" MyNewClassId

Windows IP Configuration

Successfully set the class id for adapter Local Area Connection.
Note You can use the Ipconfig /showclassid <adapter number> command to display all the DHCP class IDs allowed by the DHCP server for any network adapter installed on your computer. |
|
