Now that you have an understanding of how data is
stored in the Table service, it’s time to develop a web application that
can use it. We defined an entity for storing
the Hawaiian shirt product, and we looked at how it would be stored in
the Table service. Here you’ll build a new application that will manage
the product inventory for the Hawaiian Shirt Shop website.
1. Creating a
project
Create a new Cloud Service
web role project called ShirtManagement.
If you need a refresher on how to set up your development environment
or how to create a web role project.
Like the other
storage services, communication with the Table service occurs through
the REST API .
Although you can use this API directly, you’re likely to be more
productive using the StorageClient library provided in the Windows Azure
SDK.
Whenever you create a new
Cloud Service project, this library will be automatically referenced.
But if you’re building a brand new class library or migrating an
existing project, you can reference the following storage client
assembly manually:
In addition, you’ll
need to reference the ADO.NET Data Services assemblies:
|
The Table service exposes
its HTTP REST APIs through its implementation of the ADO.NET Data
Services framework. By using this framework, we can utilize the ADO.NET
Data Services client assemblies to communicate with the service rather
than having to develop or use a custom REST wrapper.
Because ADO.NET Data Services
is used by the storage client SDK, you’ll need to reference those
assemblies too.
|
Now that you’ve set up your
project, let’s look at how you can add the Product entity class to the project.
2. Defining an
entity
Before you create your
product-management web page, you need to create an entity in the web
project. At this stage, we’ll just show you how to add the entity
directly to the web page.
To keep this example
simple, we’ll just store the shirt name and description, as before. Add a
new class to your web project named Product.cs and define the class as shown in the following listing.
Listing 1. Product entity
public class Product : TableServiceEntity
{
   public string Name { get; set; }
   public string Description { get; set; }
}
|
In listing 1, the Product
class inherits from the TableServiceEntity base class (Microsoft.WindowsAzure.TableService.TableServiceEntity). This base class contains the three properties
required by all table storage entities:
Timestamp
PartitionKey
RowKey
Now that you’ve set up your
project and defined your entity, you need to create a table to store
the entity in. The same method can be used in both the development and
live environments.
3. Creating a
table
The simplest method of
creating a table is to create a PowerShell script or to use one of the
many storage clients that are available. We’ll use Azure
Storage Explorer, which you can download from CodePlex: http://azurestorageexplorer.codeplex.com/.
In this
section, we’ll look at how to create a table in two ways: using Azure
Storage Explorer and using code.
Creating a Table Using
the Azure Storage Explorer
Once you have downloaded and
fired up Azure Storage Explorer, it will automatically connect you to
your development storage account as long as your local development
storage service is running.
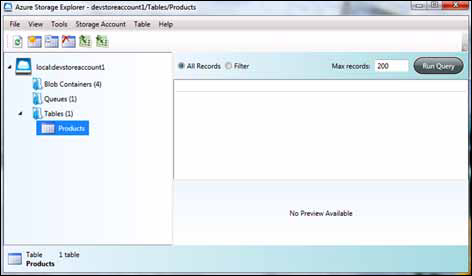
To create a new table
in your storage account, all you need to is select Table > New Table
and enter the name of your table (Products, in this case). Figure 1 shows the newly created Products table in Azure
Storage Explorer.
Although using a tool such as
Azure Storage Explorer is probably the easiest method of creating a new
table, you may wish to do this manually in C#.
Creating a Table in
Code
In this example, you’ll
manually create a console application that will create a new table in
the storage account when it’s run. Although we’ll have you use a console
application in this example, you could easily use a web application,
Windows Forms application, or Windows Presentation Foundation
application. The deployment application doesn’t need to be a cloud
application (web or worker role); it can be a standard application that
you run locally.
To create the
application, perform the following steps:
1. | Create a
console application targeting .NET 3.5.
|
2. | Add a reference to System.Data.Services.
|
3. | Add a reference to System.Data.Services.Client.
|
4. | Add a reference to Microsoft.WindowsAzure.StorageClient.
|
5. | Add an app.config or web.config entry with your storage
account credentials.
|
6. | Add the following code to create the table:
CloudStorageAccount.SetConfigurationSettingPublisher((configName, configSetter) =>
            {
configSetter(RoleEnvironment.GetConfigurationSettingValue(configName));
            });

var storageAccount =

  CloudStorageAccount.FromConfigurationSetting("DataConnectionString");

CloudTableClient tableClient =
   storageAccount.CreateCloudTableClient();

tableClient.CreateTableIfNotExist("Products");
|
The code added in step
6 retrieves storage account information from the app.config and then
calls the CreateTableIfNotExist method from the CloudTableClient object, passing in the name of the table to create
(Products).
|
The code used to create a new
table will work not only on your development storage account, but will
also work against the live system. All you need to do to make this code
work against the live system is to change the DataConnectionString configuration setting to your live account.
|
Now that you know how to create
a table both in the live system and in development storage, it’s worth
taking a quick peek at how this is implemented in the development
storage backing store. Figure 2 shows how tables are represented in the development storage
SQL Server database.
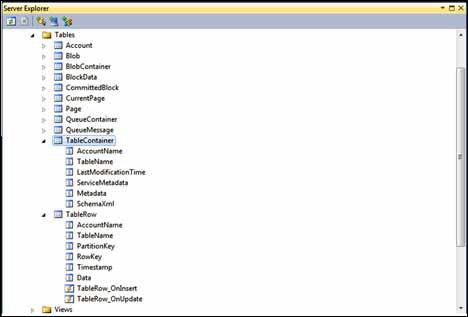
As you can see in figure 2, the SQL Server database that stores the
entities is pretty flexible. The TableContainer table keeps a list of
all the tables stored in the development storage account. Because you
can create tables dynamically, any new table created will contain a new
entry in this table.
Each row in the TableRow
table in figure 2 stores a serialized version of the
entity. As you can see from this table definition, the only fixed data
that’s stored in this table is AccountName, TableName, PartitionKey,
RowKey, and TimeStamp. All other properties are stored in the Data
column. All other properties are stored in the Data column. As you can see, the
actual development storage schema relates to the logical representation
that you saw in table 4.
Now that you’ve seen how
tables are represented in development storage, let’s look at how you
can start working with your entities.
