After your application is up and running in Azure,
you’ll want to automate some of the management functions. Automation can
include scaling your roles, changing configuration, and automating
deployments. Almost anything you can do through the Azure portal you can
do through the service management API.
The
service management API is built like all the other APIs in Azure. It
uses REST and XML under the hood, wrapped in a pleasant .NET library.
You can use the service management API directly with REST, but most
people use either the library or use a tool that calls the APIs.
All the management APIs we’re
going to discuss can be called from inside or from outside Azure. All
management calls are free; they incur no cost to call or execute. The
Azure team has said that they monitor the use of the APIs and can
throttle back your calls if they’re abused.
To start using the
service management API, you need to configure your account with
certificates for API authentication. After you’ve done that, you’ll be
able to send it commands. After we show you how to configure your
account, we’re going to look at how you can work with your services and
containers, how to automate a deployment to the cloud, and how you can
use the management API to scale your service up or down.
1. What the API doesn’t do
A little earlier we said that
the service management API can do almost as much as the portal.
However, you must use the portal to do the following things:
Access billing data— The
portal has several tools you can use to monitor your usage and billing
in near real time. Monitoring allows you to estimate your charges as
they occur. The final numbers are crunched at the end of the month to
generate your bill.
Create subscriptions and create compute or storage services— After you’ve created the subscription and services, you can do everything else from the management API.
Deploy management certificates— You can’t use the management service to deploy a management certificate; you have to do this manually.
To make calls with the API, you need to sign them with a certificate, which we’ll discuss next.
2. Setting up the management credentials
The service management API
has a lot of power, so all of its calls and responses must be secure.
All calls are transferred over HTTPS, using a signed certificate that
you associate with your Azure account. Whether you’re calling the REST
by hand or using the .NET library, you’ll need to attach a certificate
to your Azure account trusts.
You can use any X.509 v3
certificate that you want to use. Because you have control over which
certificates your account trusts, you can use self-signed certificates
if you want to. You can also use certificates that you’ve purchased from
a certificate authority like VeriSign.
Your account can hold up to
five certificates. You can distribute those certificates to different
people or processes, and then eventually revoke them if you need to. All
a person needs in order to use the management API on your services is
that certificate and your subscription number. We’ll look at how to
revoke a certificate later in this section.
Setting Up a Certificate
To
set up your management certificates, you need a certificate to upload.
We’re going to walk you through the process of creating a certificate
locally and then uploading it to your account.
The goal is to create a .cer
file that holds the public key for your certificate. You never share the
private half of the key. This public key will be uploaded to Azure, and
Azure will use it to verify that your private key was used to sign the
management API request.
You need to use IIS 7 to
create a self-signed certificate. Open the IIS manager and look for the
Features view. Listed there is a link for Server Certificates. Click
Create Self-Signed Certificate in the Actions pane and follow the steps.
You’ll give the certificate a name, which will be used whenever you’re
working with the certificate.
You can also use the
Visual Studio command prompt to create a self-signed certificate. Open
the command prompt (make sure to run it as an administrator), and then
enter the following command:
makecert -r –pe -n "CN=CompanyName" -a sha1 -len 2048 -ss My "filename.cer"
This command creates a certificate that you can use in the local directory.
Importing and Revoking a Certificate
Importing a certificate is as
easy as logging into your Azure portal and going to the Account tab.
Choose Manage My API Certificates. The window, shown in figure 1, displays
the certificates you’ve uploaded; you can also upload a new certificate
from this window. Your certificate must be in a .cer file. If you have a
different format, you can easily convert it by importing it into your
Windows certificate store, and then exporting it in the format you want.
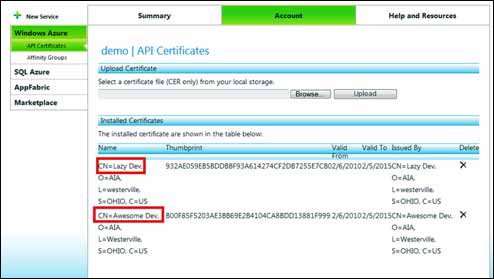
You can have up to five
certificates in your account at a time; take advantage of them. Each
person or system that’s using the management API should have their own
certificate. If you provide certificates in this way, you’ll have an
easy way to revoke their access. To revoke a certificate, click the
Delete X icon next to the one you want to revoke.
You need to attach your
certificate to each request that you send to the API. Attaching your
certificate ensures that the message is signed with your private key,
which only you should have. When Azure receives your message, it’ll
check that the message came from you by opening it with the public key
you uploaded in the .cer file.
You’ve got some certificates now and you’re ready to learn about some of the things you can use the service management API for.
