4. Automating a deployment
Even
though you can do everything you need through the naked REST API of the
service management service, it’s a lot easier to use something that
provides a higher level of abstraction. REST is fine, but it’s too
low-level for us on a daily basis.
There are two popular
options to go with. The first is a collection of PowerShell commandlets
that have been provided by Microsoft. These are useful when you’re
integrating cloud management into your existing management scripts. You
can find these commandlets at http://code.msdn.microsoft.com/azurecmdlets.
We might be using a
higher-level tool, but you still need to provide the tool with the
subscription ID of your Azure account and the thumbprint for the
certificate you’ll be using to manage your account. You can enter these
into the configuration file for the tool, csmanage.exe.config. The
easiest place to find the ID and the thumbprint is on the Azure portal.
The csmanage
application can work with one of three resources online: hosted
services, storage services, or affinity groups. Each command you send
will include a reference to the resource you want to work with.
Getting a List of Hosted Services
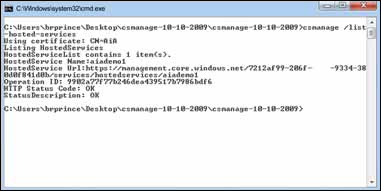
To get a simple list of the
hosted services you have in your account, you can execute the following
command at a command prompt. This command executes the same query you
previously made manually.
csmanage.exe /list-hosted-services
When you run this
command, the application connects to your account in the cloud and
returns a list of the services you have. When we executed this command,
we had just one hosted service, as shown in figure 2.
After you have a list of your services, you next task is to create a deployment of your application.
Creating a Deployment
First,
you need to create the package for your code. You’ve probably done this
a thousand times by now, but right-click the Azure project and choose
Publish.
When you’re using the
management service, a service package has to be in BLOB storage for you
to deploy it; you can’t upload it as part of the actual create-deployment
command. What you can do is upload the package through any tool you
want to use. In this example, we just want to upload the cspkg file.
This BLOB container can be public or private, but it should probably be
private. You don’t want some jokester on the inter-web to download your
source package. Because the management call is signed, it’ll have access
to your private BLOB containers, so you won’t have to provide the
credentials. The configuration file will be uploaded when you run the create-deployment command. The following listing shows the command-line code for deploying a package.
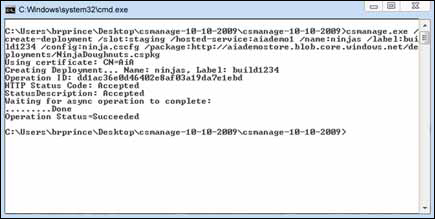
Listing 3. Pushing a deployment to the cloud from the command line
That’s a lot to type in by hand. The most common use of csmanage
is in an automated deployment script. You could make the deployment
completely hands-off with enough script and PowerShell. When you execute
the command in listing 3,
there’ll be a slight pause as the configuration is uploaded and the
management service deploys your bits. The output of the command is shown
in figure 4.
All this is wonderful, but you don’t want to just upload and deploy your code; you need to start it.
Starting the Code
You need to start your code so that the FC can start your site. The command to start everything is quite simple:
csmanage /update-deployment /slot:staging /hosted-service:aiademo1 /status:running
This command tells the
management API that you want to update the deployment of your service
that’s in the staging slot to running. (You can use the same command to
set the status to suspended.) After you set the status to running, it
can take a few minutes for the FC to get everything up and running. You
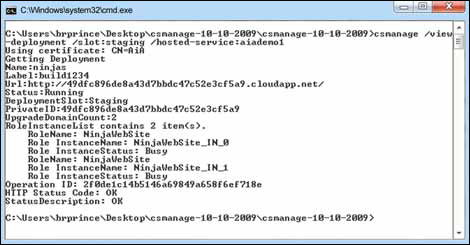
can check on the status of each instance of your roles by using the view-deployment command:
csmanage /view-deployment /slot:staging /hosted-service:aiademo1
When you execute this command,
you’ll get a detailed view of each instance. In this example, both of
our instances were busy, as shown in figure 5. If we just wait a few minutes, they’ll flip to ready.
When your instance status reads as ready, you can use a command to perform a VIP swap.
Performing a VIP Swap
Remember, a VIP swap occurs
when you swap the virtual IPs for production and staging, performing a
clean cutover from one environment to the other. Using a VIP swap is
the simplest way to deploy a new version. You can always do an update
domain walk, which is more complicated but provides the capability for a
rolling upgrade.
You need a deployment in each slot to perform a VIP swap through the csmanage
or REST interfaces. If you’re deploying for the first time to an empty
environment, either deploy your first version into the production slot,
or rerun the swap-deployment command and adjust the slot parameter to production.
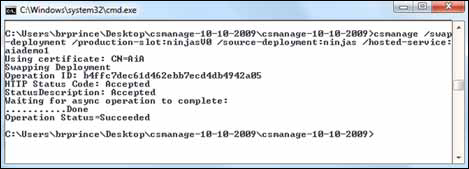
To perform the VIP swap, execute the following command:
csmanage /swap-deployment /production-slot:ninjasV0 /source-deployment:ninjas
     /hosted-service:aiademo1
Be careful when you type in this command. The third parameter, source-deployment, is different from what you would expect. Because the second parameter is production-slot, you would expect the third to be staging-slot.
The naming isn’t terribly consistent. Another mystery is why you need
to define the slot names at all. You can have only one slot of each
anyway. Go figure.
Figure 6 shows the successful completion of the VIP swap.
Now that you’ve swapped out to production and have fully tested the slot, you can tear down the staging slot.
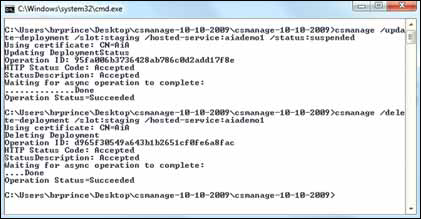
Tearing Down a Deployment
Use the following command to suspend the state of the servers, and then delete the deployment:
csmanage /update-deployment /slot:staging /hosted-service:aiademo1 /
     status:suspended

csmanage /delete-deployment /slot:staging /hosted-service:aiademo1
You need to execute these
two commands back-to-back. You can’t delete a service while it’s
running, so you have to wait for the first command to suspend the
service to finish.
Figure 7 shows the successful completion of these commands.
You’ve
successfully automated the deployment of a cloud service, started it,
moved it to production, and then finally stopped and tore down the old
version of the service.
You’ve
done this without having to use the portal. Even so, you still had to
use the portal to upload your management certificates and create the
initial service container.
Now to what people really care about in the cloud: dynamically scaling the number of instances that are running your service.
