1. Problem
You have a Windows Phone 7 Silverlight application with more than one page and you need to navigate through the pages.
2. Solution
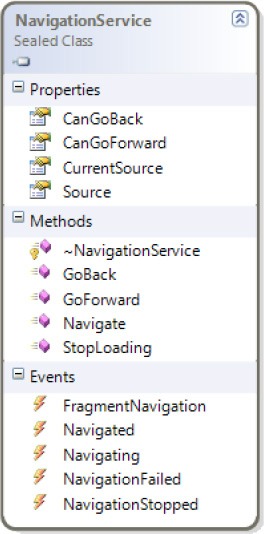
You have to use the NavigationService class and, optionally, the OnNavigatedTo and OnNavigatedFrom event handlers).
3. How It Works
The Windows Phone 7
Silverlight application is based on pages and a frame. The latter is the
top-level container that provides features such as page orientation and
reserves space for the pages' rendering and status bar. The Frame
contains one or more pages and provides the navigation service to go
through the pages.
A page is a
container for Silverlight controls that is rendered in a space reserved
by the frame. The page optionally provides the application bar , which is used to provide a page menu and a toolbar.
The PhoneApplicationPage class provides developers everything needed to manage a page. On the other hand, the PhoneApplicationFrame class represents the frame.

The NavigationServices property of the PhoneApplicationClass class enables developers to access the frame's navigation service and use the Navigate method. This method has one parameter, which is the Uri object containing the URL of the target page. This Uri constructor has two parameters: the former is the string containing the URL of the page, and the latter is the UriKind enumeration, where you can set whether the URL is relative or absolute.
public bool Navigate(
        Uri source
)
Another useful method provided by the NavigationServices class is GoBack. This method simulates the hardware Back button press in going one page back. You can use the CanGoBack property to retrieve a Boolean value indicating whether you can go back to the previous page (true) or not (false).
public void GoBack()
public bool CanGoBack { get; }
NOTE
The NavigationServices class provides the GoForward
method too, but because there is no forward navigation in a Windows
Phone 7 application, this method always returns an exception.
4. The Code
To demonstrate simple navigation between two pages, we have created the NavigatingApp Silverlight application.
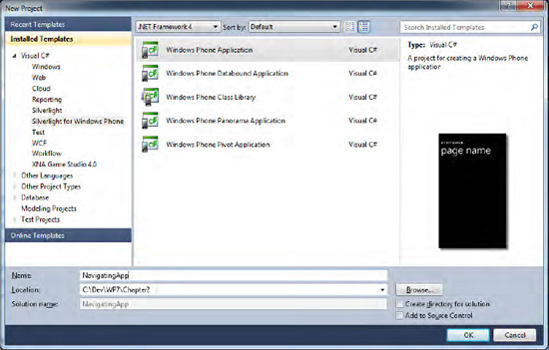
Start Visual Studio 2010 and
choose New Project from the Start page and then select the Windows Phone
Application template. In the Name text box of the New Project dialog
box, type NavigatingApp (see Figure 2).

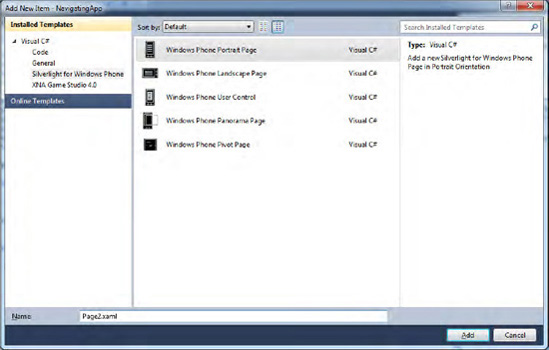
From the Solution Explorer window, right-click the NavigatingApp project name and choose Add New Item.
From the Add New Item
dialog box, select the Silverlight for Windows Phone template from the
Installed Templates list. Then select Windows Phone Portrait Page. Name
the page Page2.xaml and then click OK (see Figure 3).

On both pages, you have to add a hyperlink button. In the MainPage.xaml page, add the following code between the ContentPanel grid tags:
. . .
        <!--ContentPanel - place additional content here-->
        <Grid x:Name="ContentPanel" Grid.Row="1" Margin="12,0,12,0">
            <HyperlinkButton x:Name="hbButton1" Content="Navigate to Page 2"
                             Click="hbButton1_Click"/></Grid>
. . .
In the Page2.xaml page, insert the following code:
. . .
        <!--ContentPanel - place additional content here-->
        <Grid x:Name="ContentPanel" Grid.Row="1" Margin="12,0,12,0">
            <HyperlinkButton x:Name="hbButton2" Content="Go back" Click="hbButton2_Click"/>
. . .
Both codes specify the Content attribute, used to define the text that will be shown in the page, and the Click event handler. In the event handler code, we find the navigation logic between the two pages.
In the MainPage.xaml.cs file, we find the Click event handler:
private void hbButton1_Click(object sender, RoutedEventArgs e)
        {
            this.NavigationService.Navigate(new Uri("/Page2.xaml", UriKind.Relative));
        }
Because the event handler is defined in the MainPage class that derives from the PhoneApplicationPage class, you can have direct access to the NavigationServiceNavigate method, you can go to Page2.xaml. Note the relative URL attribute specified by the UriKind enumeration. This indicates that the URL is relative to the root application path. Because Page2.xaml is stored at the same level as MainPage.xaml—that is, the root—we can use that simple form. property. By using the
In the Page2.xaml.cs file, we find the other Click event handler:
private void hbButton2_Click(object sender, RoutedEventArgs e)
        {
            if (this.NavigationService.CanGoBack)
                this.NavigationService.GoBack();
        }
First, you check whether you can go back to the previous page, and if you can, you call the GoBack method.
NOTE
You could use the Navigate method in the Page2 event handler to pointing to MainPage.
There is a side effect, however. As with browser navigation, pressing
the Back button results in the application showing the previous page in
the same state you left it. If you write the URL of the page and
navigate to it, the browser shows a brand new page. The same occurs
here: by using the Navigate method and specifying the URL of the MainPage.xaml page, you will obtain a fresh, new copy of the MainPage class.
5. Usage
In Visual Studio 2010, make
sure your target is Windows Phone 7 Emulator and then press Ctrl+F5. The
emulator will start, briefly showing the splash screen and then the
main page. Click the hyperlink button to access the second page. Now
click either the hyperlink button or the hardware Back button, and you
will return to the main page.
NOTE
If you use Navigate instead of GoBack
to return to the main page and then press the hardware Back button, the
application will not exit as you may expect but will show Page2 again. That's because each time you call the Navigate
method, a brand new page is created and loaded, and the replaced page
is put on the page stack. Pressing the hardware Back button of the
Windows Phone 7 device goes away from the current page and pops the old
page off the stack.