A methodology
is a process or procedure, for example, designed for repeatability that
has been proven to work for a certain paradigm. In our case, it is a
repeatable and thorough SQL Server–focused performance and tuning
process. We generalized this focused process into a repeatable
methodology and identified two possible paths that can be taken through
it: one for a new
SQL Server implementation that will have performance and tuning
designed into it from the start and another for performance and tuning
of an existing SQL Server implementation (one that needs to be scaled out or rescued—or in other words, “optimized”).
Figure 4
illustrates this overall performance and tuning methodology within a
traditional waterfall development methodology context. But, as you will
see, it is very iterative in nature and can be followed within any
organization’s formal development methodology.
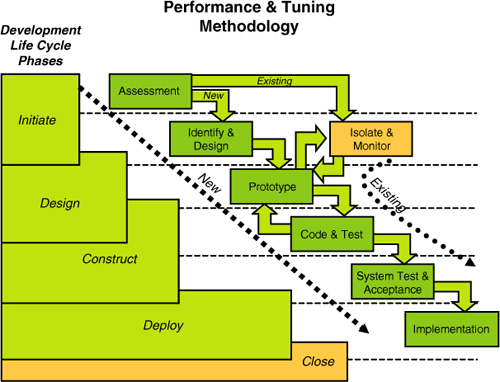
Notice the two distinct paths
labeled “New” and “Existing” indicated by the dashed arrowed lines. As
mentioned earlier, one path is for new implementations, and the other is
for existing implementations. The following sections describe each of
these distinct paths through the methodology.
Designing In Performance and Tuning from the Start
If you are just starting to
design and develop a new SQL Server–based implementation, it would be
great to factor in all possible performance and tuning considerations
from the beginning. In real life, this is rarely done primarily because
much is unknown from a data access, number of users, and table design
point of view. However, you are not precluded from designing in certain
common performance and tuning considerations, nor are you precluded from
incorporating a performance and tuning “prototyping” step in your
methodology so that you have known and predictable results of what you
are building “as you go” and not “at the end.” As you have no doubt
experienced (or heard many times), changing something after it is built
is more expensive than if you had considered it much earlier
in the development process. In fact, such changes are likely at least
10 or more times more expensive from both a monetary point of view and
from a time point of view.
As you can see in Figure 4,
each path begins with an assessment step. For new development, this
step covers the traditional “initiation” type of activities, such as
project sizing, scheduling, scope refinement, and resourcing. As you
identify project sizing, scheduling, and resourcing, you should add in
5% to each subsequent phase of your traditional development life cycle
for performance and tuning activities. We outline these activities
shortly. In general, they include capturing performance goals, having
performance and tuning design reviews, building prototypes optimized to
meet these performance goals, and setting final checkpoints that
demonstrate full compliance of performance achievement under full loads.
Our performance and tuning methodology for new implementations focuses
on six major steps along the way to deployments. We don’t list all the
tasks or activities around your programming or user interface
activities. Instead, we just focus on the SQL Server–oriented items that
pertain to optimal performance and tuning.
The six development methodology steps are
Assessment
During this project
initiation phase, a complete picture of the effort is usually identified
and assessed at a high level. This includes
Project sizing— Determines if this is a small, medium, or larger project.
Project scope clarifications— Describe the intent and application scope to be created.
Deliverables identified—
Identifies deliverables for all subsequent phases of the project. This
should also include new tasks for performance and tuning activities.
Schedules/milestones— Reflect what is needed to build this application, when it must be delivered, and everything along the way.
Resources identified and committed to project— Includes some specialized resources that enable your performance and tuning tasks and reviews.
All organizations have their
own version of this step/phase, but you should note that you need to
plan in time for performance and tuning from the beginning. We suggest
at least adding 5% to the number of hours to performance and tuning
tasks for each subsequent step in the development life cycle. That 5%
will save you enormous heartache and grief later and will ensure the
success of your implementation.
Identify and Design
The
identification and design step is centered around the clear
identification of what must be built, what service-level agreements are
needed, and what performance goals must be met. The performance and
tuning-oriented tasks are as follows:
Identify the primary service-level agreements (SLAs)/performance goals—
This task is critical and must be stated clearly and realistically.
Sub-second response rates are likely not realistic for every element of
an application. You will be measured against these goals.
Estimate work load/use profiles—
These profiles are the general volumes of major activity this
application must support, such as 68% online activity, 32% reporting
activity, and availability such as 24×7×365. These profiles should also
include any known growth estimates for different increments of time such
as 6-month growth numbers, 12-month growth numbers, so on.
Generalize to major access patterns—
This task quantifies the major data access patterns that must be
supported by the application. Knowing these patters is essential in
order to design in performance from the start. Examples of data access
patterns are a shopping cart access pattern and an ATM access pattern.
They would be vastly different in their table, indexing, and
transactional designs.
Design for all layers of the architecture—
Based on the performance goals, workloads, and major data access
patterns, your initial designs should not only cover the SQL Server
objects (such as table designs, index designs, and so on), but must also
reach out to each other’s architectural layer previously identified.
Now is the time to design on the correct partitioning scheme, correct
transactional model, correct file placement approach, correct disk
subsystem to use, correct servers needed, and memory management needs of
your application. You should include a task in your project plan for a
complete performance and design review.
Prototype
We added a formal prototyping
step into this methodology to stress how important it is to fully
evaluate and understand the performance expectations of the application
you are building. This very iterative process can help greatly in
refining the designs being considered. Go ahead and build a prototyping
environment where you can thoroughly try out what you have designed in
the preceding “Identify and Design” step. Your prototype should
illustrate (and implement) the major data access patterns you must
support, show how they are achieving planned performance goals, and
indicate whose results must be signed off on to pass to the next
development phase step. You may have to iterate back through this and
the preceding step several times to narrow in on a more optimal design
solution. Use this time now to ensure success later.
In a prototype environment, prototype possible solutions—
This is for a generalized design and does not have to include every
column of data or functionality of the application. There may be one or
more possible solutions that you must prototype. The prototype is at the
generic “pattern” level. Often we use tables that have artificial
columns as placeholders of known unusual data types along with the minimal known columns needed to implement a data access pattern and table design.
Dissect trouble areas—
During the prototyping, you will have issues around your design and the
performance results you are getting. Now is the right time to solve
these types of issues. Not later.
Ramp up for load/stress testing—
Your prototypes should include some level of volume or peak stress
testing results so you can have a good understanding of what to expect
at peak times. In addition, it is beneficial to prototype and test with
data volumes that are representative of your expected production data
volumes. This helps to identify ahead of time any performance issues
that may arise when querying and processing larger data volumes.
Note
Very large volumes of data may
require modifications to the database design to provide good
performance. The earlier this need is determined in the design/testing
process, the less expensive it will be to implement these changes in the
system while code is still being developed rather than having to make
changes after the system has been put into production.
Iterate back to the “Identify and Design” step (as needed)—
Design and redesign as much as is needed. Prototyping helps you narrow
in on an optimized solution quickly. In general, shoot for a 90%
solution (one that meets performance within 10% of stated goals).
You should also have
the right tools available to you during this prototyping step. This
includes monitoring tools, performance and tuning tools, and other
instrumentation needed to better understand and resolve any early issues
that surface.
Code and Test
In the “Code and Test” stage,
you fully code all elements of your application. This includes all
table designs, index designs, application coding, and complete testing
prior to the system test and user acceptance.
Perform full coding and unit/load testing—
At this point, perform complete coding of your application and
database. Each unit test must also include a step to determine how it is
meeting performance goals/SLAs. Most programmers are not accustomed to
this checkpoint. The code does not go forward unless the goals/SLAs are
fully met. No exceptions. Again, whenever possible, testing should be
done with data volumes and values that are representative of the
expected production data after the system has been running for an
extended period of time. Doing so is very important to help avoid future
performance issues when the system is in production, because
as data volumes grow, queries may optimize differently. Queries that
run quickly with small data volumes may optimize differently and run
slowly with larger data volumes. However, if you can optimize the
database design and queries to provide good performance when you have
large data volumes, performance should be just as good or even better
with smaller data volumes as well.
Perform regression testing if desired—
Utilize full regression testing if you desire. This step usually
requires complex testing harnesses and dedicated quality assurance
resources.
Iterate back to the “Prototype” step (as needed)—
Don’t be afraid to iterate back into the prototyping mode to flesh out a
serious issue. You need to solve issues now, not later in production or
in acceptance testing.
Assess if service levels have been met—
Create a formal checkpoint that must be passed around the service
levels and performance goals being met. You cannot proceed to the next
step unless they are met!
System Test and Acceptance
The “System Test and
Acceptance” stage is the full-blown integrated system test in a
production-like environment. You do final user acceptance and full
system-level stress tests here. All your performance goals must be fully
met! Again, you need to have a formal checkpoint identified here that
requires signoff of the SLAs/performance goals and fully document the
results for the system stress tests.
In the full system/stress
test/user acceptance, your fully loaded application and database are
thoroughly tested by your users, and a full stress test is done to
reflect peak system usage. The users should not sign off on this step
unless the performance goals are met, and the application’s functional
test is successful.
If possible, this stage
should reflect what the complete production hardware and software stack
will look like. By now, you should also be able to set expectations for
both current and future scalability of this application.
Implementation
By design, the
implementation should be merely a formality. Certainly, all performance
concerns should have been met, documented, and verified even under peak
processing scenarios. It is also recommended that any production
implementation include a certain amount of performance and tuning
instrumentation and monitoring. This should be a standard part of any
production implementation environment now.
Production build/implementation— You should perform a complete buildout of your application in production.
Production performance and monitoring—
You need to have complete performance and tuning instrumentation and
monitoring in place and tied to your system monitoring services (SMS)
environment. There is usually a proactive monitoring following a new
implementation for an extended amount of time. Don’t just implement and
walk away. There is likely something that must be adjusted.
Final documentation/results— In
this step, you create a set of documents that reflect what you built
and also the current performance levels being achieved. These documents
will be valuable later as the application changes and workloads
increase.
Figure 5
shows a holistic picture of the different layers that you have been
building on and how these different layers depend on each other and are
built on each other. Make sure you have checked off and considered each
of them in your pursuit of optimizing your SQL Server–based
implementation.
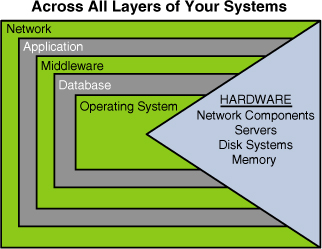
Starting at the hardware
footprint, to the operating systems that sit on top of the hardware, to
the database and middleware implemented on top of the OS, to the
application itself (however many application tiers), and the network
supporting the communication to the users—all have a part in delivering
an optimal implementation.
The next section describes our formal performance and tuning methodology applied to an existing implementation.
Performance and Tuning for an Existing Implementation
Many of you may have just
skipped down to this section because you have already built something
and are trying to get to some serious performance and tuning for your
existing implementation. Regardless of your situation, the essence of
this section is describing the methodology for isolation,
identification, and migration to get your existing implementation to a
well-performing and tuned implementation. We use isolation in the sense that you must isolate the major performance issues quickly, identification in the sense of locating the exact issues to focus on, and migration
in the sense of having to get from the current issues to a new
issue-free implementation. This last part is often incredibly hard to
do—like changing tires on a car while it is still moving. With this in
mind, a different path through the performance and tuning methodology is
needed—one that starts with an assessment, but an assessment of what
issues or shortcomings exist, and then a separate branch
(path) that includes isolation, monitoring, and identification of the
issues rapidly. This is then followed by rapid prototyping and further
isolation and monitoring and eventual full system testing and rolling
out the changes into your production implementation.
One big advantage of doing
performance and tuning on an existing implementation is that you have
live transactional information, live data, and other production
execution history to work from. From all of these, you should be able to
piece together a good execution profile, all the major data access
patterns, and other major characteristics critical to tuning what you
have. You also are able to include new information or scalability needs
as well.
Another initial decision you
need to make is whether you want only transparent changes (ones that
have no application changes whatsoever, such as index changes, server
instance changes, file placement changes, some stored procedure changes,
and so on) or if you can tolerate making nontransparent changes (ones
that force you to also make schema, structure, and SQL statement
changes, and even application changes). Of course, your decision depends
on how much trouble you are in.
Now, let’s look back at Figure 41.4
and focus on the far right-most path through this methodology. We start
by recasting the traditional “initiation” type of activities such as
project sizing, scheduling, scope refinement, and resourcing to focus on
just the performance and tuning tasks at hand. Again, we don’t list all
the tasks or activities around your programming or user interface
activities; we just focus on the SQL Server–oriented items that pertain
to optimal performance and tuning.
Performance and tuning methodology steps for an existing implementation are as follows:
Assessment
For this first step, assessment, a complete picture of the performance issues or expectations must be outlined. This includes
Project sizing—
Determines if the performance and tuning effort you are about to engage
in will be a small, medium, or large project. Although it is not a
full-blown development project, it could certainly be bigger than you
realize.
Project scope clarifications—
Identify mostly whether you can tolerate only transparent changes
versus nontransparent changes to resolve your performance issues.
Deliverables identified— Focuses
mostly on performance and tuning activities but may be expanded to
application activities if the changes needed must extend into the
application itself.
Schedules/milestones— Reflect what is needed to monitor, isolate, identify, and roll out the changes needed.
Resources identified and committed to project—
Identifies resources centered around your best performance and tuning
folks. Don’t scrimp here. Even if you have to hire some experts to help
with this effort, this is money well invested.
Isolate and Monitor
Now comes the specialized
path down the performance and tuning methodology for existing
implementations. It is time to monitor, isolate, and identify exactly
where your problems are. In addition, you must not lose sight of the
complete stack and all the layers that will potentially be a part of
your performance issues.
You also need to revisit (or
define for the first time) what service-level agreements are needed and
what performance goals must be met. The performance and tuning-oriented
tasks are as follows:
Identify the primary service-level agreements (SLAs)/performance goals—
If you haven’t performed this task yet, the time is now. If you did it
previously, it is time to revisit what these SLAs should be
realistically. Again, subsecond response rates are likely not realistic
for every element of an application. You should also add new or emerging
scalability and growth needs to your goals now. This may have some very
significant impact to new design decisions or performance and tuning
approaches that would be different if all you needed to do was tune for
an existing, unchanging workload.
Set up your execution capture and monitoring capabilities—
You should perform this task at each of the layers in your architecture
if you can. Remember, many performance issues often are spread across
multiple areas. Our preference is to get peak production monitoring.
This includes basic monitoring using Perfmon counters, SQL Server
Profiler tracing, and even third-party monitoring tools that can help
you see major issues graphically as they are happening.
Isolate hottest issues—
We like to use the 90/10 rule such that 10% of your execution
transactions or implementation configurations are likely causing 90% of
your problems. If you solve that 10%, you have a well-performing
platform. These issues must be isolated layer by layer (network,
hardware, OS, application server/application, SQL Server instance,
database, SQL statements, and so on).
Create workloads/use profiles—
Utilizing the tracing/capture tools, you need to capture and organize
where the problem issues are located at each layer. For SQL statements,
this means capturing and ordering the worst-performing SQL into the top
100 worst by I/O and CPU consumption usually. You also need to identify
concurrency issues (locking/deadlocks), disk/file utilization queues,
cache utilization, and
many other handles. It is from these issues that you must create
repeatable execution patterns so that you can tune to support them. You
must also execute all activities such as batch processes and so on that
might not normally come into play until scheduled events have occurred.
For new growth or scalability increases, add the appropriate workloads,
use profiles, and SQL statements into the mix.
Identify issues and possible solutions for all layers of the architecture—
Based on the performance goals, workloads, and major data access
patterns, you need to come up with a series of performance changes
prioritized by the biggest impact. These changes may include SQL Server
objects changes (such as table changes, new or different indexes, and so
on) but could also reach out to other architectural layers previously
identified. These changes can also affect adding or changing a
partitioning scheme, fixing a transactional model, correcting the file
placements, changing the disk subsystem or server configurations, and
adjusting the memory requirements of your application. Before you make
any changes, you should have a comprehensive performance review that
outlines all issues identified and proposes solutions to each.
Prototype
You now enter an
iterative cycle between isolate, monitor, prototype, isolate, monitor,
and prototype. This cycle may repeat for any number of iterations as you
deem necessary. You should set your overall goals to achieve at least
95% of your performance goals. It isn’t too hard to get to that point.
However, it is hard to squeeze out that last 5%, though. Often, getting
those last few yards isn’t really going to buy you that much more
relief.
When you want to get good
performance and tuning results, it’s always best to utilize a
prototyping environment that is very much like your production
environment (or at least as close to the same as possible in all
aspects—memory, CPU, disk subsystems, data volumes, and so on).
Optimizer decisions and I/O times, for example, vary greatly from one
configuration to another. If your prototyping system is completely
different from your production system or configuration, you will likely
be able to achieve only 80% of your performance goals and SLAs. Often,
we are able to use a company’s QA/User Acceptance Testing environment,
which is a mirror image of the production system, including a very
current and complete production database backup image being used for the
system testing. You need to negotiate time with this type of
environment. Some prototyping can be accomplished on smaller
environments (such as testing new partitioning schemes, new SQL query
statements, and so on). But you need to run this all on a full-blown
production-like environment before it is all said and done.
Again, your prototype
should illustrate (and implement) the major data access patterns you
must support, show how they are achieving planned performance goals, and
indicate whose results must be signed off on to pass to the next
development phase step. You may have to iterate back through this and
the preceding step several times to narrow in on a more optimal design
solution. You need to have full execution monitoring and tracing set up
in this prototyping environment.
Create a complete prototype environment— Remember that you have to test existing and new solutions, not just one or the other. A change in something new may
adversely affect something that was fine before, but becomes slow
performing with the new solution. There may be one or more possible
solutions that you must prototype to get the best results. You will be
using “live” patterns based on production queries for the most part now.
Any new functionality or solutions will be added to this mix.
Ramp up for load/stress testing—
Your prototypes should include some full level of volume or peak stress
testing results so you can have a good understanding of what to expect
at peak times and the potential impact of performance changes to one
aspect of the system on another, such as increased locking contention.
Iterate back to the “Isolate and Monitor” step (as needed)—
Change, enhance, and try out new solutions in this iterative circle.
Using a prototyping approach allows you to narrow down to what works
best rather quickly.
Remember that you should
have the right tools available to you during this prototyping step. They
include monitoring tools, performance and tuning tools, and other
instrumentation needed to better understand and resolve any early issues
that surface.
Code and Test
The “Code and Test” step takes
on a more formal process after the prototyping of all possible
performance and tuning enhancements has been completed. In this step,
you fully code all elements of your application with any changes that
have resulted from the prototyping effort. This includes all table
designs, index designs, and application coding prior to the final system
test and user acceptance. Remember, if you are doing only the
transparent changes, this part should be fairly easy; but if your
changes are nontransparent, this will be a full-blown code and test
phase of your entire application.
Perform full coding and unit/load testing—
Perform complete coding of the application and database. Each unit test
must also include a step determining how they are meeting performance
goals/SLAs. Most programmers are not accustomed to this checkpoint. The
code does not go forward unless the goals/SLAs are fully met. No
exceptions.
Perform regression testing if desired—
Utilize full regression testing if you desire. This step usually
requires complex testing harnesses and dedicated quality assurance
resources.
Iterate back to the “Prototype” step (as needed)—
Don’t be afraid to iterate back into the prototyping mode to flesh out a
serious issue. You need to solve issues now, not later in production or
in acceptance testing.
Assess if service levels have been met—
Create a formal checkpoint that must be passed around the service
levels and performance goals being met. You cannot proceed to the next
step unless these goals are met!
System Test and Acceptance
The
next step is the full-blown integrated system test in a production-like
environment. You do final user acceptance and full system-level stress
tests here. All your performance goals must be fully met! Again, you
need to have a formal checkpoint identified here that requires signoff
of the SLAs/performance goals and fully document the results for the
system stress tests.
In the full system/stress
test/user acceptance, your fully loaded application is thoroughly tested
by your users, and a full stress test is done to reflect peak system
usage. The users should not sign off on this step unless the performance
goals are met, and the application’s functional test is successful.
If possible, this
stage should reflect what the complete production hardware and software
stack will look like. By now, you should also be able to set
expectations for both current and future scalability of this
application.
Implementation
The biggest issues now are
migrating your new changes into the existing production implementation.
This may include complex data structure changes and data migrations from
old structures to new structures, or may simply involve dropping and
re-creating indexes. You should plan all steps of your changes to the nth
degree and test the upgrades on your QA platform a few times. You may
have to schedule downtime for extensive nontransparent changes. You
should make full backups at all layers prior to your live upgrade in
production. Be sure to have a set of performance benchmark operations
ready to run in production to verify the results you intended.
Production build/implementation— You should perform a complete buildout of your application in production and full migration upgrade scripts/data conversions.
Production performance and monitoring—
You need to have complete performance and tuning instrumentation and
monitoring in place and running. Run a series of performance testing
scripts/queries as a part of your production upgrade process. Don’t just
implement and walk away. There is likely something that must be
adjusted even at this late stage.
Final documentation/results— In this step, you create a set of documents that reflect what you built and also the current performance levels being achieved.
In theory, you
should now be in an optimized execution implementation. You should be
prepared to monitor, monitor, and monitor some more. We traditionally
keep a close monitoring eye for about five days of execution and then
switch back to a normal amount of proactive monitoring after that.
The
following sections highlight some common design techniques, approaches,
and guidelines you should consider or utilize as you tune your SQL
Server implementation.
