Securing Data in Storage with Encrypting File System (EFS)
The Encrypting File System (EFS) can be used on New Technology File System (NTFS)
partitions beginning with Windows 2000. It can be used on files and
folders, whereas BitLocker only encrypts the entire partition. Simply
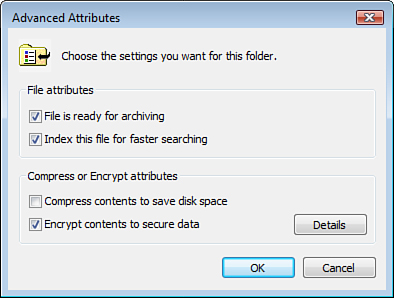
right-click any file or folder on an NTFS partition and select Properties. Then click AdvancedEncrypt Contents to Secure Data check box, as shown in Figure 3.
Depending on the amount of content being encrypted, the encryption
process can take a second, or it can take hours. You’ll know that the
content is encrypted because, by default, the file changes color in
Explorer. and check the
When
you encrypt your first file on a computer, a self-signed, user
authentication digital certificate is automatically generated. This
certificate is bound to your user account, is stored in your Personal
Certificate Store in your user profile, and contains an encryption key.
Let’s call this the certificate key. Next, a second encryption key is generated. Let’s call this key the fast key.
This fast key is used to encrypt the content. Finally, the certificate
key is used to encrypt the fast key. The encrypted fast key gets stored
with the newly encrypted file in NTFS.
Each file you encrypt uses a
different fast key. All fast keys get encrypted with your one
certificate key, so you can access any and all fast keys as desired and
decrypt the EFS files. Because no one else has your certificate key, no
one else can access the fast keys, and without the fast keys, no one
else can decrypt and access your EFS files.
Exam Alert
This
restriction can present a problem if you ever need to transfer your EFS
files to another computer. Without the certificate key in your Personal
Certificate Store, you cannot access the fast keys that are stored with
the EFS files. You must remember to also export the self-signed digital
certificate from your Personal Certificate Store to the target
computer.
Securing Computers with the Security Configuration and Analysis Tool (SCAT)
The Security Configuration
and Analysis Tool (SCAT) is a powerful tool to analyze the security of a
computer and then configure and export a security template for
redeployment on the same computer and possibly on hundreds or thousands
of similar computers.
You must build a new
Microsoft Management Console (MMC) to access the SCAT tool. In addition,
Vista is not supplied with security templates. These are typically used
by network administrators. These templates can be copied from Windows
Server 2000 or Server 2003 from the \Windows\Security\Templates folder. A security template has an .inf
extension. If you don’t have access to these files on a server, you can
download security templates in the Windows Server 2003 Security Guide
at
http://www.microsoft.com/downloads/details.aspx?FamilyId=8A2643C1-0685-4D89-B655-521EA6C7B4DB&displaylang=en
Place the security templates in a folder where you can find them later.
Performing a Security Analysis
To build the Security Configuration and Analysis Tool MMC, follow these steps:
1. | Click Start > Run, type MMC, and click OK.
|
2. | From the menu, select File > Add / Remove Snap-in.
|
3. | Select Security Configuration and Analysis Tool and click Add.
|
4. | Select Security Templates and click Add.
|
5. | Click OK.
|
6. | From the menu, select File > Save As.
|
7. | Type SCAT.msc and save the MMC either on the desktop or in Administrative Tools.
|
8. | In the left pane, right-click SCAT and select Open Database.
|
9. | Type any name for your new security database and click Open. The security database file gets an .sdb extension.
|
10. | You
must select a security template to compare your computer against. These
are the files you just copied from a server or downloaded from the
Windows Server 2003 Security Guide.
|
11. | The
wizard may open the Templates directory and present the list of
security templates that are available on the system. If it does not, in
the left pane, right-click Security Templates and click Open. Either way that you get there, if you have access to it, select the Setup Security.inf template. Otherwise, select any one of the .inf security templates you have access to and click Open. The Setup Security.inf
template resets the system’s security settings to that of a fresh
install of the operating system. Other templates configure greater or
lesser levels of system security.
Caution
Use Caution with the Security Configuration and Analysis Tool
This tool is used to analyze security on computers and implement
security templates on computers. Use caution when you are using this
tool. If you accidentally choose Configure Computer Now,
this implements whatever security template you’ve imported on your
computer. You can impose severe security lockdowns on your computer, and
it is possible that many applications and services will fail. In the
next steps, you choose Analyze Computer Now, not Configure Computer Now.
|
12. | Right-click Security Configuration and Analysis Tool in the left pane and select Analyze Computer Now, as shown in Figure 4.

|
13. | Accept
the default locations for the log file and watch as your computer is
compared against the security template you selected earlier in this
exercise.
|
14. | If the SCAT tool shows you a log file, in the right pane, click More Actions. Then deselect View Log File.
Exam Alert
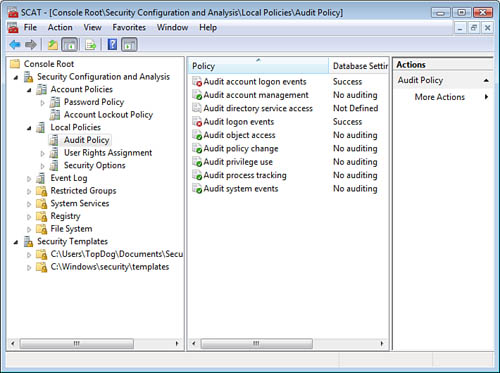
Expand the items in the left pane (as shown in Figure 5)
to reveal how closely your computer is configured to the security
template. A green check indicates your computer meets or exceeds the
template. A red X indicates your computer does not meet the template’s
security setting.
|
15. | Adjust
the template settings to meet the security requirements for the system.
When the template settings are satisfactory, right-click Security Configuration and Analysis and click Configure Computer Now to apply the settings of the template to the system.
|
Be sure that you
evaluate every setting before configuring the system; many settings are
preconfigured and will be applied even if you are unaware of their
settings.
Alert
The command-line utility SecEdit.exe can also be used to verify that the computer’s security configuration matches that of a specified security template.
