Ideally, solving a problem
will require a specific tweak to the system: a Registry setting change, a
driver upgrade, a program uninstall. But sometimes you need to take
more of a “big picture” approach to revert your system to some previous
state in the hope that you’ll
leap past the problem and get your system working again. Windows Vista
offers three ways to try such an approach—last known good configuration,
System Restore, and System Recovery Options—which you should use in
that order. The next three sections discuss these tools.
Booting Using the Last Known Good Configuration
Each time Windows Vista starts successfully in Normal mode, the system makes a note of which control set—the system’s drivers and hardware configuration—was used. Specifically, it enters a value in the following Registry key:
HKLM\SYSTEM\Select\LastKnownGood
For example, if this value is 1, it means that control set 1 was used to start Windows Vista successfully:
HKLM\SYSTEM\ControlSet001
If you make driver or
hardware changes and then find that the system won’t start, you can tell
Windows Vista to load using the control set that worked the last time.
(That is, the control set that doesn’t include your most recent hardware
changes.) This is the last known good configuration,
and the theory is that by using the previous working configuration,
your system should start because it’s bypassing the changes that caused
the problem. Here’s how to start Windows Vista using the last known good
configuration:
1. | Restart your computer.
|
2. | At the Windows Boot Manager menu , press F8 to display the Advanced Boot Options menu.
|
3. | Select the Last Known Good Configuration option.
|
Recovering Using System Restore
The Last Known
Good Configuration option is most useful when your computer won’t start
and you suspect that a hardware change is causing the problem. You might
think that you can also use the last known good configuration if
Windows Vista starts but is unstable, and you suspect a hardware change
is causing the glitch. Unfortunately, that won’t work because when you
start Windows Vista successfully in Normal mode, the hardware change is
added to the last known good configuration. To revert the system to a
previous configuration when you can start Windows Vista successfully,
you need to use the System Restore feature.
Windows Vista creates automatic restore
points each day and when you perform certain actions (such as installing
an uncertified device driver). To revert your system to a restore
point, follow these steps:
1. | Select
Start, All Programs, Accessories, System Tools, System Restore and then
enter your UAC credentials to display the System Restore dialog box.
|
2. | The first System Restore dialog box offers two options:
Recommended Restore—
Activate this option to restore Windows Vista to the restore point
shown (which is usually the most recent restore point). Skip to Step 4.
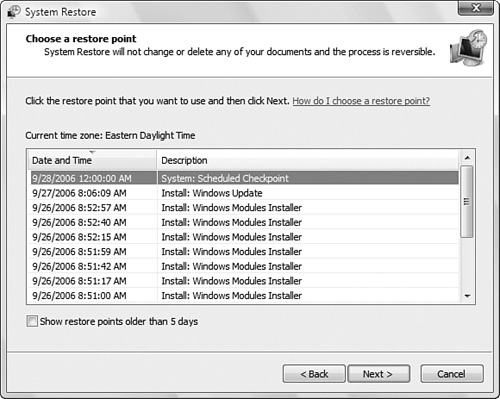
Choose a Different Restore Point—
Activate this option to select from a list of restore points. Click
Next to display the Chose a Restore Point dialog box, shown in Figure 1, and continue with step 3.
|
3. | Click the restore point you want to use. There are five common types of restore points:
System—
A restore point that Windows Vista creates automatically. For example,
the System Checkpoint is the restore point that Vista creates each day
or when you boot your computer.
Install— A restore point set prior to installing a program or update.
Manual— A restore point you create yourself.
Undo— A restore point set prior to a previous use of System Restore to revert the system to an earlier state.
Unknown— Any restore point that doesn’t fit in the above categories.
Note
By default, Windows
Vista displays only the restore points from the previous five days. If
you need to restore to an earlier date, activate the Show Restore Points
Older Than 5 Days check box. Note that this check box only appears if
you have at least one restore point that is more than five days old.
|
4. | Click
Next. If other hard disks are available in the restore point, Vista
displays a list of the disks. Activate the check box beside each disk
you want to include in the restore, and then click Next.
|
5. | Click Finish. Vista asks you to confirm that you want your system restored.
|
6. | Click
Yes. System Restore begins reverting to the restore point. When it’s
done, it restarts your computer and displays a message telling you the
results of the restore.
|
7. | Click Close.
|
Tip
System Restore is
available in Safe mode. So, if Windows Vista won’t start properly, and
if using the last known good configuration doesn’t work, perform a Safe
mode startup and run System Restore from there. If you can’t start Vista
at all, you can also run System Restore using the System Recovery
Options, discussed in the next section.
Recovering Using the System Recovery Options
If
Windows Vista won’t start normally, your first troubleshooting step is
almost always to start the system in Safe mode. When you make it to
Windows Vista, you can investigate the problem and make the necessary
changes (such as disabling or rolling back a device driver). But what if
your system won’t even start in Safe mode?
Your next step should
be booting with the last known good configuration. And if that doesn’t
work either? Don’t worry, there’s still hope in the form of the System
Recovery Options, a utility that enables you to launch recovery tools or
access the command line. Here’s how to use it:
1. | Insert the Windows Vista DVD.
|
2. | Restart your computer. If your system prompts you to boot from the DVD, press the required key or key combination.
Tip
If your system won’t
boot from the Windows Vista DVD, you need to adjust the system’s BIOS
settings to allow this. Restart the computer and look for a startup
message that prompts you to press a key or key combination to modify the
BIOS settings (which might be called Setup
or something similar). Find the boot options and either enable a DVD
drive-based boot or make sure that the option to boot from the DVD drive
comes before the option to boot from the hard disk. If you use a USB
keyboard, you may also need to enable an option that lets the BIOS
recognize keystrokes after the POST but before the OS starts.
|
3. | In the initial Install Windows screen, click Next.
|
4. | Click Repair Your Computer. If your system has multiple Vista partitions, you see a list of them.
|
5. | Click the Vista partition you want to repair and click Next. The System Recovery Options window appears, as shown in Figure 2.
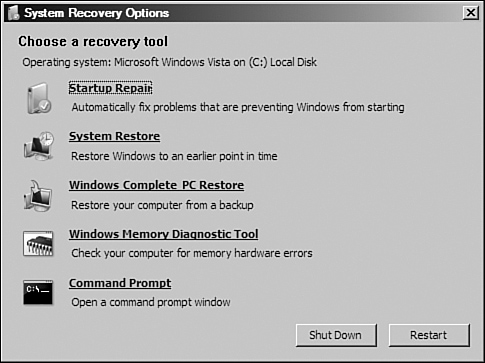
The System Recovery Options window offers you the following five tools to help get your system back up and running:
Startup Repair—
This tool checks your system for problems that might be preventing it
from starting. If it finds any, it attempts to fix them automatically.
System Restore— This tool runs System Restore so that you can revert your system to a protection point .
Windows Complete PC Restore— This tool restores your system using a system image backup.
Windows Memory Diagnostic Tool— This tool checks your computer’s memory chips for faults, as described earlier (see “Running the Memory Diagnostics Tool”).
Command Prompt— This tool takes you to the Windows Vista command prompt, where you can run commands such as CHKDSK.
|
