Logo
programming4us
programming4us
programming4us
programming4us
Home
programming4us
XP
programming4us
Windows Vista
programming4us
Windows 7
programming4us
Windows Azure
programming4us
Windows Server
programming4us
Windows Phone
 
programming4us
Windows 7

Microsoft OneNote 2010 : Customizing Tags

- Free product key for windows 10
- Free Product Key for Microsoft office 365
- Malwarebytes Premium 3.7.1 Serial Keys (LifeTime) 2019
11/13/2011 11:16:56 AM
OneNote offers more than two dozen tags in the Tags gallery, but if they aren’t descriptive enough, you can create tags of your own.

To create a tag, start by clicking More in the Tags gallery. This button is located below the scroll bar. Clicking it opens the gallery. With the gallery open, choose Customize tag on the gallery. Then, in the Customize Tags dialog box, click the New Tag button. You see the New Tag dialog box, in which you can enter a name, choose a symbol, choose a font color, and choose a highlight color for your tag.

1. Customize a Tag

  1. Click the Home tab.

  2. Click More on the Tags gallery to open this gallery.

  3. Choose Customize Tags.

  4. Click the New Tag button to open the New Tag dialog box.

  5. In the Display Name text box, enter a name for the tag.

  6. Open the Symbol menu and choose a symbol for the tag.

  7. Open the Font Color menu and choose a font color for the tag name.

  8. Click OK.

  9. In the Custom Tags dialog box, click the Move Tag Down button to move the customized tag one position lower in the Tags gallery.
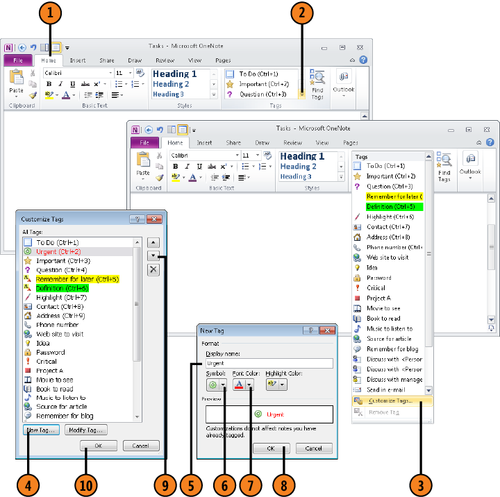
  10. Click OK.


Tip:

The first eight tags in the Tags gallery are assigned the shortcut keys Ctrl+1 through Ctrl+8. To give a customized tag a keyboard shortcut, move the customized tag to one of the first eight positions in the Tags gallery.


Tip:

If you choose a check box symbol for your tag in the New Tag dialog box, you can check off the tag to indicate, for example, when a task is complete or a project is finished. What’s more, when you search for tagged items, you can narrow the search to tags that have been checked off.


2. Modify a Tag

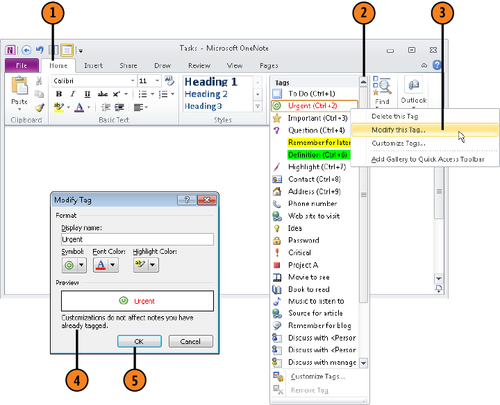
  1. Click the Home tab.

  2. Click More in the Tags gallery to open this gallery.

  3. Right-click the tag you want to modify and choose Modify This Tag.

  4. In the Modify Tag dialog box, change the display name, symbol, font color, and/or the highlight color.

  5. Click OK.


Warning:

OneNote doesn’t update existing tags when you modify a tag. If you change the symbol in a tag, the old symbol remains on notes you previously tagged.


3. Delete a Tag from the Tags Gallery

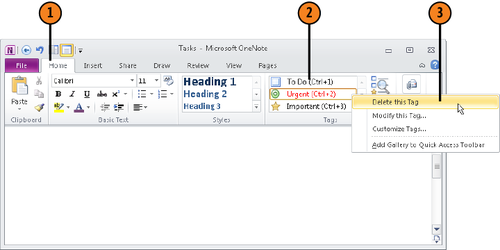
  1. Click the Home tab.

  2. In the Tags gallery, locate the tag you want to delete.

  3. Right-click the tag you want to delete and choose Delete This Tag.

Other -----------------
- Customizing Microsoft Project 2010 : Creating Custom Fields
- Microsoft Project 2010 : Sharing Data with Others
- Designing a Zero-Touch Deployment (part 2) - Deploying ZTI Task Sequences to Target Computers
- Designing a Zero-Touch Deployment (part 1) - Using System Center Configuration Manager & Creating Task Sequences Using SCCM
- Troubleshooting and Recovering from Disaster : Using the Windows Recovery Environment
- Troubleshooting and Recovering from Disaster : Getting Help with the Problem Steps Recorder
- Microsoft OneOnte 2010 : Tagging Notes for Follow Up
- Microsoft OneOnte 2010 : Moving, Copying, and Merging Pages and Sections
- Microsoft Project 2010 : Reporting on Your Project (part 1) - Generating and Customizing a Basic Report
- Microsoft Project 2010 : Reporting on Your Project (part 1) - Generating and Customizing a Visual Report
 
 
Top 10
- Microsoft Visio 2013 : Adding Structure to Your Diagrams - Finding containers and lists in Visio (part 2) - Wireframes,Legends
- Microsoft Visio 2013 : Adding Structure to Your Diagrams - Finding containers and lists in Visio (part 1) - Swimlanes
- Microsoft Visio 2013 : Adding Structure to Your Diagrams - Formatting and sizing lists
- Microsoft Visio 2013 : Adding Structure to Your Diagrams - Adding shapes to lists
- Microsoft Visio 2013 : Adding Structure to Your Diagrams - Sizing containers
- Microsoft Access 2010 : Control Properties and Why to Use Them (part 3) - The Other Properties of a Control
- Microsoft Access 2010 : Control Properties and Why to Use Them (part 2) - The Data Properties of a Control
- Microsoft Access 2010 : Control Properties and Why to Use Them (part 1) - The Format Properties of a Control
- Microsoft Access 2010 : Form Properties and Why Should You Use Them - Working with the Properties Window
- Microsoft Visio 2013 : Using the Organization Chart Wizard with new data
 
programming4us
Windows Vista
programming4us
Windows 7
programming4us
Windows Azure
programming4us
Windows Server