Callouts are blocks of text
linked to a graphic via a line or other pointing visual. They are used
to annotate diagrams without interrupting the flow of the main visual. A
classic callout is the word balloon that you see in comics to indicate
speech. You also see them in product brochures, discreetly pointing out
essential features of a fancy new gadget but not distracting from the
glossy visuals.
Using Visio 2010’s New Callouts
In Visio, callouts can be used
in innumerable ways to annotate diagrams. In Visio 2010, callouts have
been upgraded significantly. They are now part of the structured
diagramming features along with containers and lists and are fully
integrated into the user interface.
Adding Callouts to Shapes
1. | Starting with any drawing, make sure one shape is selected. This shape will be the target of the callout.
|
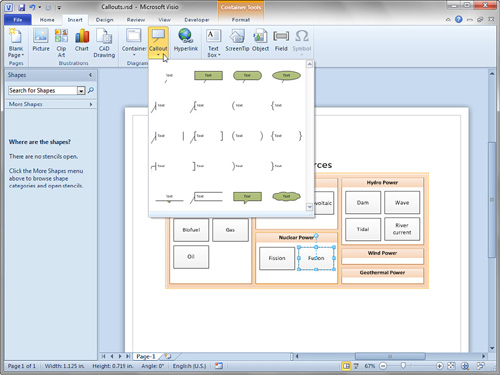
2. | In
the Diagram Parts group on the Insert tab, drop down the Callouts
gallery. You should see 20 or so callouts, similar to what is shown in Figure 1.
|
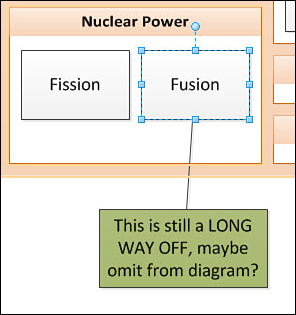
3. | Choose
one of the callouts to apply to your target shape. You can now move the
callout around and type text into it, as shown in Figure 2. If you move the target shape, the callout follows along.
|
4. | When
you select the callout, the target shape is highlighted with a thin
orange outline. This highlight is especially helpful for callouts that
don’t have a leader line because you can still tell which shape owns the
callout.
|
5. | Duplicate the target
shape (not the callout) by Ctrl+dragging or pressing Ctrl+D. You should
see that the callout is duplicated along with the target, as shown in Figure 3.

|
6. | You
can change the style of the callout by right-clicking it and expanding
the Callout Style cascading menu. There, you see the same 20 styles
shown in the Callout gallery in step 2.
|
7. | Note
there are three more callout-specific menus below Callout Style:
Orientation, Callout Line, and Resize with Text. Take some time to
experiment with these functions.
|
8. | Select the callout and notice the yellow control handle at the end of the leader line, in the middle of the target shape.
|
9. | Move the control handle so that it is over a blank area on the page. You have now disconnected the callout from its target.
|
10. | You
can use this handle to change the callout’s target shape. Drag the
control handle so that it is over a different shape. Notice that as you
do this, the new target is highlighted with an orange outline,
indicating that it will receive the callout and become its target.
|
11. | Move the new target shape and notice that the callout is now attached.
|
Using Legacy Callout Shapes
Visio
callouts have been around for a long time, but they were much less
sophisticated before Visio 2010. Visio treated them as ordinary shapes
and didn’t provide any of the special callout behavior we’ve just seen.
You were responsible for moving them and duplicating them manually.
Nevertheless, these old-style callouts are useful, and you might
appreciate the variety. You can find them in the More Shapes menu, under
Visio Extras, Callouts. Figure 4 shows a wild sampling from the Callouts stencil.

Many of the old callout shapes are
1D shapes, which means you position each end independently, like you do
with lines and arrows and connectors. You can glue callout ends to
connection points on target shapes and to guides. (Guides can be pulled
out of the rulers. They don’t print, and you can glue shapes to them.)
The practical result is that
the leader line stays glued to the target, and the text end stays put,
which is sometimes exactly what you want a callout to do. Figure 5 shows old style callouts arranged in two columns. Each callout has one end glued to a target, the other end glued to a guide.
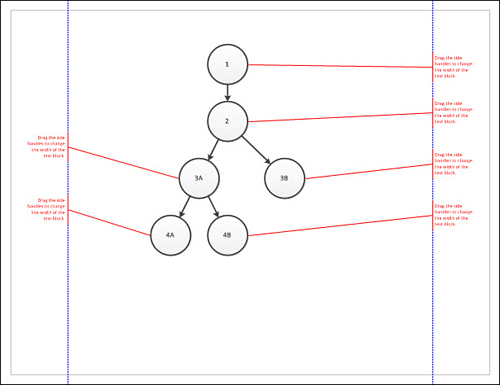
The text remains near the page
edges, but the leader lines move with the target shapes. And since the
text ends are glued to the guides, each column can be easily
repositioned by moving a single guide. Older technology, but still quite
useful!
The Callouts stencil has three special callouts that behave much like Visio 2010 callouts, and in some ways are even smarter.
At the
bottom of the stencil, you’ll find Custom callout 1, Custom callout 2,
and Custom callout 3. You attach them using control handles, and they
move with their targets just as the new callouts do. Even better, these
callouts can display Shape Data information from their targets—something
Visio 2010’s new callouts don’t do. In this case, the “old” callouts
are actually more powerful than the new ones. We can only wonder why
Microsoft didn’t include the Shape Data field display in the new
callouts!
