1. Saving to a Remote Computer
Any time you save a new
document — whether it's one you've created yourself, or something you're
downloading — a Save As dialog box (or something similar) will open,
enabling you to save the file. The dialog box will have a Folders list
so that you can choose where you want to save the document.
As
with the Open dialog box, you can choose the Network folder from the
Folders list to get to all of the locations in your Network folder, and
then navigate to wherever you want to save the file from there. Or,
click in the text box where you would normally enter the filename and
instead enter a UNC path to the folder where you want to store the file.
After the folder opens in the dialog box, enter the filename.
2. Downloading Programs to a Network Share
If you regularly download
programs to install on multiple computers, consider using the folder
named Public Downloads within your Public folder. After you save a
downloaded program file to that folder, you'll be able to install it on
all the computers in the network. You still have to install it on each
computer individually, but there is no need to download it on every
computer, especially if you're sharing a not-so-speedy Internet
connection.
Start by creating the Public
Downloads folder in your own Public Documents folder, or on another
shared folder on your network. Then, initiate the download as you
normally would. When the File Download dialog box appears, click Save.
In the Save As dialog box, navigate to the shared Public Downloads
folder and save the file there.
|
You can download the file from
the computer where the Public Downloads folder resides, or from another
computer on the network. The advantage of performing the download from
the same computer where the file will be stored is that you minimize
network traffic. If you are instead saving to a shared folder across the
network, the file comes through the network to your computer, then goes
across the network to the shared folder, effectively doubling the
network traffic and slowing down the process.
|
|
After the file has been
downloaded, you can access it from any other computer on the network to
install the program. Just browse the network from the computer where
you want to install the program, open the shared Public Downloads
folder, and double-click the file to begin the installation.
NOTE
Some
programs need to be installed from a local copy of the file, rather
than across the network. If you have problems installing across the
network, copy the file across the network to the local computer and
install from that local copy.
3. Transferring Files between Computers
Moving and copying files on a
LAN is virtually identical to doing so on a single computer.
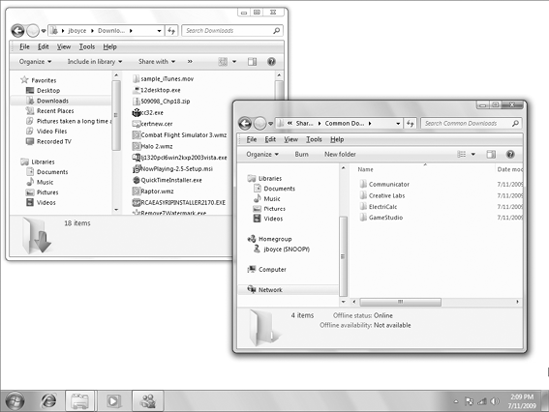
For example, let's say you're
sitting at a computer named Hobbes, and you have a bunch of files in a
subfolder named Shared Docs\Common Downloads on a computer named Spock.
So, the UNC path would be \\Spock\SharedDocs\Common Downloads. You want
to copy one or more files to the Downloads folder of your own user
account on Hobbes. Just open the Network folder. Then open the Spock,
SharedDocs, and Common Downloads folders. Then, click the Start button
and open the Documents folder for your user account. It might be easiest
if you size and position the windows so you can see the contents of
both as in Figure 1.
With
both folders open, as in the figure, you can select the files you want
to copy in the remote folder using any technique you like.
To copy (rather than move) the items to the remote folder, right-drag
any selected icon to the remote folder, and then choose Copy Here after
you release the mouse button. (If you drag using the left mouse button,
the files will be moved, rather than copied.) That's all there is to it.
As I said, it's no different from moving and copying files between
folders and drives on your own computer, except that you have to use the
Network folder or a UNC path to open the remote folder.
4. Using a Shared Printer
You use a shared printer from a remote computer exactly as you use a local printer. Choose File =>
Print from the program's menu bar. When the Print dialog box opens,
look for the shared printer, click it, and click the Print button.
If the shared printer
doesn't show up in the Print dialog box, you can either add it right
from the Print dialog box or you can install it from the Devices and
Printers applet. To install it from the Printers dialog box, click Find
Printer to open the Network folder. Expand the computer where the
printer is shared, right-click the printer, and choose Connect. Windows
will connect to the printer and prompt you to let it install the drivers
for the printer.
Whichever method you use to add the printer, after the printer is installed, choose File =>, select the newly installed printer, and click Print.
|
You can play shared media
from a Windows 7 computer on any other Windows 7 computer in the
network, and on compatible networked digital media players.
|
|
