Visual Studio 2010 introduces to the WPF development a
new interesting feature at the IDE level. The feature is known as
drag’n’drop data-binding and is something that was already available in
Windows Forms for many years. Now you can simply build data forms in WPF
too with such new tooling. The base idea is that you can build a data
form by simply dragging items from the Data Sources window, and Visual
Studio will generate all the code for you, including master-details
scenarios. There is also other good news in Visual Studio 2010, which is
the Data Sources window support for entities from an Entity Data Model
based on the ADO.NET Entity Framework. This section explains how you can
take advantage of the new WPF drag’n’drop data-binding to easily build
data forms, explaining the meaning and behavior of the auto-generated
code.
Tip
The drag’n’drop
data-binding has obviously some limitations, and in many cases you need
to put your hands over the auto-generated code or, differently, write
your own data-binding code from scratch. This new technique offers
several advantages: The result is completely customizable, as in the
style of WPF applications; second, if you are new to data-binding in
WPF, it allows you to simply understand how things work against a more
complex data-source (such as an EDM or a DataSet). Finally, it also
provides the ability of separating the data-source from the user
interface, although this is something that you will probably need to
edit according to your application logic.
To complete the next code examples, follow these steps after creating a new WPF project in Visual Basic:
1. | Create a new WPF project for Visual Basic.
|
2. | Add a new Entity Data Model based on the Northwind sample database, ensuring that you include the Customers and Orders tables.
|
After this brief introduction, it is time to understand how easy building data forms is with WPF 4.
Creating Tabular Data Forms
The goal of the next
example is to show how simple it is to create tabular data
representations, also taking a look at necessary objects for performing
data-binding in code. To accomplish this, first divide the default Grid
into two columns as follows:
<Grid>
    <Grid.ColumnDefinitions>
        <ColumnDefinition Width="200"/>
        <ColumnDefinition/>
    </Grid.ColumnDefinitions>
</Grid>
Next, add a ListBox
control either by dragging it from the Toolbox or by writing the
following code (for better layout purposes, ensure that you place it in
the left column):
<ListBox Name="CustomersListBox"
         Grid.Column="0"/>
This ListBox stores a list of customers’ names that will be added shortly. Now open the Data Sources window by clicking Shift+Alt+D. The result looks similar to Figure 1, depending on how many entities you added to the Entity Data Model.
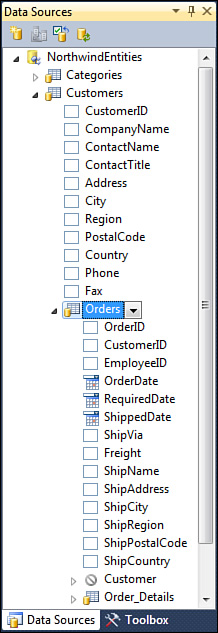
As you can see, the Data Sources
window now also lists entities coming from Entity Data Models, and this
is a new feature in Visual Studio 2010. The default icon near each
entity name indicates that data will be represented as tabular, but you
can replace this representation with a list view or with a details view
simply by selecting the appropriate value from the combo box on the
right side of each entity name. (At the moment leave unchanged the
default selection.) Now, expand the Customers entity (as shown in Figure 1) and select the CompanyName item; then drag it onto the ListBox
and release the mouse. When you release the mouse, you will not notice
anything new on the designer surface, but look at what happened in the
XAML code editor:
<Window.Resources>
    <CollectionViewSource x:Key="CustomersViewSource"
                          d:DesignSource=
                          "{d:DesignInstance my:Customer,
                                             CreateList=True}" />
</Window.Resources>
<Grid DataContext="{StaticResource CustomersViewSource}">
    <Grid.ColumnDefinitions>
        <ColumnDefinition Width="200"/>
        <ColumnDefinition/>
    </Grid.ColumnDefinitions>
    <ListBox Name="CustomersListBox"
             Grid.Column="0" DisplayMemberPath="CompanyName"
             ItemsSource="{Binding}" />
</Grid>
Visual Studio generates some code, both XAML and Visual Basic, each time
you perform some drag’n’drop action. For now it generated a CollectionViewSource object within the window’s resources. You may compare the WPF CollectionViewSource to the Windows Forms’ BindingSource
control, which basically acts like a bridge between the underlying data
collection and the user interface. The code states that such CollectionViewSource is populated via a list (CreateList=True) of Customer instances. This statement is accomplished via the d:DesignInstance custom markup extension, exposed by the d
Xml name-space that points to Microsoft Expression Blend schema for
WPF. This is useful because it provides resources for design-time
data-binding. Notice also how Visual Studio added a DataContext property for the default Grid, whose source is the above described CollectionViewSource. In this way, all child controls will populate picking data from the CollectionViewSource. You can get an example of this by taking a look at the ListBox overridden definition: It is populated with data-binding (ItemsSource property) and shows just the value of the CompanyName property (DisplayMemberPath) for each item in the bound collection. Now drag onto the form the Orders item from the Data Sources window, ensuring that you drag the one nested within Customers. When dragged and dropped, the result should look like in Figure 2.
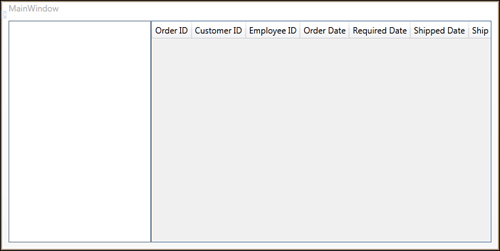
First, notice how the new DataGrid
control simply enables building tabular data representations. By simply
dragging the data source, Visual Studio generated all the necessary
items for you. If you now take a look at the XAML code editor, you will
first notice a second CollectionViewSource referring to the Orders data:
<CollectionViewSource x:Key="CustomersOrdersViewSource"
                      Source="{Binding Path=Orders,
                      Source={StaticResource CustomersViewSource}}" />
Notice how the source for the data-binding is the Orders collection from the previously generated CustomersViewSource object of type CollectionViewSource. Next, Visual Studio also generated markup code for the DataGrid.
For this, it did not take advantage of columns auto-generation, whereas
it instead created specific columns for each property in the bound
collection. This enables the IDE to also generate custom cell templates
that can show data with the appropriate control. The following is the
XAML code for the DataGrid:
<DataGrid AutoGenerateColumns="False"
          EnableRowVirtualization="True"
          Grid.Column="1"
          ItemsSource="{Binding
          Source={StaticResource CustomersOrdersViewSource}}"
          Name="OrdersDataGrid"
          RowDetailsVisibilityMode="VisibleWhenSelected">
    <DataGrid.Columns>
        <DataGridTextColumn x:Name="OrderIDColumn"
                            Binding="{Binding Path=OrderID}"
                            Header="Order ID"
                            Width="SizeToHeader" />
        <DataGridTextColumn x:Name="CustomerIDColumn"
                            Binding="{Binding Path=CustomerID}"
                            Header="Customer ID"
                            Width="SizeToHeader" />
        <DataGridTextColumn x:Name="EmployeeIDColumn"
                            Binding="{Binding Path=EmployeeID}"
                            Header="Employee ID"
                            Width="SizeToHeader" />
        <DataGridTemplateColumn x:Name="OrderDateColumn"
                                Header="Order Date"
                                Width="SizeToHeader">
            <DataGridTemplateColumn.CellTemplate>
                <DataTemplate>
                    <DatePicker
                     SelectedDate="{Binding Path=OrderDate}" />
                </DataTemplate>
            </DataGridTemplateColumn.CellTemplate>
        </DataGridTemplateColumn>
        <DataGridTemplateColumn x:Name="RequiredDateColumn"
                                Header="Required Date"
                                Width="SizeToHeader">
            <DataGridTemplateColumn.CellTemplate>
                <DataTemplate>
                    <DatePicker
                     SelectedDate="{Binding Path=RequiredDate}" />
                </DataTemplate>
            </DataGridTemplateColumn.CellTemplate>
        </DataGridTemplateColumn>
        <DataGridTemplateColumn x:Name="ShippedDateColumn"
                                Header="Shipped Date"
                                Width="SizeToHeader">
            <DataGridTemplateColumn.CellTemplate>
                <DataTemplate>
                    <DatePicker
                     SelectedDate="{Binding Path=ShippedDate}" />
                </DataTemplate>
            </DataGridTemplateColumn.CellTemplate>
        </DataGridTemplateColumn>
        <DataGridTextColumn x:Name="ShipViaColumn"
                            Binding="{Binding Path=ShipVia}"
                            Header="Ship Via"
                            Width="SizeToHeader" />
        <DataGridTextColumn x:Name="FreightColumn"
                            Binding="{Binding Path=Freight}"
                            Header="Freight"
                            Width="SizeToHeader" />
        <DataGridTextColumn x:Name="ShipNameColumn"
                            Binding="{Binding Path=ShipName}"
                            Header="Ship Name"
                            Width="SizeToHeader" />
        <DataGridTextColumn x:Name="ShipAddressColumn"
                            Binding="{Binding Path=ShipAddress}"
                            Header="Ship Address"
                            Width="SizeToHeader" />
        <DataGridTextColumn x:Name="ShipCityColumn"
                            Binding="{Binding Path=ShipCity}"
                            Header="Ship  City"
                            Width="SizeToHeader" />
        <DataGridTextColumn x:Name="ShipRegionColumn"
                            Binding="{Binding Path=ShipRegion}"
                            Header="Ship Region"
                            Width="SizeToHeader" />
        <DataGridTextColumn x:Name="ShipPostalCodeColumn"
                            Binding="{Binding Path=ShipPostalCode}"
                            Header="Ship Postal Code"
                            Width="SizeToHeader" />
        <DataGridTextColumn x:Name="ShipCountryColumn"
                            Binding="{Binding Path=ShipCountry}"
                            Header="Ship Country"
                            Width="SizeToHeader" />
    </DataGrid.Columns>
</DataGrid>
The DataGrid data source is set via the ItemsSource property pointing to the CustomersOrdersViewSource object, which includes information from both Customers and related Orders. The rest of the code is quite simple to understand. Each column has a cell template, which is of type DataGridTextColumn for text fields. Other built-in types are DataGridHyperLinkColumn for displaying hyperlinks, DataGridCheckBoxColumn for displaying Boolean values with a check box control, and DataGridComboBoxColumn that allows selecting items from within a combo box. It is worth mentioning that for data types that the DataGrid has no default counterpart for, Visual Studio generates a custom cell template with DataGridTemplateColumn objects. In this case the custom template has been generated for embedding DatePicker controls for setting and displaying dates within cells.
|
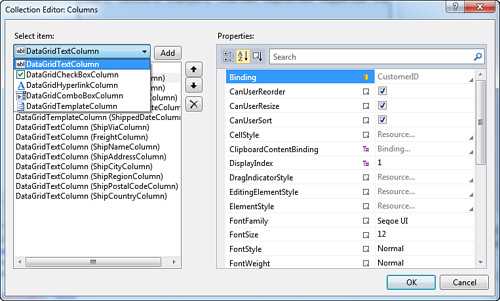
The IDE provides a convenient way for designing columns with the designer instrumentation. Simply select the DataGrid and in the Properties window, click Columns. Figure 3 shows how you can edit existing columns or add new ones, also setting data-binding at design time.
|
This is not enough, of course,
in that some Visual Basic code is also required for fetching data and
assigning such data to the user interface for presenting. If you now
open the Visual Basic code behind the file for the current Window, you get the result shown in Listing 1.
Listing 1. The VB Auto-Generated Code for the Drag’n’Drop Data-Binding
'Add an Imports directive followed by the project namespace
Imports IntroducingDataBinding
Class MainWindow

   Private Function GetCustomersQuery(ByVal NorthwindEntities As NorthwindEntities)_
                    As System.Data.Objects.ObjectQuery(Of Customer)

        Dim CustomersQuery As System.Data.Objects.ObjectQuery(Of Customer) = _
                              NorthwindEntities.Customers
        'Update the query to include Orders data in Customers.
        'You can modify this code as needed.
        CustomersQuery = CustomersQuery.Include("Orders")
        'Returns an ObjectQuery.
        Return CustomersQuery
    End Function

    Private Sub Window_Loaded(ByVal sender As System.Object,
                              ByVal e As System.Windows.RoutedEventArgs) _
                              Handles MyBase.Loaded

        Dim NorthwindEntities As NorthwindEntities = New NorthwindEntities()
        'Load data into Customers. You can modify this code as needed.
        Dim CustomersViewSource As System.Windows.Data.CollectionViewSource = _
            CType(Me.FindResource("CustomersViewSource"),
            System.Windows.Data.CollectionViewSource)
        Dim CustomersQuery As System.Data.Objects.ObjectQuery(Of Customer) = _
            Me.GetCustomersQuery(NorthwindEntities)
        CustomersViewSource.Source = CustomersQuery.Execute(System.Data.Objects.
                                                            MergeOption.AppendOnly)
    End Sub
End Class
|
The GetCustomersQuery method returns the full list of customers and related orders, returning a new Entity Framework object, ObjectQuery(Of T).
Such an object type represents a typed query and is also capable of
receiving data back. Of course such a query is a default one; therefore,
you may customize it according to your needs. When the window is
loaded, other than the ObjectContext instance, notice how the code retrieves the instance of the CustomersViewSource (of type CollectionViewSource) via the FindResource
method, which enables searching for a resource declared in XAML. This
instance will finally receive the executed query so that its result will
be reflected to the user interface. Basically the process is the
following: The query fetches data; data is assigned to a CollectionViewSource instance; because this instance is bound to a UI control (such as the DataGrid), fetched data is reflected to the UI and vice versa. This is also because the DataGrid control provides support for the two-way data-binding, and this is also allowed by the ObjectQuery(Of T) class. At this point you can run the application to see the result shown in Figure 4.
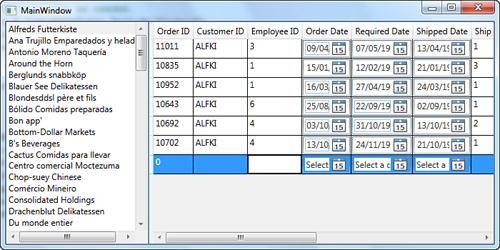
With a few mouse clicks you can build an application that can present tabular data. You can click inside the DataGrid
for editing existing data or for adding new rows. If you want to save
data to the underlying database, you should simply implement a control,
such as a Button, whose Click event handler invokes the ObjectContext.SaveChanges
method, and you are done. But you see this example in the next section,
which is interesting but that requires a little bit of manual work.
