Creating Master-Details Forms
Similarly to what
already happened in Windows Forms, creating master-details forms in WPF 4
is also straightforward. This also enables you to understand other
important concepts for the data-binding. Add a new window to the current
project and name it MasterDetails. Divide the default Grid into four cells, so that you can also add special buttons, as follows:
<Grid>
    <Grid.ColumnDefinitions>
        <ColumnDefinition Width="200"/>
        <ColumnDefinition/>
    </Grid.ColumnDefinitions>
    <Grid.RowDefinitions>
        <RowDefinition/>
        <RowDefinition Height="50"/>
    </Grid.RowDefinitions>
</Grid>
Repeat the step of adding a ListBox and binding the customer’s CompanyName property, same as in the first part of the previous subsection, ensuring that the ListBox
is placed in the upper-left column. Visual Studio 2010 generates for
you exactly the same XAML code of the previous example. Now go to the
Data Sources window, select the Orders item nested within Customers, and from the combo box, select Details. At this point drag Orders onto the upper-right cell of the window. Figure 5 shows the result of this operation.
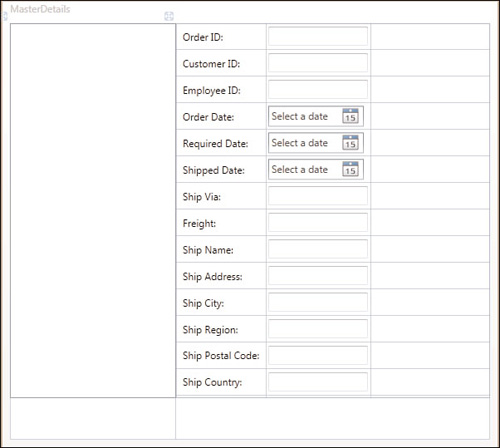
Notice how Visual Studio generated a series of controls, basically couples of Label/TextBlock.
Also notice how the IDE can recognize the bound data type and of adding
the appropriate controls. For example, for dates, it adds to the form
some DatePicker controls. Instead of a DataGrid, the auto-generated XAML code contains a new Grid with a series of children controls. Listing 2 shows an excerpt of the content of the new Grid.
Listing 2. Excerpt of the Auto-Generated XAML Code for Details
<Grid DataContext="{StaticResource CustomersOrdersViewSource}" Grid.Column="1"
Grid.Row="0" Name="Grid1" >
<Grid.ColumnDefinitions>
<ColumnDefinition Width="Auto" />
<ColumnDefinition Width="Auto" />
</Grid.ColumnDefinitions>
<Grid.RowDefinitions>
<RowDefinition Height="Auto" />
<RowDefinition Height="Auto" />
<RowDefinition Height="Auto" />
<RowDefinition Height="Auto" />
<RowDefinition Height="Auto" />
<RowDefinition Height="Auto" />
<RowDefinition Height="Auto" />
<RowDefinition Height="Auto" />
<RowDefinition Height="Auto" />
<RowDefinition Height="Auto" />
<RowDefinition Height="Auto" />
<RowDefinition Height="Auto" />
<RowDefinition Height="Auto" />
<RowDefinition Height="Auto" />
</Grid.RowDefinitions>
<Label Content="Order ID:" Grid.Column="0" Grid.Row="0"
HorizontalAlignment="Left" Margin="3"
VerticalAlignment="Center" />
<TextBox Grid.Column="1" Grid.Row="0" Height="23"
HorizontalAlignment="Left" Margin="3" Name="OrderIDTextBox"
Text="{Binding Path=OrderID}"
VerticalAlignment="Center" Width="120" />
<Label Content="Customer ID:" Grid.Column="0" Grid.Row="1"
HorizontalAlignment="Left" Margin="3"
VerticalAlignment="Center" />
<TextBox Grid.Column="1" Grid.Row="1" Height="23"
HorizontalAlignment="Left" Margin="3" Name="CustomerIDTextBox"
Text="{Binding Path=CustomerID}"
VerticalAlignment="Center" Width="120" />
<Label Content="Employee ID:" Grid.Column="0" Grid.Row="2"
HorizontalAlignment="Left" Margin="3"
VerticalAlignment="Center" />
<TextBox Grid.Column="1" Grid.Row="2" Height="23"
HorizontalAlignment="Left"
Margin="3" Name="EmployeeIDTextBox"
Text="{Binding Path=EmployeeID}"
VerticalAlignment="Center" Width="120" />
<Label Content="Order Date:" Grid.Column="0" Grid.Row="3"
HorizontalAlignment="Left" Margin="3"
VerticalAlignment="Center" />
<DatePicker Grid.Column="1" Grid.Row="3" Height="25"
HorizontalAlignment="Left" Margin="3"
Name="OrderDateDatePicker"
SelectedDate="{Binding Path=OrderDate}"
VerticalAlignment="Center" Width="115" />
<!--Following other controls... -->
</Grid>
|
Basically the code implements pairs of labels/text. For dates, you can notice the presence of DatePicker controls whose SelectedDate
property is bound to the date property from the data source. If you
take a look at the Visual Basic auto-generated code, you see no
differences with the one shown in the first example. Now there is some
other work to do. Building a master-details form requires providing
controls for navigating, adding, deleting, and saving items. At this
point add the following XAML code, which implements some buttons whose
meaning is self explanatory:
<StackPanel Grid.Row="1" Grid.Column="1" Orientation="Horizontal">
    <StackPanel.Resources>
        <Style TargetType="Button" x:Key="ButtonStyle">
            <Setter Property="Width" Value="80"/>
            <Setter Property="Height" Value="40"/>
            <Setter Property="Margin" Value="5"/>
        </Style>
    </StackPanel.Resources>
    <Button Style="{StaticResource ButtonStyle}" Content="Save"
            Name="SaveButton" Click="SaveButton_Click"/>
    <Button Style="{StaticResource ButtonStyle}" Content="Add"
            Name="AddButton" Click="AddButton_Click"/>
    <Button Style="{StaticResource ButtonStyle}" Content="Delete"
            Name="DeleteButton" Click="DeleteButton_Click"/>
    <Button Style="{StaticResource ButtonStyle}" Content="Next"
            Name="NextButton" Click="NextButton_Click"/>
    <Button Style="{StaticResource ButtonStyle}" Content="Back"
            Name="BackButton" Click="BackButton_Click"/>
</StackPanel>
Now switch to the Visual Basic code. The first task is moving the ObjectContext declaration at class level, to make it reachable from within other methods. Replace the NorthwindEntities variable declaration with the northwindContext name to avoid conflicts, move it to class level, and edit the first line of the Window_Loaded event as follows:
Private northwindContext As NorthwindEntities


Private Sub Window_Loaded(ByVal sender As System.Object,
                          ByVal e As System.Windows.RoutedEventArgs) _
                          Handles MyBase.Loaded

    Me.northwindContext = New NorthwindEntities
The first button that can be handled is the SaveButton. The Click event handler is the following:
Private Sub SaveButton_Click(ByVal sender As System.Object,
                             ByVal e As System.Windows.
                             RoutedEventArgs)
    'Handle your logic here, such as exceptions
    'and optmistic concurrency
    Try
        Me.northwindContext.SaveChanges()
    Catch ex As Exception

    End Try
End Sub
The second task is moving to class level the CollectionViewSource objects declarations so that we can invoke them within event handlers. They actually are enclosed in the Window_Loaded event handler and thus have no external visibility. Moreover, we also need to manually declare and get the instance of the CustomersOrdersCollectionViewSource object because the application needs to provide the ability of adding and removing items only to the Orders collection. (Performing this on CustomersViewSource would affect Customers, too.) Code in Listing 3 summarizes the edits that you need to do manually at this point.
Listing 3. Moving CollectionViewSource Declarations at Class Level
Private CustomersViewSource As CollectionViewSource
Private CustomersOrdersViewSource As CollectionViewSource

Private Sub Window_Loaded(ByVal sender As System.Object,
                          ByVal e As System.Windows.RoutedEventArgs) _
                          Handles MyBase.Loaded

    Me.northwindContext = New NorthwindEntities
    'Load data into Customers. You can modify this code as needed.
    Me.CustomersViewSource = CType(Me.FindResource("CustomersViewSource"),
                                CollectionViewSource)
    Me.CustomersOrdersViewSource =
                             CType(Me.FindResource("CustomersOrdersViewSource"),
                             CollectionViewSource)

    Dim CustomersQuery As System.Data.Objects.
                          ObjectQuery(Of IntroducingDataBinding.Customer) = _
                          Me.GetCustomersQuery(northwindContext)
    CustomersViewSource.Source = CustomersQuery.
                                 Execute(System.Data.Objects.
                                         MergeOption.AppendOnly)
End Sub
|
The next buttons require explaining other concepts, which the next sections cover.
