2.2 Cisco Unified CallConnector for Microsoft Dynamics CRM
Cisco first released a call connector in 2004,
and they have been upgrading it ever since. The call connector by Cisco
is called the Cisco Unified CallConnector for Microsoft Dynamics CRM,
and it enables organizations to integrate the two industry-leading
enterprises (Microsoft and Cisco) to aid in better customer-care
solutions.
Advanced features of the connector include the following:
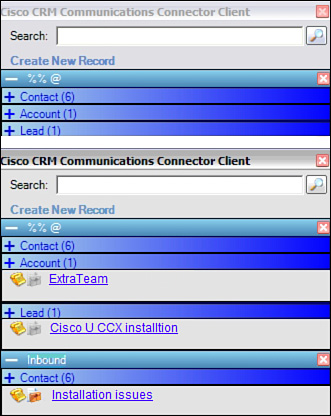
Screen pops: Opens contact records and creates new phone call activity records as calls are placed or received (see Figure 4)
Click-to-dial: Supports the Click-to-Dial feature from a Microsoft CRM contact record
Call duration tracking: Tracks the duration of phone calls and associates them with phone activity records
Call information capture: Captures incoming and outgoing call information, including calling number, called number, and call start and end times
Customer record creation: Easily creates a new CRM customer record when a new customer call arrives
As long as you have deployed the Cisco
CallManager 4.x or later, there is no cost for this connector. However,
certain requirements apply: the server component Cisco CallManager 4.x
or later, the client component .NET Framework 2.0 or later, the user
account enabled for CTI integration, and TAPI installed on the client
(as described later).
Note
The
client needs to have a thick client installed, which will interface
with a server component, which is usually installed on the Microsoft
Dynamics CRM server.
To install the Cisco Unified CallConnector, follow these steps:
1. | Log in to the CRM web server.
|
2. | Install the server component CUCCServerInstaller.exe. You can download this from http://www.cisco.com/public/sw-center/index.shtml.
|
3. | Click Next on the Welcome screen.
|
4. | At the License Agreement screen, select the I Agree option, and then click Next
|
5. | Choose the destination folder on the Select Installation folder screen, and then click Next.
|
6. | Click Next to begin installation on the Confirm Installation screen.
|
7. | The Configuration Screen will display. Select the defaults, and then click OK.
|
8. | Click Close to complete installation.
|
To configure the Cisco Unified CallConnector, follow these steps:
1. | Launch the configuration options by selecting Start, Programs, Cisco, and then set the following configurations:
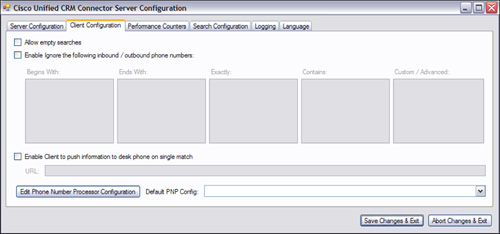
Select Cisco CallConnector Server Configuration. The Configuration window will display, as shown in Figure 5

|
2. | Enter the appropriate URL information for the Microsoft Dynamics CRM server. Using our example in Figure 7.5,
you would replace moss:5555 with the name of your server and port. (If
you are on the default port [i.e., port 80], you enter only the machine
name.)
Note
You can verify each of the addresses entered by navigating to a browser and entering them there. Each should load a page.
|
3. | Enter the organization the server will be using.
|
4. | Click Enable CRM KeepAlive Searches. When this is enabled, it allows an active connection to the CRM for faster search results.
|
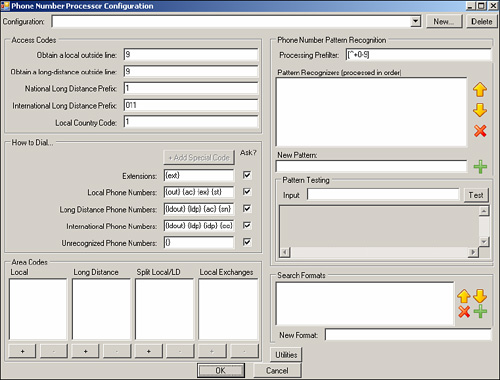
5. | Click the Edit Phone Number Processor Configuration button on the Client Configuration tab (see Figure 6). On this screen, you can configure the dialing rules for various locations, to automate dialing.
Optional settings are for keepalive searches. These allow faster
searches for end users. This is useful when you have many users and want
to remove the authentication overhead.
Phone number processing is the most important part of the
configuration. Every country has a different number processing pattern.
It is vital to configure this properly.
Pattern recognizer and search format capabilities combine to find the appropriate record in the CRM.
Figure 7
shows a standard configuration. Your configuration might differ
depending on your setup. Click the Utilities button to launch a wizard.
The wizard walks administrators through standard settings for most
locations. However, you can change
the dialing rules, and you can change phone number recognition patterns
based on the different implementation systems you may be dealing with.
|
6. | On
the Dialing Rules Wizard screen, click New and enter a name for the
configuration. The name should be something that will be easy for end
users to understand, such as San Francisco Call Center.
|
7. | Click OK.
|
8. | Click the Utilities button.
|
9. | Select Wizards / Templates from the menu.
|
10. | Select
the wizard that matches your region. If a wizard does not have your
region listed, you must configure the phone number pattern (PNP)
manually. After configuring the PNP, click OK.
|
11. | Click Save Changes & Exit.
|
Note
The independent software vendor (ISV)
integration needs to be configured in Microsoft Dynamics CRM to enable
end users to access this function.
To enable ISV configuration, follow these steps:
1. | Open the Dynamics CRM website with administrative privileges.
|
2. | Open the Settings section.
|
3. | Select the System Settings option.
|
4. | In the System Settings window, click the Customization link.
|
5. | In the Custom Menus and Toolbars section, click the Selection button.
|
6. | Add Outlook and Web Application.
|
7. | Click the >> button to add them to the selected values.
|
8. | Click OK.
|
Client Installation
Client installation requires four major steps:
Install the Java Runtime Environment.
Install and configure the Cisco TSP client.
Install the Cisco JTAPI client.
Install and configure the Cisco MSCRM connector client.
1. Install the Java Runtime Environment
1. | Download the Java Runtime Environment (JRE) from http://www.java.com/en/download/manual.jsp.
|
2. | Launch the installer.
|
3. | Accept the license agreement.
|
4. | On the Java Setup – Complete dialog box, click Finish.
|
2. Install and Configure the Cisco TSP Client
1. | Download the Cisco TAPI service provider (TSP) client from the Cisco download center.
|
2. | Launch the installer.
|
3. | On the Language Selection screen, select the appropriate language, and then click Next.
|
4. | On the Welcome screen, click Next.
|
5. | On the Choose Destination Location dialog box, enter the installation folder and click Next.
|
6. | To the question about multiple instances for Cisco Unified CallManager TSP, answer No.
|
7. | Click Next to begin the installation.
|
8. | Click Finish.
|
Note
It is important to reboot the machine before proceeding to the next steps. Otherwise, the next steps will fail.
To configure the TSPs, complete the following steps:
1. | Open the Control Panel.
|
2. | Select Phone and Modem Options.
|
3. | Display the Advanced tab.
|
4. | Select CiscoTSP001, as shown in Figure 8.
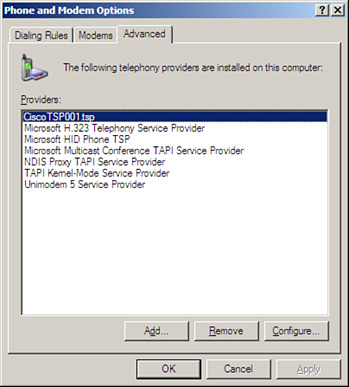
|
5. | Click Configure.
|
6. | Enter a username and password for the Cisco phone system.
|
7. | The
username and password is for logging in to the Cisco phone system,
which enables the tie between the Cisco phone line to the computer. To
obtain this username and password, contact your Cisco system
administrator.
|
8. | Enter the DNS name or the IP address of the local Cisco phone server.
|
9. | Click OK.
|
10. | Click Close.
|
Note
It is important to reboot the machine before proceeding to the next steps. Otherwise, the next steps will fail.
3. Install the Cisco JTAPI Client
1. | Navigate to the location with the JTAPI installer and launch the setup for the Cisco JTAPI client.
|
2. | On the Welcome screen, click Next.
|
3. | Click Next on the Choose Installation Folder Location screen.
|
4. | Confirm the settings, and then click Next to begin the installation.
|
5. | Click Finish.
|
4. Install and Configure the Cisco MSCRM Connector Client
1. | Download and launch the setup from the Cisco website (http://www.cisco.com/public/sw-center/index.shtml).
|
2. | Agree to the license agreement.
|
3. | On the Select Installation Destination screen, click Next.
|
4. | Click Next on the Confirm Installation screen.
|
5. | Click Finish to complete the setup.
|
After the server has been set up and configured,
you need to configure the client. After you install and configure the
TAPI on the client machine, the CallConnector client allows you to
choose the physical/soft phone to which you want to attach this API, as
follows:
1. | To
view the configuration options, right-click the Cisco CallConnector
icon in the lower-right corner of the desktop and select Configuration
(see Figure 9).

|
2. | Select
the device that you want to integrate (get the phone number from). This
is where you can select a Cisco phone or a regular analog phone. Figure 10 shows the Microsoft Dynamics CRM client configuration options.
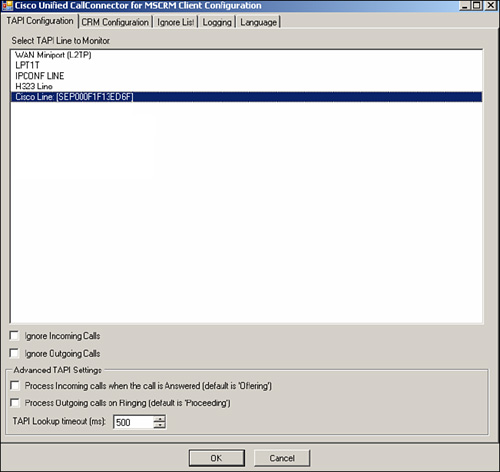
|
3. | On the Client Configuration tab, enter the server name where Cisco CallConnector client is installed (see Figure 11).
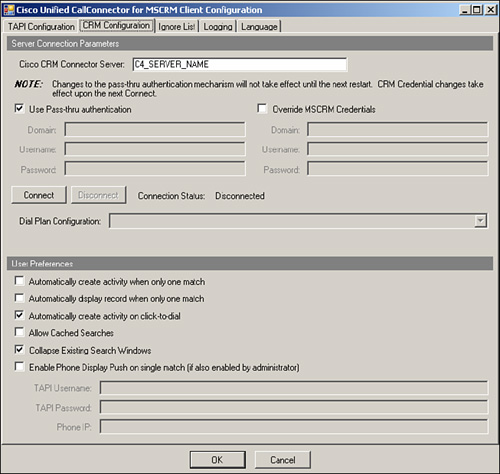
Then select the behavior required from the integration from among the following user preferences:
- Automatically Create Activity When Only One Match: This allows service centers to have an automatic log for all matched incoming calls.
- Automatically Display Record When Only One Match: This allows the screen to pop up automatically when only one match is found.
- Automatically Create Activity on Click-to-Dial: This allows an activity to be logged into the system when the agent places a call.
Figure 11 shows the user preference options.
|
4. | Click OK to accept the changes.
Note
You can configure the Cisco
CallConnector client for use with an analog telephone. This potential
configuration enables remote users who don’t have a Cisco phone at home
to leverage some of these features.
|
