Logo
programming4us
programming4us
programming4us
programming4us
Home
programming4us
XP
programming4us
Windows Vista
programming4us
Windows 7
programming4us
Windows Azure
programming4us
Windows Server
programming4us
Windows Phone
 
Windows Server

Microsoft Lync Server 2010 Edge : Reverse Proxy Configuration (part 3)

- Free product key for windows 10
- Free Product Key for Microsoft office 365
- Malwarebytes Premium 3.7.1 Serial Keys (LifeTime) 2019
11/1/2011 3:28:20 PM

Redirect SSL Bridging

When using the Web Server Publishing Wizard, there are some settings unavailable that need to be modified after creating the rule. Because the external web services run on an IIS website using port 4443, the following steps are required to redirect Threat Management Gateway rules to this port instead of 443.

1.
Right-click the web site publishing rule just created and select Properties.

2.
Click the Bridging tab.

3.
In the Redirect requests to SSL port, change the 443 to 4443, as shown in Figure 4.
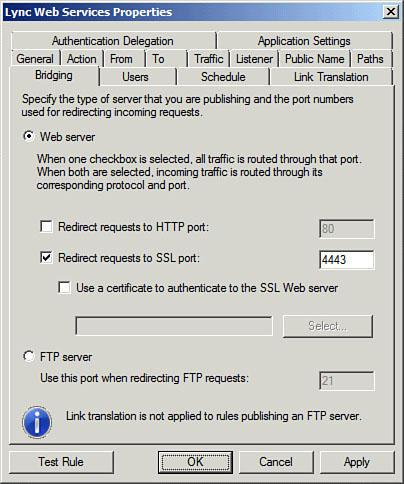
Figure 4. SSL Bridging Redirection


4.
Click the Apply button to save changes.

Listen for Additional Public Names

By default, the Threat Management Gateway only responds to requests for the public name entered during the Web Site Publishing Wizard. Because additional URLs can be used for dial-in conferencing or meetings, they must be added to the rule.

1.
Right-click the web site publishing rule just created and select Properties.

2.
Click the Public Name tab.

3.
Use the Add button to enter any simple URLs published for dial-in conferencing or meetings.

4.
Click the Apply button to save changes after all names have been added, as shown in Figure 5.
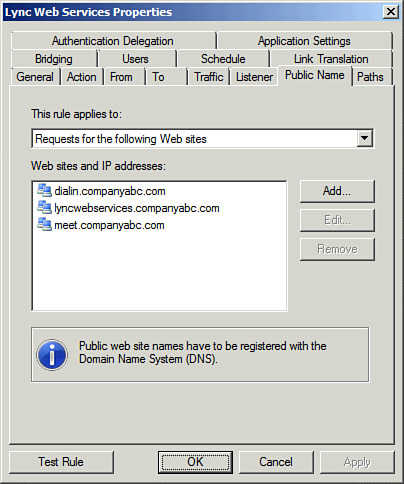
Figure 5. Additional Public Names


Test and Apply Rules

After creating and editing the rules, they can be applied to the Threat Management Gateway configuration, but should first be tested.

1.
Right-click the web site publishing rule just created and select Properties.

2.
Press the Test Rule button to check the published rule. Verify that the rule test returns a green check mark, as shown in Figure 6, and then click OK.
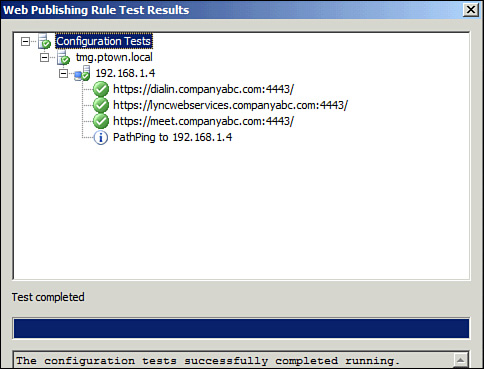


Figure 6. Test the Web Publishing Rule


3.
Click Apply to submit the new rule and web listener.

4.
Enter a description of the changes when prompted and click Apply.

5.
Click OK when the configuration is applied.

Other -----------------
- InfoPath Designer 2010 : Create an InfoPath 2010 Add-In & Create a Custom Task Pane
- InfoPath Designer 2010 : Access Your Form Within a Visual Studio Workflow
- Microsoft SQL Server 2008 R2 : Query Plan Caching (part 2) - Monitoring the Plan Cache
- Microsoft SQL Server 2008 R2 : Query Plan Caching (part 1) - Query Plan Reuse & Query Plan Aging
- Microsoft Dynamics AX 2009 : Processing Business Tasks - Posting general journals
- Microsoft Dynamics AX 2009 : Processing Business Tasks - Creating new general journals
- Windows Small Business Server 2011 : An Email Primer (part 2) - Connecting an Exchange Server to the Internet
- Windows Small Business Server 2011 : An Email Primer (part 1) - Understanding Email Addresses & Email Server Functions
- Exchange Server 2007 : Securing Access to ActiveSync with Secure Sockets Layer Encryption (part 3) - Installing a Root Certificate on a Windows Mobile Device
- Exchange Server 2007 : Securing Access to ActiveSync with Secure Sockets Layer Encryption (part 2) - Using an Internal Certificate Authority for OWA Certificates
 
 
Top 10
- Microsoft Visio 2013 : Adding Structure to Your Diagrams - Finding containers and lists in Visio (part 2) - Wireframes,Legends
- Microsoft Visio 2013 : Adding Structure to Your Diagrams - Finding containers and lists in Visio (part 1) - Swimlanes
- Microsoft Visio 2013 : Adding Structure to Your Diagrams - Formatting and sizing lists
- Microsoft Visio 2013 : Adding Structure to Your Diagrams - Adding shapes to lists
- Microsoft Visio 2013 : Adding Structure to Your Diagrams - Sizing containers
- Microsoft Access 2010 : Control Properties and Why to Use Them (part 3) - The Other Properties of a Control
- Microsoft Access 2010 : Control Properties and Why to Use Them (part 2) - The Data Properties of a Control
- Microsoft Access 2010 : Control Properties and Why to Use Them (part 1) - The Format Properties of a Control
- Microsoft Access 2010 : Form Properties and Why Should You Use Them - Working with the Properties Window
- Microsoft Visio 2013 : Using the Organization Chart Wizard with new data
 
programming4us
Windows Vista
programming4us
Windows 7
programming4us
Windows Azure
programming4us
Windows Server