SQL Server’s database mirroring functionality is
similar to log shipping in the way it maintains a copy of the primary
database for HA purposes; both approaches copy transaction log data from
the primary to the secondary database. Although the similarities
between the two HA solutions for SQL Server may be striking, the
differences between them are even more so. Database mirroring differs
from log shipping in several areas, the three most apparent being when
the transaction log data is copied to the secondary server, how that
data is transferred from one server to another, and how the databases
behave when the primary server suffers an outage.
Database mirroring’s
most appealing advantage over log shipping is that transactions
committed to the primary database are copied over to the secondary
database instance at once after they are written to the database. This
gives database mirroring a distinct advantage over log shipping by
reducing latency and ensuring that the contents of the secondary
database are completely current. When the transactions are sent to the
secondary database, the individual transaction records are sent to the
secondary database via TCP, not transaction log backups via a file
system copy. But the most desirable aspect of database mirroring is that
you can configure it to automatically fail over to the secondary server
should the primary server suffer an outage. That’s a big change from
log-shipping’s reliance on a manual failover.
The Server Components of Database Mirroring
Database
mirroring requires at least two servers—a principal and a mirror—and
allows the use of an optional third server, a witness, to automate
failovers from the principal to the mirror in the case of an outage on
the principal.
Principal.
This is the database you want to mirror to a SQL Server instance on a
separate server. You must back up the principal database using the Full
recovery model for the database to use database mirroring; mirroring is
not available when using the Simple or Bulk-Logged recovery models.
There can be only one principal server for a target database, and it can
have only one mirror server as a partner in the mirroring session. You
can implement this role on servers using the Enterprise or Standard
licenses for SQL Server. Mirror.
This is the database that functions as the mirroring partner for your
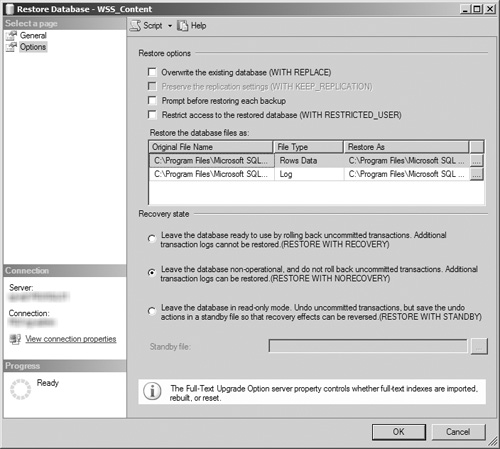
principal database. You must initially restore the mirror database from a
full backup of the principal database using the Restore with No
Recovery option (and then any transaction log backups required to make
the database up to date) before you can update it with transactions via
database mirroring. See Figure 8.11 for an example of where this setting is selected. A single secondary server can host multiple databases
acting as mirrors to principal databases on other servers. Databases
hosted on the mirror instance not acting as a mirror can also be
principal databases in database mirroring with other database instances.
You can implement this role on servers using the Enterprise or Standard
licenses for SQL Server.
Witness.
This server is optional and is needed only if you require SQL Server to
automatically fail over to the mirror database if a failure or outage
occurs on the principal database. The witness server does not perform
resource-intensive activities or host content as part of the database
mirroring process; its only role is to detect a failure in the principal
database and enable automatic failover to the mirror. You can implement
this role on servers using the Enterprise, Standard, Workgroup, or
Express Edition licenses for SQL Server.
How to Configure Database Mirroring
Your environment must meet the following requirements to enable database mirroring for one or more of your SQL Server databases:
Servers.
In addition to the server hosting your principal SQL Server database
instance, you must have a second database instance hosting on a separate
server to function as the mirror server. A witness server is optional
but is required if you want to have automatic failover. SQL Server license.
The principal and mirror servers must be running one of the following
versions of SQL Server: SQL Server 2008 or 2008 R2 Standard Edition
(synchronous mirroring only; the various modes of database mirroring
available are discussed later in this section), or SQL Server 2008 or
2008 R2 Enterprise Edition. The witness server must be running one of
the following versions of SQL Server: SQL Server Express Edition, SQL
Server 2008 or 2008 R2 Standard Edition, SQL Server 2008 or 2008 R2
Workgroup Edition, or SQL Server 2008 or 2008 R2 Enterprise Edition.
Database mirroring is not available with SQL Server Embedded Edition. Permissions. Your mirror database instance must provide the same permissions and roles that are granted to your principal database instance. Recovery model. The database targeted for database mirroring must be backed up using the Full recovery model.
The following steps provide an
example of how to enable and configure SQL Server database mirroring
with a principal, mirror, and witness server.
1. | Open
SQL Server Management Studio and right-click on the target database for
database mirroring. Select the Properties item from the menu.
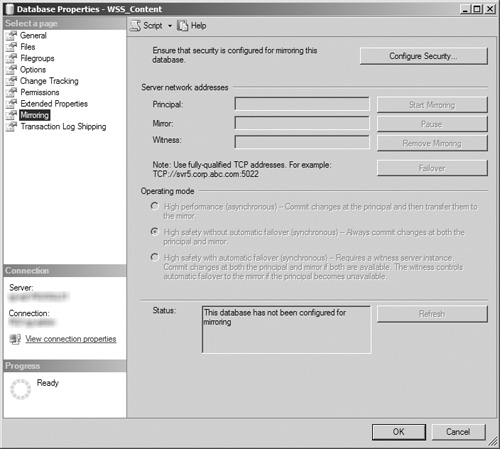
| 2. | When the Database Properties dialog box opens , click the Mirroring page link in the left pane.
| 3. | This action opens the Mirroring page (see Figure 2) with most of its options disabled. Click the Configure Security button to configure the database mirroring security settings.
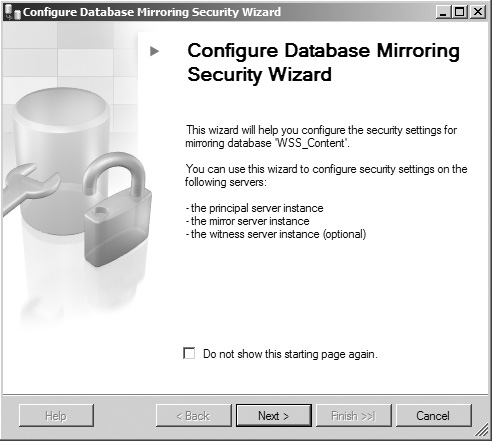
| 4. | This opens the Configure Database Mirroring Security Wizard, as shown in Figure 3; click the Next button to continue.
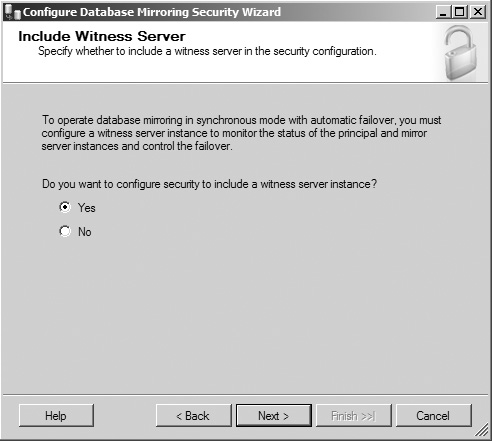
| 5. | The wizard next prompts you for witness server configuration information (see Figure 4).
If you want to set up a witness server and enable automatic failover
for this database mirroring configuration, select the Yes option and
click the Next button. If not, select the No button and click the Next
button. In this example, select the Yes option button to configure a
witness server.
| 6. | The wizard’s Choose Servers to Configure screen opens (see Figure 5),
displaying the three database mirroring server roles that can have the
database mirroring security configuration saved on them, with check
boxes to the left of them. The check boxes for the principal and mirror
server instances are checked by default and disabled to prevent the
selection from being modified. The witness server instance check box is
checked by default but can be unchecked. Ensure that all three server
instances are checked, and click the Next button to continue.
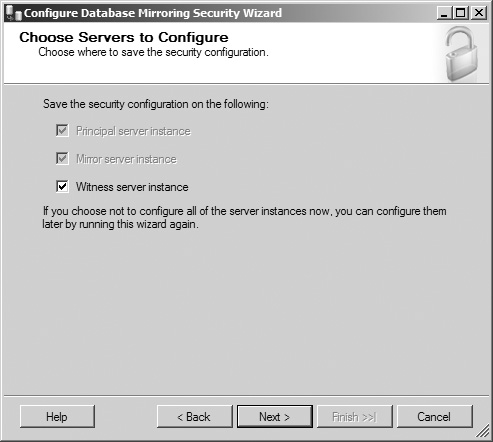
Note
If you choose not to configure a witness server, the third server role is not displayed in the screen.
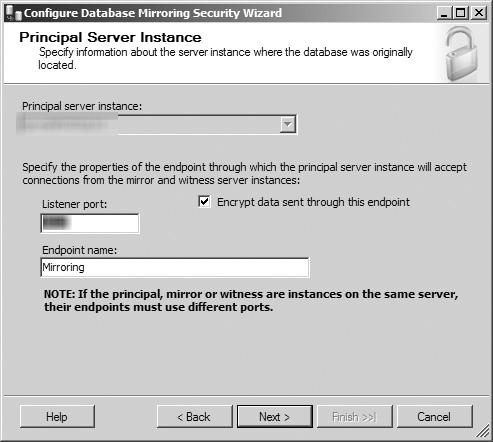
| 7. | This opens the wizard’s Principal Server Instance screen (see Figure 6).
In this screen, you are shown the current database instance hosting the
principal database for the mirroring process in a disabled drop-down
menu. In this window, you can opt to have SQL Server encrypt each
transaction as it is sent from the principal server by selecting the
associated check box, specify the networking port that the principal
server uses to communicate with the mirror and witness server, and
rename the endpoint for transactions sent from the principal server.
When you have entered the information and configuration data for your
principal database instance, click the Next button to continue.
Tip
If you have previously
established a database mirroring endpoint for the target database, the
Encrypt Data check box, the Listener Port text field, and the Endpoint
Name text field are disabled, preventing you from modifying the
configured endpoint. To change the current mirroring endpoint, you must
execute Transact-SQL commands to DROP or ALTER the mirroring endpoint.
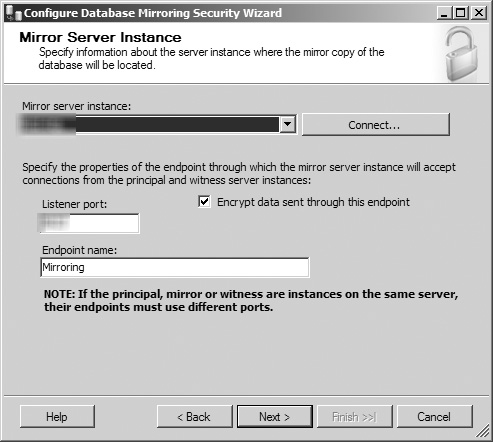
| 8. | The wizard proceeds to the Mirror Server Instance screen (see Figure 7), which looks similar to the Principal Server Instance screen in Figure 6,
except that the database selection drop-down menu is now enabled. In
this screen, you can select the database instance hosting the mirror
database for the mirroring process from the drop-down menu. If the
desired database instance is not available in the drop-down menu, click
the Connect button to open a dialog box to log into the database
instance or select the Browse for More option from the drop-down menu.
After selecting the current database instance, you can opt to have SQL
Server encrypt each transaction as it is sent from the mirror server by
selecting the associated check box, specify the networking port that the
principal server uses to communicate with the mirror and witness
server, and rename the endpoint for transactions sent from the principal
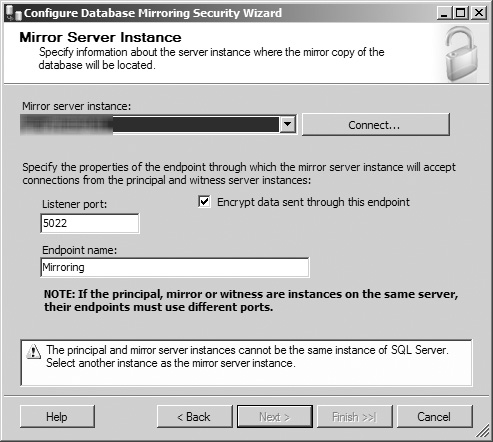
server. If you attempt to select the same database instance as the one
you established as the principal server, SQL Server displays an error
message instructing you to select another instance, and the Next button
is disabled (see Figure 8).
After you have entered valid information and configuration data for
your mirror database instance, click the Next button to continue.
| 9. | The wizard again opens a screen similar to the Principal Server Instance screen in Figure 6—the Witness Server Instance screen (see Figure 9)—and
it has the database selection drop-down menu enabled. In this screen,
you can select the database instance hosting the witness database for
the mirroring process from the drop-down menu. If the desired database
instance is not available in the drop-down menu, click the
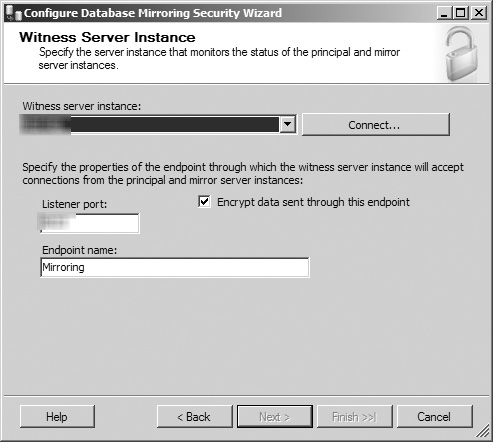
Connect button to open a dialog box to log into the database instance,
or select the Browse for More option from the drop-down menu. After
selecting the current database instance, you can opt to have SQL Server
encrypt each transaction as it is sent from the witness server by
selecting the associated check box, specify the networking port that the
principal server uses to communicate with the mirror and witness
server, and rename the endpoint for transactions sent from the principal
server. Like the mirror server screen, if you attempt to select the
same database instance as the one you established as the principal or
mirror server, SQL Server displays an error message similar to Figure 8
instructing you to select another instance, and the Next button is
disabled. After you have entered valid information and configuration
data for your witness database instance, click the Next button to
continue.
Note
If you opt not to include a witness server in step 5 or not configure its security in step 6, this screen is not displayed.
| 10. | The
Service Accounts screen opens, allowing you to specify a service
account in DOMAIN\ACCOUNT format for each of the servers in the database
mirroring configuration. As Figure 10 shows, the screen provides instructions regarding when accounts
should and should not be specified, as well as what actions SQL Server
takes if the accounts listed do not currently have SQL Server logins.
Once you’ve configured the account information, click the Next button to
continue.
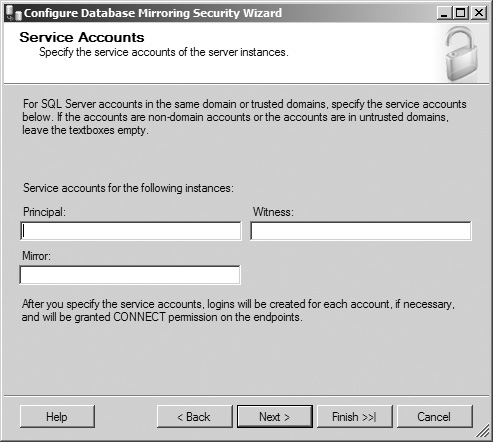
Note
If you opt not to include a witness server in step 5, the text field for the Witness Service account is not displayed.
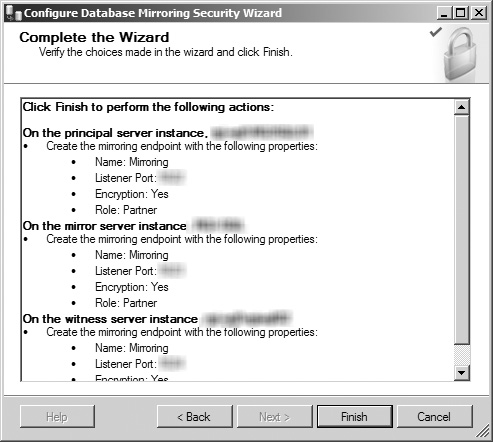
| 11. | The last screen of the wizard is now displayed (see Figure 11),
allowing you to review what you have configured before clicking the
Finish button to finalize the security configuration process. If you see
any items that need to be modified, click the Back button to navigate
to them and make your changes. When you are ready, click the Finish
button to complete the wizard and have SQL Server begin to configure the
database monitoring configuration’s security.
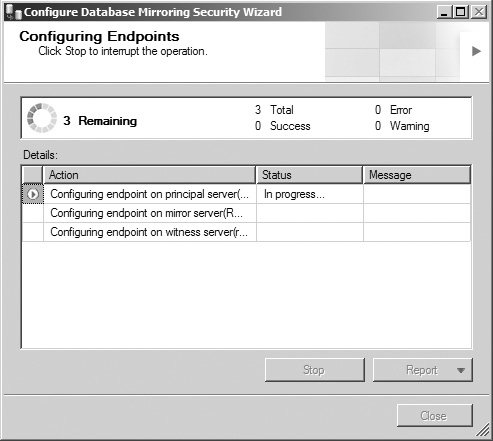
| 12. | The Configuring Endpoints screen (see Figure 12)
displays the progress of the security configuration as it executes.
Once the tool is finished, ensure that all tasks have completed with a
status of Success, review the status messages and reports as needed, and
click the Close button to return to the Mirroring page of the
database’s Properties window.
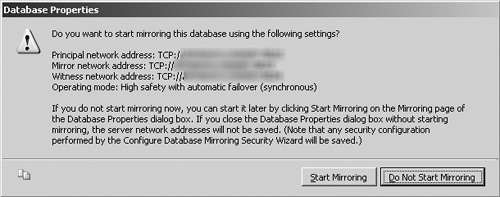
| 13. | After
SQL Server has completed the endpoint configuration process, the wizard
closes and you are prompted with a window asking if you want to start
database mirroring for the target database using the configuration that
just completed, as shown in Figure 13.
Click the Start Mirroring button if you are ready to enable the
process, or click the Do Not Start Mirroring button if you are not. In
this example, the Do Not Start Mirroring button was clicked.
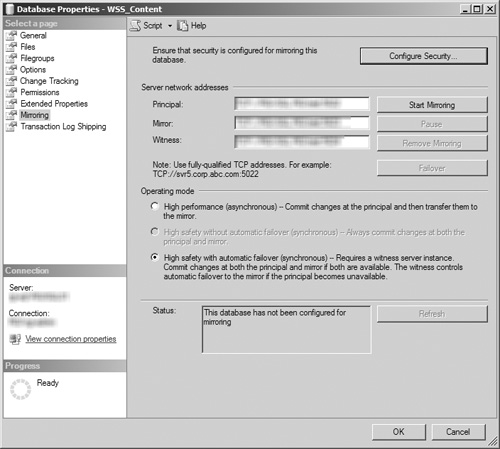
| 14. | Regardless
of whether you choose to start the mirroring process, when you return
to the Mirroring page, it is apparent that many more fields are now
enabled after security was configured, as shown by Figure 14.
In the Server Network Address section, the text fields for the
Principal, Mirror, and Witness servers are now enabled and populated
with the network connection string used to contact each of these
servers. If you did not start mirroring in step 13, only the Start
Mirroring button is enabled. If you did start mirroring in step 13, the
Pause, Remove Mirroring, and Failover buttons are enabled. In the
Operating Mode section, the High Performance (Asynchronous) and High
Safety with Automatic Failover (Synchronous) option buttons are enabled
if you chose to include a witness server in step 5. If you did not
include a witness server in step 5, the High
Performance (Asynchronous) and High Safety Without Automatic Failover
(Synchronous) option buttons are enabled. In both cases, the latter
radio button is selected by default. The Status section contains a text
box displaying the database mirroring status for the database and a
Refresh button, which is disabled if mirroring has not been started. If
the Status field indicates that the database has not been configured for
mirroring, click the Start Mirroring button to initiate the process.
| 15. | After
mirroring has been started for the database, you can suspend the
process by clicking the Pause button. A dialog box is displayed asking
you to confirm your request, and you are then returned to the Mirroring
page. The former Pause button is now marked as the Resume button and can
be clicked to resume the mirroring process for the database.
Note
Pausing the mirroring
process places the mirrored database in a suspended status and results
in transactions not being transferred from the principal database to the
mirrored database until mirroring is resumed. You can use the Pause
option as a short-term solution to improve performance on the principal
database instance, but you should not use it for extended periods. The
transaction log of the principal database is not truncated while
mirroring is paused so that all logged transactions can be sent to the
mirrored database once the process is resumed. If mirroring is not
resumed in a timely fashion, the transaction log can grow too large and
use all of its available disk space, ultimately causing an outage of the
principal database if it cannot write to its transaction logs.
| 16. | To
completely stop the database from being mirrored, click the Remove
Mirroring button. A dialog box is displayed asking you to confirm your
request, and you are then returned to the Mirroring page. To restart
mirroring for this database, you must manually re-create all the
configured mirroring settings. This action permanently removes the
mirroring associations and security settings between the principal,
mirror, and witness servers, but the copy of the mirrored database is
not deleted from the mirror database instance.
Note
If you chose to keep the
mirrored database, you must perform a Restore with Recovery action
against it to make it available, because it was originally created using
Restore with No Recovery. You should consider renaming the mirrored
database to avoid confusion between it and the principal database.
| 17. | To
manually fail a database over from its principal to its mirror, click
the Failover button. A dialog box is displayed asking you to confirm
your request, and you are then returned to the Mirroring page. After
completing the failover, the mirroring server roles of the two databases
have been swapped, so the original principal now has the mirror role
and the original mirror is now the principal database.
Note
Keep
in mind that this change of roles has only occurred in SQL Server from a
mirroring perspective; it does not communicate this update to the
applications or services that use the database and may influence their
ability to access the database.
| 18. | If
you want to change the operating mode of the mirroring process, simply
select the button next to the option you want and click OK, closing the
database’s Properties window and saving your changes.
|
Step 14 briefly discussed a
crucial component of SQL Server’s database mirroring functionality: the
operating mode. The option you select for this section directly impacts
how SQL Server handles your mirrored database in the case of an outage.
The three options available are described next:
High Performance (Asynchronous).
This operating mode commits changes to the principal database, sends
them to the mirror, and then proceeds with normal processing without
waiting for confirmation by the mirror server that the transfer was
successful. High Performance mode offers improved performance because
the principal server is not waiting on the mirror server to execute
operations, but there is also an increased risk of error due to the lack
of confirmation. This database mirroring mode is better suited when the
operational performance of the database is more important to your
organization and a zero-loss RPO isn’t a strict requirement. High Safety Without Automatic Failover (Synchronous).
This operating mode does not mark a transaction as completed until it
has been written to the transaction log of both servers. Because it does
not require a witness server, the database must be manually failed over
to the mirror in the case of an outage. If your organization requires
that a mirrored database meet a zero-loss RPO target, High Safety
Without Automatic Failover is the best database mirroring choice
available. High Safety with Automatic Failover (Synchronous).
This operating mode does not mark a transaction as completed until it
has been written to the transaction log of both servers, but it does
provide automatic failover because it requires a witness server. High
Safety with Automatic Failover mode is best suited if your organization
places a high priority on realtime RTO targets for databases; the
availability of automatic failover means that the database’s downtime is
limited to the time it takes to bring the mirror online.
As previously stated, one of the
most attractive features for database mirroring is its ability to
provide automatic failover capabilities for your SharePoint databases in
the event of an outage on your principal database instances. It is also
important to understand that this important feature is only available
with one of database mirroring’s three operational modes: High Safety
with Automatic Failover. Neither High Performance nor High Safety
Without Automatic Failover
allows for the mirroring configuration to be redirected from the
principal to the mirror should an error occur on the principal. This
fact, combined with some compatibility issues discussed in the following
section, makes the operating modes without automatic failover much less
compelling and useful. If you want to create a secondary copy of a
database without automatic failover, consider using log shipping or
database backups before using database mirroring. Both log shipping and
backups require far less in terms of IT resources to implement and are
much more flexible than database mirroring with the ability to create
multiple redundant copies of a single database—something not possible
with mirroring. In general, take some time to carefully consider the
requirements and implications of your options prior to implementing
database mirroring in your environment. The choice you make directly
affects your database architecture, the performance of your system, and
your disaster recovery and HA planning.
|
