Inviting Others to a Groove Workspace
Before
you can invite someone to a Groove workspace, they need to be a Groove
user. Each person you invite to a Groove workspace needs to have a role,
either Manager, Participant, or Guest. Each role comes with a set of
permissions that allow a user to perform certain tasks. Mangers can
invite others, edit existing files, and delete files or the entire
workspace. Participants can edit and delete files. Guests can view
existing data, but not make changes. After you send an invitation to
join a workspace, check for Groove alerts in the notification area to
see if the user has accepted your invitation.
Invite Users to a Workspace
 In SharePoint Workspace 2010 (New!), double-click the Groove workspace you want to use.
 Click the Workspace tab.
 Click the Invite Members button.
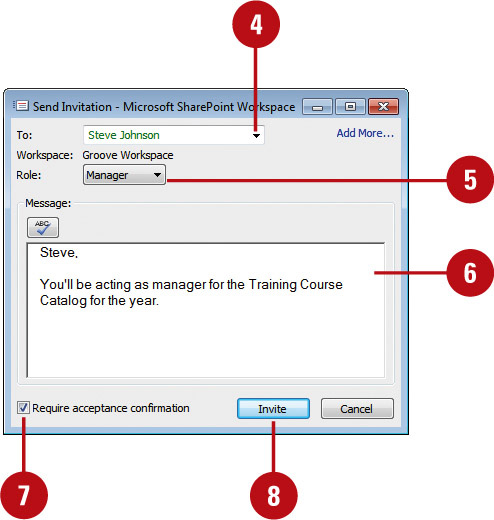
 Click the To list arrow, and then select a user.
If the user you want is not there, click Add More, click Search for User, type part of the user’s name, click Find, select the user’s name you want, click Add, and then click OK.
 Click the Role list arrow, and then click a role: Manager, Participant, or Guest.
 Enter a message.
 Select the Require acceptance confirmation check box as a security recommendation.
 Click Invite.
Monitor your Groove alerts for status and acceptance.

You can change workspace roles and permissions. Click the Workspace tab, click Properties, click the Permissions tab, adjust permissions, and then click OK.

Saving a Document to a SharePoint Server
You
can save documents to a Document Management Server, such as a Document
Library on a SharePoint site, in a similar way that you save documents
on your hard disk. After you save the document for the first time using
the Save to SharePoint command (New!),
you can click the Save button on the Quick Access Toolbar as you do for
any document to update the document on the site. If you save a file to a
library that requires you to check documents in and out, the SharePoint
site checks it out for you. However, you need to check the document in
when you’re done with it. If the site stores multiple content types, you
might be asked to specify the content type.
Save an Office Document to a SharePoint Server
 Open the Office document you want to save to a Document Management Server.
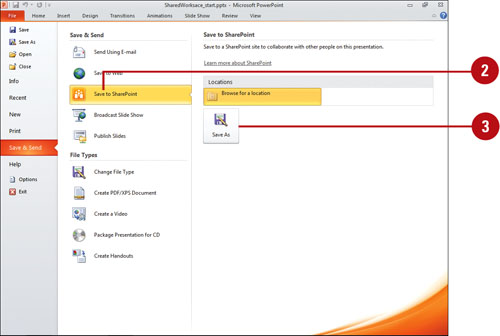
 Click the File tab, click Save & Send, and then click Save to SharePoint.
 Click the Save As button.

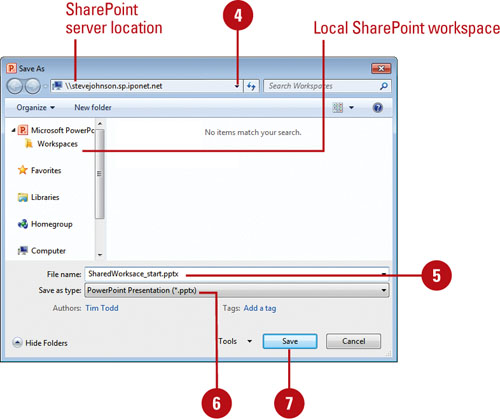
 Navigate to the network folder location on the SharePoint server where you want to save the file.
- If you set up a local version of a SharePoint workspace with Microsoft SharePoint Workspace 2010 (New!), you can click the Office program name in the left pane, and then click Workspaces to access it.
 Type a document file name.
 If necessary, click the Save as type list arrow, and then click the file format you want.
 Click Save.

Open an Office Document from a SharePoint Server
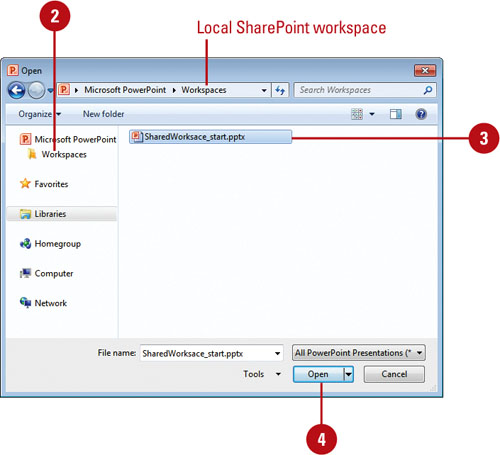
 Click the File tab, and then click Open.
 Navigate to the network folder location on the SharePoint server where you want to save the file.
- If you set up a local version of a SharePoint workspace with Microsoft SharePoint Workspace 2010 (New!), you can click the Office program name in the left pane, and then click Workspaces to access it.
 Select the document.
 Click Open.

You can access SharePoint resources.
After you save or publish an Office document to a SharePoint Server
site, you can click the File tab, click Save & Send, and then click
Save To SharePoint to access other server related commands.