4. Install an Operating System
The whole point of
virtual hard disks, virtual machines, and Hyper-V is to let more than
one operating system run on a single set of hardware. When you build the
virtual machine and its associated hard disk, the operating system is
not included. You will still need to acquire and install the operating
system of your choice. Hyper-V is very versatile, allowing you to run
Windows operating systems and even SUSE Linux if you so desire. The
process of installing an operating system on a virtual machine is very
much the same as installing to physical hardware, with a few exceptions.
You will recall from our
earlier discussion that a VHD file is an allocation of disk space used
to install operating systems and applications and to store data. When
you install an operating system, you are actually installing to the VHD.
4.1. Install from DVD
One of the most common
methods used to install an operating system is to install it directly
from the DVD/CD media. Each virtual machine has a setting for the DVD/CD
drive. This setting can be configured to capture the physical DVD
drive:
Set a controller to capture the DVD/CD.
Set the boot order to ensure that the DVD/CD is first.
Insert the DVD/CD into the physical DVD/CD drive.
Start the virtual machine.
When prompted, hit a key to boot from DVD/CD.
At this point, the install will proceed as normal.
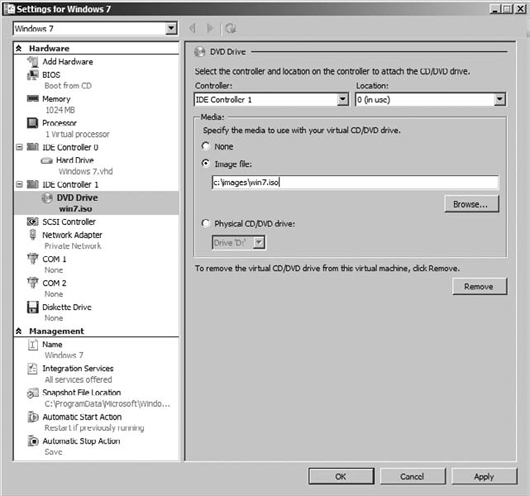
4.2. Install from ISO
DVD/CD is a great
methodology for install, but it is certainly not the only option. In
fact, many in the IT world have picked up a subscription to TechNet or
MSDN that will allow them to download an ISO image of a DVD that can be
used to burn a physical DVD. Or, in this case, it can actually be used
to install the operating system directly to the virtual machine. The
process is similar to a traditional install with one simple setting
change:
Set a controller to capture the DVD/CD.
In the Media section, select the Image File option.
Browse to the location of the ISO file, as shown in Figure 17.
You can get the same effect by
using the connection window for the virtual machine. You can use the
Media menu, select DVD Drive, and use the Insert Disk option.
When you install an
operating system to a virtual machine, remember that all the files are
being installed to the virtual hard disk. The operating system is no
different from if it were installed to the local hardware. There are not
different versions of operating systems for the virtual world. They are
the same installs and have the same operational capacity as any other
operating system install.
5. Connect to a Virtual Machine
Once you have a virtual
machine created and the operating system is installed and functional,
there is one remaining obstacle. The operating system is running in an
environment that is essentially invisible to the user. There is no
default video output in Hyper-V. You will need to connect an application
to the video output of the virtual machine in order to interact with
the VM and to see what's going on. The application that you will use to
connect to the virtual machine was installed automatically when you
installed Hyper-V. The application is called the Virtual Machine
Connection tool. Using this tool, you can connect to the virtual
machine, control the state of the virtual machine, take snapshots of the
virtual machine, and modify some of the settings of the virtual
machine.
When you connect to a virtual
machine using the Virtual Machine Connection tool, it will
automatically use the credentials that you used to log in to the
physical machine to establish the connection to the virtual machine. If
you want to use other credentials, you can configure those in Hyper-V.
By default Administrator permissions are the minimum required
permissions necessary to connect to the console. Please note that this
does not mean
that the Virtual Machine Connection tool will log you on to the virtual
machine. The credentials supplied are simply used to connect to the
virtual machine. You will still need to supply the appropriate
credentials to log on to the virtual machine.
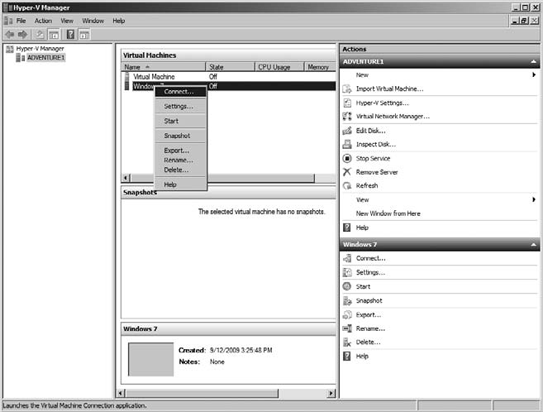
To connect to a virtual
machine, you can open the Hyper-V Manager and locate the desired virtual
machine. Double-click the virtual machine, and the Virtual Machine
Connection tool will start. You can also right-click the selected
virtual machine and choose Connect, as shown in Figure 18.
6. Use Snapshots
The coolest thing
about virtual machines is that they are virtual machines. We know you
are thinking "Duh!" So, what's the big deal? Virtual machines are really
compact. The operating system is located in a VHD file and the settings
that go with it. This makes it really easy to take a point-in-time
picture of the state of the operating system and the settings associated
with the virtual machine. This process is called taking a snapshot.
The value in this is that you can take a snapshot, work away making
changes and updates to the virtual machine, and then (and this really
rocks) apply the snapshot to take the virtual machine right back to the
state it was in when you took the snapshot.
Virtual machine
snapshots are file-based snapshots of the state, disk data, and
configuration of the virtual machine. The snapshot creates a file called
an AVHD file. You can take multiple snapshots of a single virtual
machine, and you can even take a snapshot while the virtual machine is
up and running. You can revert or apply snapshots to get to the virtual
machine configuration you desire.
You can create snapshots
using the Hyper-V Manager or the Virtual Machine Connection tool.
Applying snapshots, listing available snapshots, and editing snapshots
are tasks available through the Hyper-V Manager only.
Snapshots can help you
create specific environments such as those needed in validation and
testing. It is easy to reproduce the same environment and settings over
and over again. Snapshots are perfect for building a staging server to
test hotfixes, patches, and updates before deploying them to your
network.
It is important to
consider that the things that we love about snapshots can also be the
thing that we hate about snapshots. When you take a snapshot, all the
data and settings are in the snapshot. Anything you create, delete,
save, or install will be reverted to the snapshot state when you revert
or apply a snapshot. This means if you create a bunch of documents and
then revert to a previous snapshot, all the data created since the
snapshot was taken will be gone. If you know this ahead of time, it is
not a big deal because you can simply take another snapshot to maintain
the current data and state. If you didn't know this ahead of time, it
could be really painful.
To make a snapshot of a virtual machine, follow these steps:
Open the Hyper-V Manager.
Select the virtual machine you want to snapshot.
Click Snapshot in the Actions pane, as shown in Figure 19.
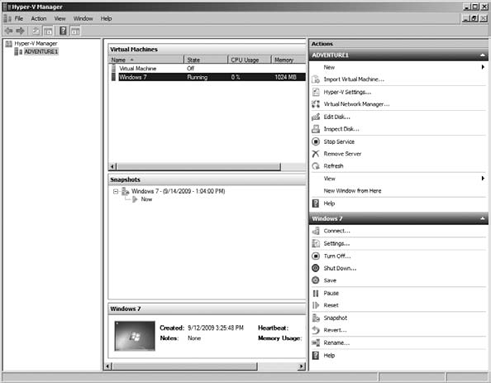
The snapshots will show up in the
Snapshots pane in the center of the screen. It is important to note
here that when you take a snapshot of a running virtual machine, the
performance of the virtual machine will be impacted as the snapshot file
is made. Snapshots are stored in a hierarchy. As you create additional
snapshots, you will see them show up in the Snapshots pane of the
Hyper-V Manager.
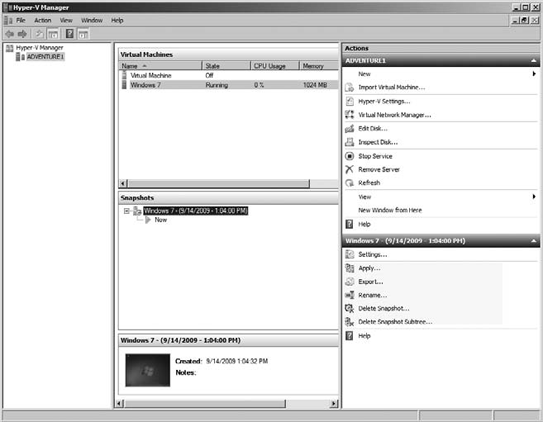
After a snapshot is taken, it is
labeled with the virtual machine name and a date and timestamp. This is
an easy logical way to keep track of snapshots. If for some reason you
want to change the name of a snapshot, you can do so using the Rename
option in the Actions pane while the snapshot is selected.
To apply a snapshot, you
will also use the Actions pane with the snapshot selected. This will
allow you to apply the snapshot directly to the virtual machine.
It is possible to export the snapshot for use with a virtual machine using the Export option in the Actions pane.
Finally, it is possible to
delete a snapshot, or a snapshot subtree, from the Actions pane with the
snapshot selected. When you delete a snapshot, be aware that although
the snapshot is no longer listed in the snapshot tree structure, the
AVHD file is not deleted until the virtual machine is shut down. When a
snapshot is deleted, the data and settings that were stored in the
snapshot are merged, and this process can be very time-consuming.
These options, shown in Figure 20, provide significant flexibility in working with snapshots.
One final note
concerning snapshots is that although snapshots can be used to make a
point-in-time picture of a running virtual machine, they do not use the
Volume Shadow Copy Service (VSS) and therefore are not a substitute for a
permanent backup system. Snapshots can make a great temporary backup.
However, you should still configure a backup structure to protect your
virtual machines.
