The ability to look at the events occurring on your
server has always provided useful information to help you find the
source and resolution for any issues your server may encounter. The
Event Viewer is one of the more powerful troubleshooting utilities you
can use on your server. More important, this tool has been built in to
Windows-based operating systems for years and years. This tool keeps
getting more robust and easier to use with each new version of Windows.
In the following sections, you will take a brief look at the Event
Viewer and how this tool can help manage your environment.
Work with the Event Viewer
The Event Viewer provides
you with a wonderful utility to be able to view and track your
system-wide events on your server. You can view events from all aspects
of your server. You can view the traditional Windows logs (such as
Application, Security, Setup, and System). Also, since Windows Server
2008, the Event Viewer provides a method to view events for individual
applications and services.
Before you start working
with log files in the Event Viewer, you need to know a couple of things.
Every log entry and file is stored in an XML format, which will help
get the log files small and streamlined. However, log files can take up
space on your server, and you need to know how to control how big the
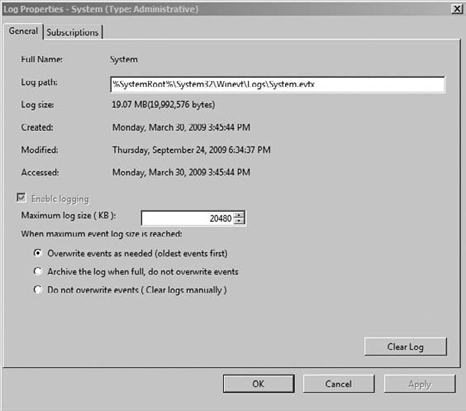
log files can become. By default, each log file will take up to 20MB in
space. You can also control what happens when the log file reaches the
space limit; you have three choices:
Overwrite Events As Needed This means the oldest events will be overwritten first.
Archive The Log When Full, Do Not Overwrite Events This will take your full log, save it to disk, and clear the log.
Do Not Overwrite Events Clear The Log Manually This will force you to clear the log when it becomes full. Before you can see any more events, you will need to clear the log.
You can change the log
retention policy by going into the properties of the log file (by
right-clicking the log file and selecting Properties) and setting the
option for retention. Figure 1 shows a picture of the log properties.
If you choose to clear the log
manually, you will want to save the log file. Additionally, saving a
log file will also provide you with a way to share data with another
administrator or support professional who may be assisting you with your
problem. To save the events to a log file, simply right-click the log
file and select Save All Events As. This will allow you to save your
event log to a file and archive it to a file share or other archival
method.
Also, when you look at the many different events located in the log file, they will have one of the following four levels:
Critical Critical events represent a failure of a service and normally result in the service being shut down or crashing.
Error Events result from some application error or other fatal software issue on your server.
Warning This will indicate potential events that can occur on your server.
Information This includes general events about tasks, normally along the lines of a service turning on successfully or a process starting.
In addition to the four
levels, in your Security log, you have two additional event types
specific to the security log file: audit success and audit failure.
These allow you to see what tasks were audited on your server. For
example, the Security log could show you when a person is successful in
logging on to your server or accessing an audited file.
To work with the Event Viewer, you need to load the tool and go to the log to review the events for a particular log:
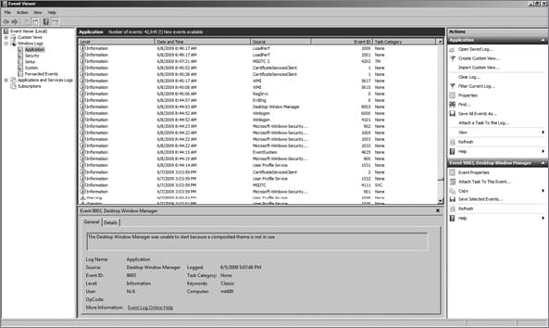
Open the Event Viewer by selecting Start => Administrative Tools and clicking Event Viewer.
Click the log you want to view, and you will see events in the pane to the right of the tree; your screen will look similar to Figure 2.
To view an event, double-click the event, or right-click and select Properties; you will see a screen similar to Figure 3.
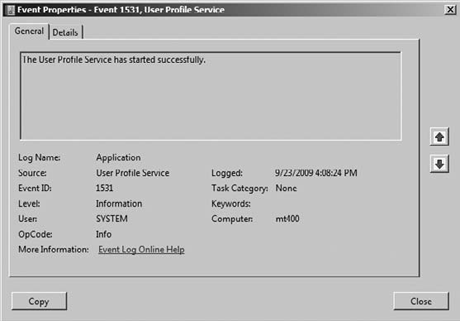
When you view the
properties of the event, you can view all the details of the event, the
source of the event, the event ID, the classification, and a variety of
other information. Looking at the event properties arms you with the
information needed to troubleshoot the problem, either by researching
help or by performing a search on the Internet.
1. Filter Events and Creating Custom Views
One of the aspects of the Event
Viewer you may have noticed is that there is a lot of server noise. In
other words, there are thousands of events, so how do you find the one
event or group of events that will be of the most use to you when you
are trying to solve a problem? In the Event Viewer there are two ways to
do this. You can either filter an existing log or create a custom view
for the events.
You can filter on a variety
of criteria, date, level, event ID, source, computer, user, keywords,
and tasks. This will allow you to reduce the amount of event noise and
quickly get to the events you are interested in.
Both of these filter
mechanisms utilize very similar steps and procedures. The difference is
when you filter a log, you are filtering a specific log. With custom
views, you can create a custom filter that will span multiple log files
on your server. To filter an event log on your server, perform the
following:
In the Event Viewer, select the log you want to filter.
Click
Filter Current Log either in the action pane on the right side of the
console or from the menu if you right-click the log. You will see a
screen similar to Figure 4.
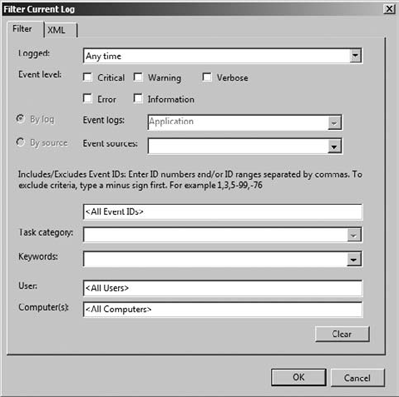
Select the criteria you want to filter, and when you are finished, click OK.
Once you create a filter for a
log file, the filter will stay on until you turn it off. To turn off
the filter on a log file, click Clear Filter in the right Actions pane
of the console, or right-click the log you want to clear the filter.
Creating a custom view follows a similar process to filtering a file:
In
the Event Viewer, click Create Custom View, and you will see a screen
similar to when you filtered a log file. The only difference is that a
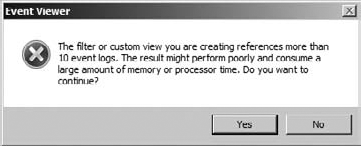
custom view provides you with the capability to span multiple logs. If
you select all the log files, you may see an error message informing you
that the view could take some time, memory, and processor time to
create, as shown in Figure 5.
After you select your options, click OK.
Name your view, choose a location to store the view in your management tree, and click OK.
If
you want to use your view, click the view in your management tree. By
default, the views are stored under the management tree in Custom Views.
2. Save Event Logs
One other aspect of working
with logs is saving them for future performance, analysis, and archival.
You can save individual logs or even custom views you have created to
files. This allows you to open logs from your own server as well as have
another administrator send logs from another server for you to review.
To save a log file or a custom view, you just need to right-click the
log or the view.
In the Event Viewer, right-click your custom view or the log you want to save.
Select
Save All Events As ... when you select a Windows log to save or select
Save All Events in Custom View As ... when you select one of your custom
views.
Type in a name, and select a location for the file. After you have named the file and selected a location, click Save.
You
will see a dialog box asking you to save display information for proper
viewing. This is important if you need log files to be viewed in
alternate languages from your own. After you have made your selection,
click OK.
You can also open saved log
files or custom views by right-clicking the custom view or log files in
the tree and selecting Open Saved Log.
3. Subscribe to Events
The Event Viewer also
provides you with the ability to subscribe to events on your server or
other servers. Subscribing to events allows you to see particular events
as they occur. By subscribing to events, you can also view events from
multiple servers in one view, since you can have events sent to one
central location. Subscribing to events provides you with a similar
filter mechanism as you used to create custom views.
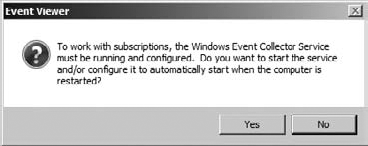
To create a subscription on
your server, you need to have the Windows Event Collector Service
running on your server. The Event Viewer will help turn on this service
for you. The first time you click Subscriptions in the Event Viewer
management tree, you may see a screen similar to Figure 6. You will need to click Yes to take advantage of Event Viewer subscriptions.
In the Event Viewer, click Subscriptions.
If prompted to turn on the Windows Event Collector Service, click Yes.
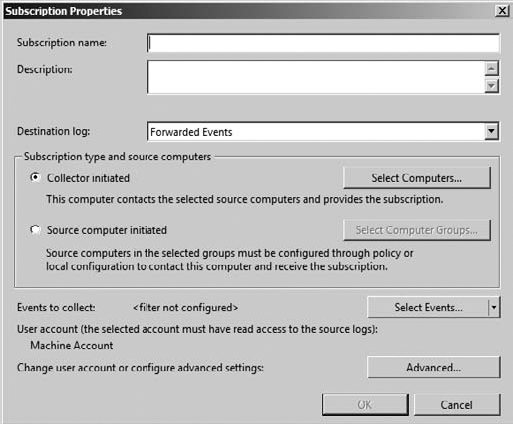
Click Create Subscription in the right Actions pane; you can also right-click Subscriptions. You will see a screen similar to Figure 7.
After you set the computers and filter criteria, click OK; your subscription will be complete.
4. Attach a Task to an Event
One of the more
proactive capabilities you can do in the Event Viewer is to attach a
task to a particular log or event. Normally you attach tasks to specific
events. When you attach a task to an event, you can perform one of the
three following actions: start a program, send an email, or display a
message. This allows you to be notified if a certain event occurs or run
a program that will fix the issue. You can also assign a task to a
custom view you may have created.
In the Event Viewer, click the event or log you want to create a task for.
Give your task a name and description, and when you are done, click Next.
Review the event you have selected, and click Next.
Select your option; the default is to run a program. Then click Next.
Depending on your action you have chosen, you may need to find the program or set up the email or message.
When you are done, click Next.
Review
the summary, and click Finish. You will see a screen informing you that
the task was created in Task Scheduler, as shown in Figure 8. Click OK to clear the message.
