With Microsoft Dynamics CRM for Outlook, you can
access CRM records and perform key actions directly within Outlook. Many
users prefer to access their CRM data by using this technique instead
of using the web client because they are already working in Outlook to
manage email and perform other tasks. The Outlook client user interface is a little different from the web client, so here is a brief overview of the various components.
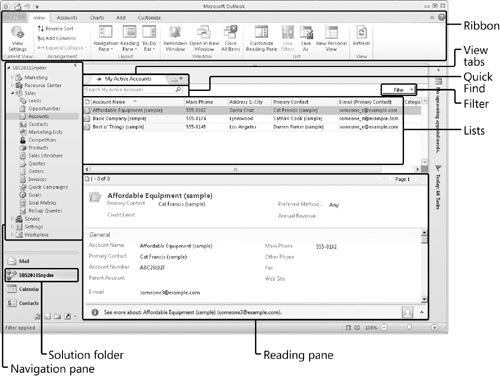
Solution folder
You will see this button in Outlook after you install the Outlook
client. You click it to access additional Microsoft Dynamics CRM
functionality. The name that appears in this button will match the name
of the organization with which your Microsoft Dynamics CRM system is
associated. Ribbon
Just as in the web client, the ribbon displays different buttons and
features depending on the context. For example, if you’re viewing a list
of accounts, the ribbon displays actions that you can take with account
records. If you’re viewing a list of contacts, the ribbon will display a
different set of actions, those that are available for contact records. View tabs
Use this area to select the data view you want to work with. In
addition, you can use the view tabs to pin views that you want to
quickly access in the future. Lists
Similar to the grid in the web client, this area displays a list of
records. Microsoft Dynamics CRM for Outlook filters the records
displayed in the list depending on the view selected on the view tab. Quick Find
Just as in the web client, you can enter a search term in the Quick
Find field to search for specific records. However, unlike the web
client version of Quick Find, the Outlook client Quick Find only
searches for records in the currently displayed view. The web client Quick Find searches for records across the entire database. Filter You can use this to filter the records in the displayed view. Reading pane The reading
pane in the Outlook client behaves like the reading pane you use when
working with Outlook contacts, email, and so on. Selecting a record in
the list updates the reading pane to show additional information about
that record. Note that the reading pane is for display only; you cannot
edit records within the reading pane.
In this exercise, you will
familiarize yourself with Microsoft Dynamics CRM for Outlook by
displaying a new view and navigating through records.
Note:
SET UP
Open Outlook with Microsoft Dynamics CRM for Outlook installed before
beginning this exercise. You need the Sonoma Partners account record you
created in this article. If you cannot locate the Sonoma Partners record in your system, select a different account record for this exercise.
In
the Outlook navigation pane, click the solution folder button that
displays the name of your Microsoft Dynamics CRM organization. In the navigation pane, click Sales and then click Accounts. A list of Microsoft Dynamics CRM accounts is displayed. Click the top record in the list. The reading pane displays information about that account. On
the keyboard, press the Down arrow. Microsoft Dynamics CRM highlights
the next account record in the list, and the record displayed in the
reading pane updates accordingly. In the Quick Find area, type Sonoma Partners, and then press Enter. This should display the Sonoma Partners sample record you created in this article. If you didn’t create that record, you can perform this exercise with any account in this list. Double-click the Sonoma Partners
record in the list. Microsoft Dynamics CRM launches the account record
in the web client. Within this window, you can make any record edits
necessary.
 On the ribbon, click the Save and Close button.
 Next you will display a new account view within Microsoft Dynamics CRM for Outlook.
 In the view tabs area, click the new tab icon located to the right of the open tab. A list of available system and personal views appears.
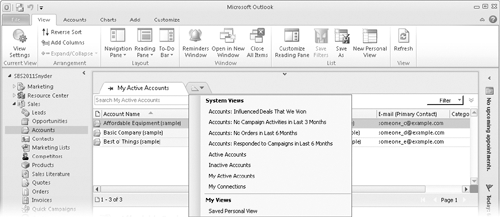
Click Active Accounts. Microsoft Dynamics CRM adds a second tab and displays a list of active accounts within Microsoft Dynamics CRM for Outlook.
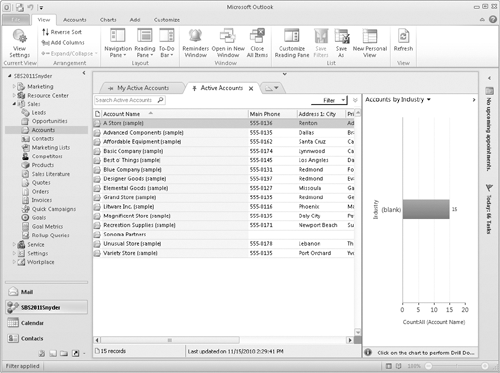
 Now click the pin icon located on the left side of the Active Accounts tab. When you do so, Microsoft Dynamics CRM for Outlook keeps this tab open so that you can quickly access it in the future.
Tip:
If you want to remove a tab,
simply click the X located on the right side of the tab. Microsoft
Dynamics CRM will remove the tab.
 Microsoft Dynamics CRM for Outlook also lets you personalize the appearance of the user interface. Let’s assume that you want to turn off the reading pane and replace it with a chart. Click the Reading Pane button, and select Off
on the submenu that appears. Microsoft Dynamics CRM for Outlook removes
the reading pane for the current entity you’re working with (accounts).
Microsoft Dynamics CRM for Outlook also lets you personalize the appearance of the user interface. Let’s assume that you want to turn off the reading pane and replace it with a chart. Click the Reading Pane button, and select Off
on the submenu that appears. Microsoft Dynamics CRM for Outlook removes
the reading pane for the current entity you’re working with (accounts).
 On the ribbon, click the Charts tab, click the Chart Pane button, and select Right from the submenu that appears.
 Microsoft
Dynamics CRM displays a chart to the right of the list. Within this
chart area, you can choose to display different charts. You can select
the chart you want to display by clicking the chart name at the top of
the chart pane.
Finally,
let’s assume that you want to log an activity for one of the accounts
in the list. As in the web client, you could use the Add tab on the
ribbon to access the buttons you need. However, Microsoft Dynamics CRM
for Outlook also provides a menu that allows you to log activities directly from the list. To access this menu, right-click any account in the list and click Create.
Microsoft Dynamics CRM for Outlook opens a list of actions you can take
against the record, allowing you to create activities, run a mail
merge, add a note, and more.
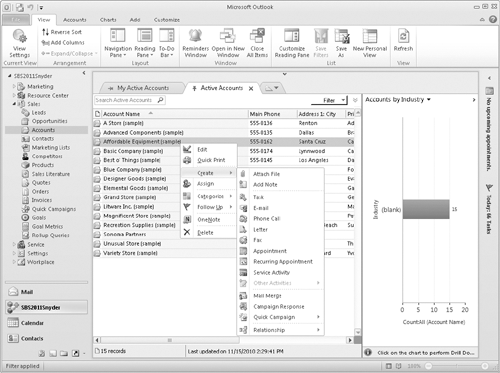
Tip:
In addition to creating Microsoft Dynamics CRM records from this menu, you can also assign categories and set follow-ups.
|
