As with the previous walkthrough of how to back up a
database in SQL Server 2008, the following steps give you a general idea
of what is involved in restoring a backup of an existing database
through the SQL Server Management Studio. This is not the only way you
can restore a database in SQL Server and is not necessarily going to be
the best approach for you to take with your SharePoint environment and
its specific needs. These steps are intended to get you thinking about
the needs and requirements for your environment and the information you
need to have on hand before you execute a SharePoint database restore
through SQL Server.
Caution
If the database being restored is not currently hosted in the target database instance, the user must have CREATE DATABASE
permissions in the instance to restore the database. If the database
already exists in the target database instance, the user must be
assigned the sysadmin and dbcreator server roles in the instance or be the owner (also known as the dbo)
of the database. If a password has been assigned to the backup media
set being used in the restore operation, that value must be provided for
SQL Server to execute the restore.
Open
SQL Server Management Studio and connect to the SQL Server database
instance to which you want to restore the database backup.
When
SQL Server Management Studio connects to the target database instance
and opens, the contents of the instance are displayed in the tree view
of the Object Explorer pane
(which by default opens on the left side of the window). Expand the
Databases entry in the Object Explorer, and find the name of the
database targeted to be overwritten with a previously created backup.
Right-click
on the name of the database, select the Tasks option when the menu
opens, select the Restore option, and then click on the Database option
to open the Restore Database dialog box. See Figure 1 for an example.

Tip
This action automatically
takes the target database offline and prevents other applications or
processes from accessing it. Whenever possible, attempt to undertake a
restore operation during a period of advertised or regular downtime for
your SharePoint environment.
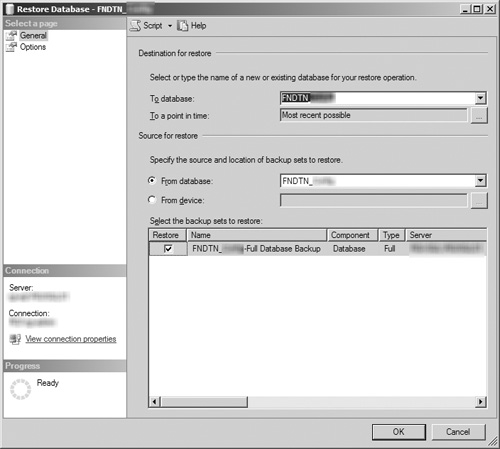
The
Restore Database dialog box opens, allowing you to customize the
restore operation to meet your needs. On the General page (see Figure 2),
you can configure the database to be restored, determine the source of
the backup set used in the restore operation, and select the specific
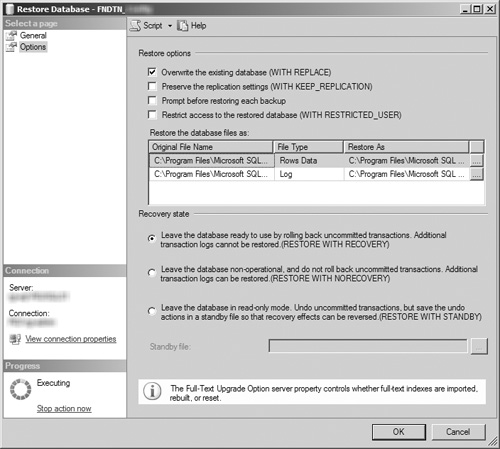
backup set used to restore the database. The Options page (see Figure 3)
allows you to configure settings for overwriting the existing database,
preserve replication settings, prompt before each restore activity,
restrict access
to the database once it is restored, configure where the database’s
files are restored on the server’s file system, and determine the type
of recovery state the database is placed in when the restore operation
is completed. After you have configured the restore according to your
requirements, click the OK button to start the restore operation.
Note
As with the Back Up Database
dialog box, the Script drop-down menu at the top of the Restore Database
dialog box allows you to create a T-SQL script that you can execute to
restore your database without the GUI interface described in these
steps.
As
the restore operation executes, the Progress box in the lower-left
corner of the dialog box displays a percentage indicating how much of it
has been completed. There is also a link displayed below the progress
indicator allowing you to cancel the operation.
Once the restore is finished, a window stating The restore of database <your database’s name> completed successfully is displayed (see Figure 4). Click the OK button to return to the SQL Server Management Studio main window.
Similar
to database backups through SQL Server Management Studio, several
configuration options are available in the Restore Database dialog box.
You can use these options to specify the backup set that is used for the
restore, where the backup is restored to, the state the database is
placed in when the restore is finished, and much more. Again, discussing
these options with your database administrator is highly recommended so
that you can determine the best configuration to use with your
environment.
Restore Destination Options
The first section of the Restore
Database window’s General tab, titled Destination for Restore, not only
allows you to select where the backup is restored within the target
database instance, but allows you choose a specific point in time where
you want the database restored. In the To Database field, you can select
a database from the drop-down menu to be overwritten by the backup, or
you can type the name of an existing or new database as the restore
target. By default, the database displayed in the field is the database
you right-clicked on to open the Restore Database window. The drop-down
menu is populated with all the databases hosted by the database
instance.
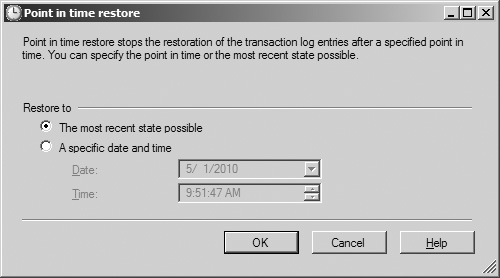
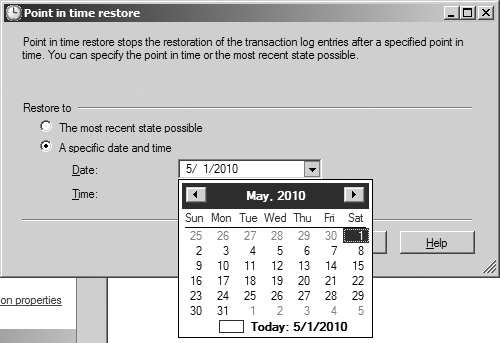
The next field, To a Point in Time, is grayed out (disabled) by default and contains the text Most recent possible,
indicating that the database will be restored to its condition when the
backup set was created. To change this setting, click the ellipses
(...) button to the right of the disabled text field. Doing so opens the
Point in Time Restore dialog box (see Figure 5).
Note
The Point in Time Restore option is not available for databases configured to the Simple recovery model.
In this window, the option
The Most Recent State Possible is initially selected, and the Date and
Time fields are disabled. To select a specific point in time for the
database to be restored to, select the A Specific Date and Time option
button, which enables the Date and Time fields. Clicking the Date
drop-down menu displays a calendar control (see Figure 6),
where you can navigate to the specific date desired. You can update the
Time field by either typing the desired value for each digit of the
time or using the Up and Down arrows to the right of the text field to
select the correct numerical value.
Note
Selecting
a date more recent than the date the target backup set was created, or a
date that lies in the future, results in the database being restored to
the most recent possible state.
Restore Source Options
In the Source for Restore section of the Restore Database window’s General tab (see Figure 7.10),
you can specify which backup set is used to restore your database. By
default, the From Database option button is selected, and the drop-down
menu next to it is populated with the name of the database you
right-clicked to open the Restore Database window. This menu is
populated with the databases hosted in the instance that have previously
had backup sets created for them; if a database has not been backed up,
it does not appear in this list. If the target database has not been
backed up with SQL Server before, this field is blank. Selecting a
different database in the From Database drop-down menu results in the
Select the Backup Sets to Restore list box being updated to show the
backup sets associated with the selected database. If the Select the
Backup Sets to Restore list box displays more than one backup set, you
can select the desired backup set by clicking its check box.
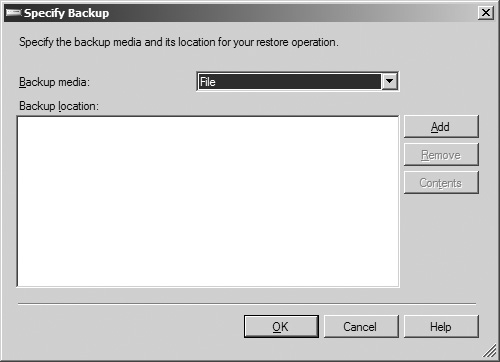
Selecting the From Device
option button disables the From Database drop-down menu and the Select
the Backup Sets to Restore list box. To select a device as the source of
the backup, click the ellipses (...) button to the right of the
disabled From Device text field. This opens the Specify Backup dialog
box (see Figure 7),
where you can select a file, tape, or device to be used as a backup
source for the restore operation. You select your type of device from
the Backup Media drop-down menu (File, Tape, or Backup Device, depending
on the types of devices that are attached
to your system) and then click the Add button to add an instance of the
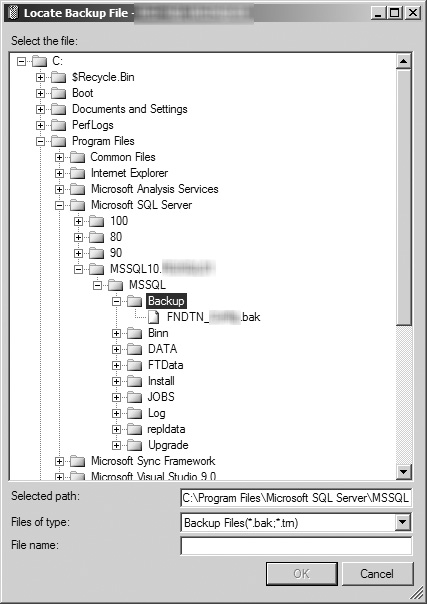
selected device type. A dialog box opens, allowing you to select the
desired backup from a list. See Figure 8
for an example of the Locate Backup File window. After selecting a
backup, click the OK button to close the window and return to the
Specify Backup window with your selected backup displayed in the Backup
Location field. You can remove the backup selection by clicking the
Remove button, and you can view the items in the backup by clicking the
Contents button. Clicking the OK button saves your configuration and
returns you to the Restore Backup window, where your selected backup is
now shown in the Select the Backup Sets to Restore list box.
Note
Keep in mind that you must
store the backup files to be used in the restore operation in a location
you can access from the server hosting the target database instance. If
you store the files on an unconnected device, such as your local
workstation, you must copy the files to the server, map a connection on
the host server to your local workstation, or place the files in a
server-accessible network location.
Restore Options
The first section on the Options
tab of the Restore Backup window, Restore Options, contains four check
boxes that you can select to configure different aspects of the
requested restore operation. By default, all four check boxes are
unchecked.
Overwrite the Existing Database.
When you select this option, the restore operation completely
overwrites an existing database and its associated files if its name
matches the database listed in the To Database field on the General tab.
Preserve the Replication Settings.
This option allows you to keep the original replication settings of the
database in the backup set when restoring it to a server different from
the server the database was backed up on. If the new server hosting the
database has different replication settings than the original host,
selecting this option prevents the server from overwriting the restored
database with its local settings. It can be used only when the Leave the
Database Ready to Use by Rolling Back the Uncommitted Transactions
option is selected in the Recovery State section.
Note
Microsoft does not support the use of SQL Server 2008’s replication functionality with SharePoint.
Prompt Before Restoring Each Backup.
This option prompts the user for confirmation prior to restoring each
backup set requested by the restore operation, which can be helpful when
you need to pause the restore operation for activities such as swapping
backup tapes.
Restrict Access to the Restored Database. Selecting
this option limits access to the database when the restore operation
has completed to the following SQL Server security roles:db_owner, dbcreator, or sysadmin.
Below the four check boxes
is the Restore the Database Files As list box. This list box displays
each of the database files associated with the database in the backup
set, showing the full path and name of the file as it existed when the
backup was created and the full path and name that it has when the
restore operation is completed. You can modify the destination path and
name of any file in the list box by clicking the ellipses (...) button
to the right of the Restore As column for the file you want to change.
This action opens a window titled Locate Database Files, which is
similar in appearance to Figure 7.16’s
Locate Backup File window. Select the desired destination location in
the window’s tree directory, and click the OK button to return to the
Restore Database window.
Recovery State
The Recovery State section
of the Options tab contains three radio buttons that determine what
condition the database is in once the restore operation is completed.
Leave the Database Ready to Use by Rolling Back the Uncommitted Transactions.
This option is selected by default and allows for the restored database
to be immediately used once the restore operation has completed. This
option is also known as Restore with Recovery.
Leave the Database Non-Operational and Do Not Roll Back Uncommitted Transactions.
This option keeps the database in a restoring state after the requested
restore operation has completed, which is useful when restoring a
database with multiple transaction logs or when restoring a sequence of
backups to a database (such as a full backup followed by a differential
backup). You cannot use the database until a subsequent restore
operation using the first option in this list has been completed. This
option is also known as Restore with No Recovery.
Leave the Database in Read-Only Mode.
This option allows a database to remain in a restoring state but makes
read-only access to the database available when the requested restore
operation is completed. This option creates a standby file on the local
file system of the server hosting the database instance to allow for the
actions of the restore operation to be undone. This option is also
known as Restore with Standby.
Below the three option
buttons is the Standby File text field, which is enabled only if the
Leave the Database in Read-Only Mode option button is selected. To
change the location of the standby file, modify the text in the text
field or click the ellipses (...) button to the right of the Standby
File text field. Doing so opens a window titled Locate Rollback Undo
File, similar in appearance to Figure 7.16’s Locate Backup File window. Select the desired destination location for the standby file in the window’s tree directory, and click the OK button to return to the Restore Database window.
Note
The standby file is simply a
copy of the existing database. If the file group for the target database
is 20GB, for instance, the standby file requires an additional 20GB of
available disk space. If there is not enough storage space for the
standby file in the file system at the location specified, the restore
operation fails.
