Unfortunately, restoring a SharePoint database is not
as simple as executing the previous steps to restore your environment.
Because SharePoint is constantly accessing, reading from, and updating
its databases, you must take certain precautions to avoid inconsistent
or corrupted data. The following sections detail the steps you must
take, depending on the restore situation, as well as some other
considerations when planning your restore strategy for your SharePoint
databases.
Overwriting SharePoint with a Restore of a SQL Backup
Although not many
additional steps are required to restore a SharePoint database in SQL
Server for an existing and operational SharePoint farm, the following
steps are important to ensure the integrity and stability of the data in
your system:
One
important step to take before making changes to your environment is to
lock down any affected SharePoint site collections so that users do not
receive inconsistent or incorrect data during the restore, or lock up
resources that may need to be accessed or written by the process.
Although it may seem attractive to set site collections within a
targeted database to Read-Only or No Access, this can be time-consuming
through the Central Administration site, especially if the database has
several site collections. It is going to be far simpler to use a
PowerShell script leveraging the Set-SPSite cmdlet and its LockState
input parameter or to completely remove the content database from the
farm via the Manage Content Database page in the Central Administration
site. Regardless of how you do it, initially you should make sure that
users cannot tie up items with affected site collections to ensure the
best experience for you and your users during the process. Microsoft
recommends that if the SharePoint 2010 Timer service on the SharePoint
server hosting your farm’s Central Administration site is running, you
should stop it via the Services management console snap-in on the server
before proceeding with the database restore. Don’t restart the Timer
service until the database has been fully restored. This is a good
practice, but it may affect what your end users experience if they are
using your farm while the Timer service is stopped. Consider
communicating with your users regarding a potential outage, and
understand how this action in general might impact any service-level
agreements (SLAs) that you have in place. Open
SQL Server Management Studio and the Restore Database window for the
target SharePoint database to be restored in SQL Server. When
the Restore Database window opens, confirm or modify the destination
and source data, and then select the Options tab to open it. Unless
you have specific requirements or needs for your SharePoint
environment, the Overwrite the Existing Database check box is the only
Restore option that you should select. In
the Recovery State section, select the Restore with Recovery radio
button if you are including all the database’s transaction logs in the
current restore operation. If you need to restore additional transaction
logs after this operation, select the Restore with No Recovery option
button. You should not use the Restore with Standby option when
restoring a SharePoint database. Click the OK button to initiate the restore operation for this database. Once
you’ve restored the database, review its settings to ensure that the
farm database access service account is assigned as the Database Owner.
You can check this in SQL Management Studio by right-clicking on the
database and choosing Properties. In the General tab, under the Database
section, see the Owner property. If it is not assigned, use the sp_changedbowner ‘<domain/username>’ Transact-SQL command to update the database owner (http://msdn.microsoft.com/en-us/library/ms178630.aspx). Making the farm database service account be the database owner assigns this account the DB Owner security role. If there are additional databases in your SharePoint environment that need to be restored, repeat steps 1 through 8 as needed. Once
all databases have been restored properly, unlock their site
collections or reattach the databases to the farm to re-enable end user
access for those items. Finally, restart the SharePoint 2010 Timer service on your farm’s Central Administration site host server.
Restoring a SQL Backup to a New SharePoint Environment
One of the great things
about SharePoint’s reliance on its databases is that it makes the data
in your SharePoint farm much more manageable and portable. In steps that
are described next, you can move or copy a content database full of
sites from one SharePoint farm to another without losing content or
configurations within a site. This is especially useful if you want to
move a site collection from a quality assurance (QA) environment to a
production environment, or you want to create a copy of a given site
collection in a new farm without having to re-create all of its contents
from scratch.
You need to consider some
prerequisites prior to executing a SQL Server restore of a SharePoint
content database backup in a new environment:
The new SharePoint farm must already be built.
The restore steps in this section assume that a new SharePoint farm has
already been installed, configured, and is ready to receive the
restored content database. Patch levels and versions must be equivalent (or greater).
The new SharePoint farm must be running the same version and patch
level or a more recent version of SharePoint as the farm that the
database backup was created in. If the restore farm is at a more recent
version of SharePoint, the platform updates the database to the correct
database schema for the farm’s version automatically. All installed custom code and files in the original farm must be present in the new farm.
The new SharePoint farm must have all the same solutions, features,
site definitions, workflows, and any other custom code or files
installed and configured as the original farm. Only restore content databases.
This process cannot be used to restore a configuration database to a
new farm; content databases for one or more site collections can be
restored into a new farm using this process, as well as databases
associated with Service Applications as long as the Service Application
for the database has already been restored or created in the new farm. Use SharePoint 2010’s Unattached Content
Database option if you are restoring a database to its original farm and
not overwriting the existing database.
Accessing a restored content database from its original farm as an
unattached content database is the only way to avoid data integrity
issues and globally unique identifier (GUID) conflicts throughout your
farm without overwriting the database, even if you give it a new name in
SQL Server.
To restore a SQL Server database backup of a SharePoint content database to a new farm, execute the following steps:
Restore
the database in the SQL Server database instance for the new farm. If
the database does not previously exist in the instance, you can create
an empty database in the instance and overwrite it with the backup or
type the name of the new content database into the To Database field in
the Restore Database window. Don’t overwrite existing content databases
for the new farm. After you’ve restored the database, review its settings to ensure that
the target’s farm database access service account is assigned as the
database owner. You can check this in SQL Management Studio by
right-clicking on the database and choosing Properties. In the General
tab, under the Database section, see the Owner property. If it is not
assigned, use the sp_changedbowner ‘<domain/username>’ Transact-SQL command to update the database owner (http://msdn.microsoft.com/en-us/library/ms178630.aspx). Making the farm database service account the database owner assigns this account the DB Owner security role. If
there is not already a Web application in your farm that you want to
associate the site collection(s) in the restored database with, create
one. Open the new farm’s Central Administration site in a browser, click
the Application Management link, and then click the Manage Web
Applications link in the Web Applications section of the page. When
the Application Management page opens, click the New button in the Web
Applications section of the Central Administration site’s Fluent user
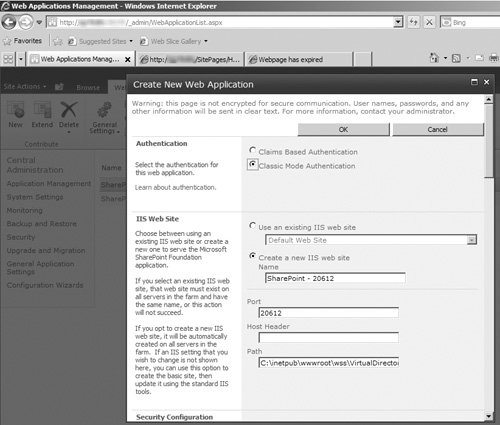
interface (UI) (also known as the ribbon). When the Create New Web Application window opens (see Figure 1), select the desired configuration settings for the new Web application and click the OK button to create it.
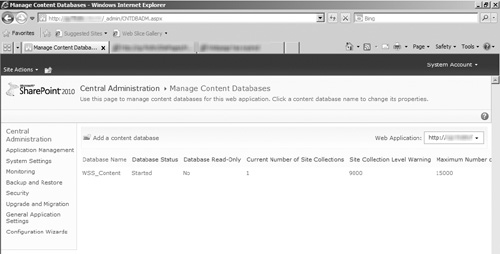
When
the new target Web application has been created to receive the restored
content database, you can delete its initial content database because
the site content you are interested in resides in the restored content
database. Return to the Application Management page in the Central
Administration site, and click the Manage Content Databases link in the
Databases section. When the Manage Content Databases page opens (see Figure 2),
if any content databases exist for the Web application, click the
linked name of the content database for the Web application to open its
Settings page. If no content databases currently exist for the Web
application, proceed to step 9.
Caution
Be sure to confirm that
the correct Web application is listed in the Web Application drop-down
menu in the upper-right corner of the page. If it is not, click the
arrow for the drop-down menu and select the Change Web Application
option. When the dialog box opens, navigate to the correct Web
application and select it.
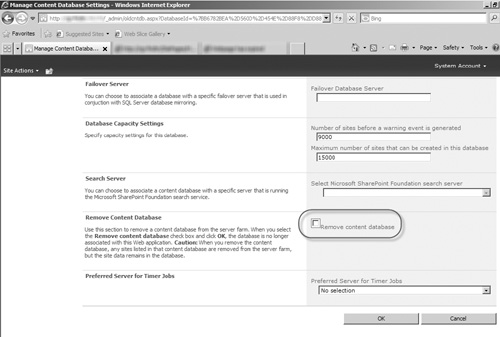
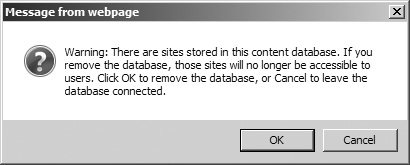
When the Manage Content Database Settings page opens (see Figure 3), check the Remove Content Database check box, which causes a confirmation window to be displayed (see Figure 4)
if the content database contains existing site collections. If the
confirmation window is displayed, determine whether you can remove the
content database from the farm. If you can, click the OK button in the
confirmation window and click the OK button to remove the content
database.
After
all content databases have been removed from the Web application,
return to the Manage Content Databases page for the target Web
application and click the Add Content Database button in the upper-left
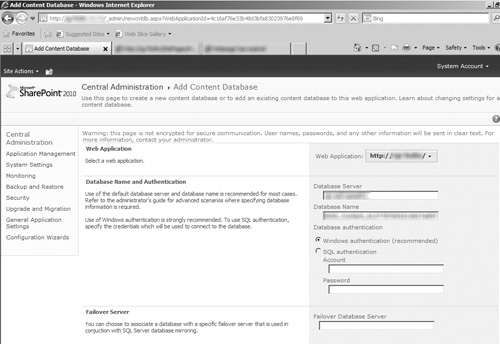
corner of the page. In the Add Content Database page (see Figure 5),
enter the name of the database instance hosting the restored content
database in the Database Server field and the name of the restored
content database in the Database Name field. Confirm the other settings
for the content database, and click the OK button to add the database.
After
the content database has been added to the Web application, review the
contents of the database through SharePoint to confirm that the addition
of the database was successful. View the Web application’s new site
collection(s) through the Central Administration site to confirm that
they are properly listed, and open them directly through a browser to
verify that all their contents and settings were correctly restored into
the new environment.
Tip
You may need to reset the
Internet Information Services (IIS) Web servers hosting your new farm
for these changes to be visible to end users.
|
