The database attach upgrade (migration upgrade)
approach is the preferred upgrade method. This approach is useful
because you can continue to use your current SharePoint farm, which
minimizes downtime during the upgrade, and it is also helpful when you
need to move to new hardware. When you perform a database attach, you
perform a migration upgrade of your content to an entirely new farm, but
you do not migrate the SharePoint Server 2007 configuration settings,
which reduces the possibility of bringing along any problems from your
SharePoint Server 2007 server farm. This approach contains two stages.
First, you prepare the new farm environment for the upgrade to SharePoint 2010.
Second, you attach your current databases to your new farm environment to complete the upgrade process.
1. Preparing the New Farm Environment for the Upgrade
In the first stage of this
upgrade type, you create the new SharePoint 2010 farm environment. In
this stage you are going to take several steps to create an environment
that will allow your current farm to be “moved” to the new SharePoint
2010 farm environment.
During this first stage of the database attach upgrade, you will perform two primary tasks.
1.1. Creating and Configuring the New SharePoint 2010 Environment
In this first set of tasks,
you take the same steps you would to prepare for an installation of
SharePoint 2010, and you complete the installation of SharePoint 2010 to
create your new farm environment. This stage of the upgrade requires
you to complete the following three steps.
Re-create your Web applications, reapply configuration settings, and copy over all customizations.
Manually transfer the customizations into your new SharePoint 2010 farm.
After completing these
three steps, you are ready to verify that the new configuration contains
all of the required configurations, Web applications, and
customizations. However, to ensure that everything is created and
configured correctly, be sure to refer to the following step-by-step
procedures as a guideline for performing this first set of tasks for
this upgrade approach.
1.1.1. Installing SharePoint 2010
In this first step, you must complete an installation of SharePoint 2010 on all servers in the farm. Remember to follow these steps when installing SharePoint 2010 on your new farm servers.
Ensure you meet the hardware and software requirements for SharePoint 2010 .
Complete the installation .
Verify the installation of SharePoint 2010 completed successfully and accurately .
You should perform these three steps on each server that you are planning on using in your new SharePoint 2010 farm.
1.1.2. Duplicating your Web Applications and Farm Configurations
In the next step of stage 1
of the update, you recreate your existing environment within your new
environment, so that when you move your content to the new environment,
all the current behavior is available on your server farm. Use the
following guidelines to ensure you duplicate your current environment in
your new environment.
Create
a Web application for each application in your SharePoint Server 2007
environment. Use the same default URL as your existing Web applications.
Manually apply all of the following configuration settings.
Alternate Access Mappings
Farm-level security and permission settings
Incoming e-mail settings
Outgoing e-mail settings
Managed paths, including /sites
Quota templates
Service settings, including Search settings
Note:
Your services settings must be created on your new farm before you upgrade the data using the database attach upgrade approach.
If
you are upgrading My Sites and User Profiles, you must ensure that the
following steps have been completed prior to the upgrade.
Create a new Web application for My Sites.
Enable the Metadata Service Application.
Enable the User Profile Service Application.
Create a proxy for the User Profile Service Application.
Associate the new proxy with the default proxy group.
1.1.3. Manually Transfering all Farm Customizations
You will also want
to manually copy the customizations you have in your current
environment, including those that are required for your sites to
function properly. These customizations include
Language packs
Custom site definitions
Custom style sheets, including cascading style sheets
Custom Web Parts and Web services
Custom features and solutions
Settings modified in the Web.config file
Form templates (XSN files) and data connection files (UDCX files) for InfoPath
Note:
You must export these files
from your current environment and import them into the SharePoint 2010
environment using Stsadm.exe commands.
1.2. Verifying the New SharePoint 2010 Environment
After you have created
and configured your new environment, you should perform tests to make
sure it contains everything required before you upgrade
your data. This verification process involves the following two steps
that you complete in your new SharePoint 2010 farm.
Test your Web applications.
Create a new Web application.
Restore the copy of the content database associated with the Web application.
Run the Windows PowerShell Test-SPContentDatabase cmdlet to verify all customizations exist in new environment.
Note:
You can use this cmdlet against the original content database, but that database should not be in use when you run the cmdlet.
Run
the Stsadmenumallwebs command in your SharePoint Server 2007
environment to obtain a list of templates associated with each site and
verify that they are installed in your SharePoint 2010 environment. The
syntax for running this command is similar to the following.
stsadm -o enumallwebs-databasename<databasename>[-databaseserver<database server
name>]
Note:
The output from this command
is not very user friendly; however, you can import it into Microsoft
Word or Microsoft Excel and format it so that it makes more sense.
2. Attaching Your Existing Content Databases to Your New SharePoint 2010 Farm
In the second stage of a
database attach upgrade, you attach the content databases from your
existing farm to the new SharePoint 2010 farm environment. This stage
has three primary steps you will follow for each content database that
you are attaching to your new farm’s SQL Server instance.
Verify that you have appropriate permissions to perform SQL tasks.
Associate the restored databases with the Web applications in the new farm.
Verify that the database attach upgrade completed successfully.
2.1. Verifying That You Have the Required SQL Server Permissions
The first action that you want
to take in this stage determines if you have the required permissions
to perform SQL Server backups on your existing SharePoint SQL Server
instance. Furthermore, you want to determine that you also have the
required permissions to restore the SQL databases on the new farm’s SQL
Server instance. The SQL Server permissions required to perform the
backup operation on your current farm are specific to the database. That
means for each content database that you are going to back up, you need
to be a member of the following fixed database roles.
db_owner
db_backupoperator
In preparation for the SQL
Server restore operations, you must be a member of the local
Administrators group, and you also must be a member of specific roles in
order to successfully complete a SQL Server restore operation. However,
on the restore operation, the required permissions aren’t just at a
database level; they are also at the SQL Server level. You need the
following permissions on the SharePoint 2010 SQL Server instance.
Note:
Alternatively, you can work with your SQL Server database administrator to complete these tasks.
The steps for backing up
and restoring your databases will vary depending on the version of SQL
Server you are running. Remember that SharePoint Server 2007 supports
integration with Microsoft SQL Server 2000, SQL Server 2005, and SQL
Server 2008. However, SharePoint 2010 only supports integration with SQL
Server 2005 and SQL Server 2008. For the steps required to perform a
database backup operation or a database restore operation, visit the
Microsoft website and locate SQL Server Books Online to find the manual
for your specific SQL Server version. Documentation for SQL Server products is available for download on any computer from SQL Server Books Online.
Note:
BEST PRACTICE
Locate the Microsoft SQL Server Books Online for your version of SQL
Server and download it to your primary computer so you always have
access to the documentation. A SQL Server installation isn’t required to
access the documentation; SQL Server Books Online is a stand-alone
product.
2.2. Associating the Existing Content Databases with Their New Web Applications
After you have completed the
backup and restore process, you can associate the databases with the
new Web applications that you created in the SharePoint 2010 farm. To
perform this process correctly, follow these three steps in the order
shown.
Execute a Windows PowerShell cmdlet called Test-SPContentDatabase.
Execute a Stsadm.exe –o command called addcontentdb.
Verify the upgrade for first database of each Web application.
2.2.1. Windows PowerShell Test-SPContentDatabase cmdlet
The Windows PowerShell
Test-SPContentDatabase cmdlet checks the Web application to verify that
all the required customizations for that database are installed. This
command does not make any changes to the database; it just creates a
report from it by entering the cmdlet in the following format.
Test-SPContentDatabase -Name<databasename >-WebApplication<URLofNewWebApp >
[ -ServerInstance<ServerInstanceName >][ -DatabaseCredentials<Domain\username >]
After the command completes, it will return information about potential issues such as
The results from this
command will also give you helpful information regarding possible fixes
for the identified problems and whether or not they will prevent the
upgrade from completing successfully.
This may be an iterative process, where you run the command, resolve the identified issues, and run the command again to
identify any new issues. Run this command as many times as necessary to
get a clean report, or one that you are confident will allow you to
complete the upgrade process.
2.2.2. STSADM –O AddContentDB Command
After resolving any potential issues identified by the Test-SPContentDatabase cmdlet, you are ready to associate the database to the Web application. Take the following items into consideration when adding your content databases.
The first content database that you add must contain the root site for the Web application.
Note:
If you are unsure what
content database contains the root site, you can locate the top-level
site collection for the Web application in Central Administration, and
when you click the top-level site link, it will specify what database it
resides in.
Do not create any site collections on the Web application until all content databases have been restored.
Any remaining content databases can be added in any order.
You cannot add the same content database more than once to a farm, even if you want to add it in different Web applications.
You
cannot add the same site collection more than once to a farm, even you
want to add it in different Web applications, because each site
collection has a globally unique identifier (GUID) stored in the
configuration database.
Note:
If you need a duplicate
copy of a site collection in your farm, you can restore the database to
an alternate farm. You can then back up the site collection from that
database and restore it in your new farm, and at that time it will
create a unique site collection and GUID.
The command and required parameters you use to add a content database to your new SharePoint 2010 SQL Server instance are as follows.
stsadm -o addcontentdb -url<URLofWebApp> -databasename<databasename>
This command has some optional parameters, which are listed with a brief description of each in Table 1.
Table 1. Optional Parameters for addcontentdb
| PARAMETER | DESCRIPTION |
|---|
| –databaseserver | If not provided, the default server is used. |
| –databaseuser | If not using Windows authentication, you must specify the SQL authenticated account and the –databasepassword parameter. |
| –databasepassword | If not using Windows authentication, you must specify SQL authenticated account and the –databaseuser parameter. |
| –forcedeleteupgradelock | Removes the upgrade lock on the database. |
| –preserveolduserexperience | When
set to true, the default maintains the previous SharePoint versions
interface. When set to false, sites reflect the new interface in
SharePoint 2010. |
| –sitewarning | Number of site collections allowed in content database before generating a warning in the Windows event log. |
| –sitemax | Maximum number of site collections allowed in the content database. |
| –assignnewdatabaseid | Assigns new database ID to database. Useful for making copies of a database and assigning it to the same farm. |
| –clearchangelog | Clears
the change log. Useful for oversized change logs, restoring a database
to a previous point in time, and causing the content to be recrawled. |
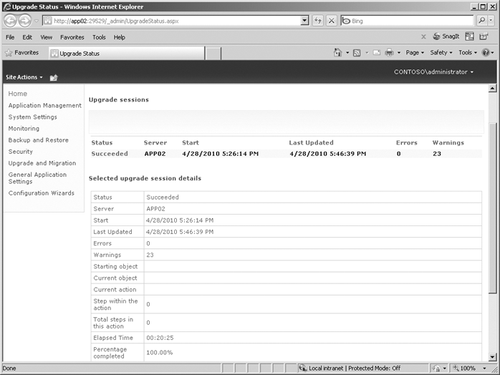
2.3. Verifying That the Upgrade Operation Was Successful
The last step in the database
attach upgrade approach is to perform a verification to make sure that
the databases were attached successfully and the Web applications are
running correctly. You can accomplish this verification by viewing the
Upgrade Status page, as shown in Figure 1, which is located in Central Administration.
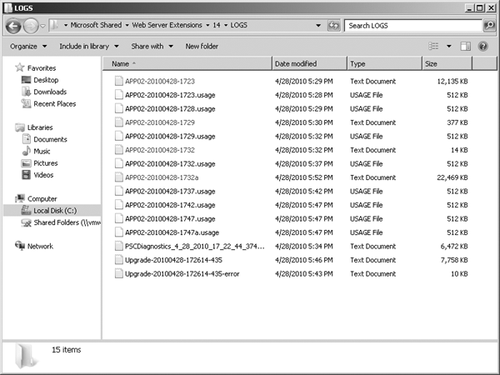
In addition to
the Upgrade Status page in Central Administration, there are two types
of files generated in the %CommonProgramFiles%\Microsoft Shared\Web
Server Extensions\14\LOGS directory: an upgrade log (.log) and upgrade
error log file (.err), as shown in Figure 2. The upgrade error log file contains a consolidated version of any errors and warnings that occurred during the upgrade.
The logs are named using the format Upgrade-YYYYMMDD-HHMMSS-SSS-random-number.log, with the following file naming conventions.
The previous procedure is
the preferred method of upgrading to SharePoint 2010, because it
provides the flexibility to move to different hardware, it prevents
configuration problems from moving from the old to the new environment,
and it allows users access to your current SharePoint environment while
the upgrade is taking place. However, it may not be the easiest option
for upgrading to SharePoint 2010, as you will see in the next section,
with a discussion of how to perform an in-place upgrade.