2. Install Roles on a Windows Server 2008 R2 Server Core Installation
Server Core, like in Windows Server 2008, is a very streamlined version
of Windows Server. Server Core has limited functionality and runs a
subset of the roles provided by Windows Server 2008 R2. It provides a
nice addition to your network without the overhead of a traditional
server. This will lower the overall maintenance and security risks for
the server. During your installation and planning process, you may
determine Server Core servers will be part of your installation. Server
Core servers can become an integral part of your environment and provide
services similarly to full server installations. For the most part,
when you install a role on a Server Core install, the role will function
the same as if it was on the full server. Since Server Core does not
have a GUI or Server Manager, you need to perform the installation with
the command prompt.
2.1. Install Active Directory on Windows Server 2008 R2 on Server Core
Installing Active
Directory on a Server Core installation can be done either by hand or
with an answer file. Either command will start by running DCPromo on the
Server Core. If you choose to run the command by hand, you will need to
enter all the parameters by hand as part of the dcpromo
command. This method can be tricky, and you should consider using an
answer file. Creating an answer file is fairly straightforward; all you
need to do is create a .txt file with the parameters already entered in the file. To create an answer file, create a new text document and put [DCINSTALL] at the top of the file. Following that, you just need to configure the parameters for the domain join. Table 2 describes the parameters.
Table 2. Domain Controller Parameters
| Parameter | Description and Values |
|---|
| UserName | Username with domain administrative credentials. |
| UserDomain | Domain of the user. |
| Password | Password for the user. |
| ReplicaDomainDNSName | FQDN of the domain to join or create. |
| Replica or NewDomain | Replica for additional domain controller.~LBNewDomain for a new domain. |
| DatabasePath | Location of the ntds.dit file; this is a local folder with "" if no value is set. dcrpomo defaults to %systemroot%\ntds. |
| LogPath | Location of the log files; this is a local folder with "" if no value is set. dcrpomo defaults to %systemroot%\ntds. |
| SYSVOLPath | Location of the SYSVOL tree; this is a local folder with "" if no value is set. dcrpomo defaults to %systemroot%\SYSVOL. |
| InstallDNS | Determines whether to install DNS on the domain controller; takes a yes or no value. |
| ConfirmGC | Determines whether the domain controller will be a global catalog server; takes a yes or no value. |
| SafeModeAdminPassword | Password
for account for Directory Services Restore Mode; make sure the password
meets the password requirements for your domain. |
| RebootOnCompletion | Determines whether the server reboots and if you are prompted; takes Yes, No, or NoAndNoPromptEither. |
| ApplicationPartitionsToReplicate | Specify if you want application partitions to replicate. |
|
The answer file shown here would join Server Core to the w2k8r2.com domain using the administrator account ID with the password of P@ssw0rd. Additionally, this server would not have DNS installed or become a global catalog server, with a recovery password of P@ssw0rd.
All the databases would be installed in the default directories, and
the server would automatically reboot at the end of the installation.
[DCINSTALL]
UserName=administrator
UserDomain=w2k8r2
Password=P@ssw0rd
ReplicaDomainDNSName=w2k8r2.com
ReplicaOrNewDomain=Replica
InstallDNS=no
ConfirmGC=no
SafeModeAdminPassword=P@ssw0rd
RebootOnCompletion=Yes
|
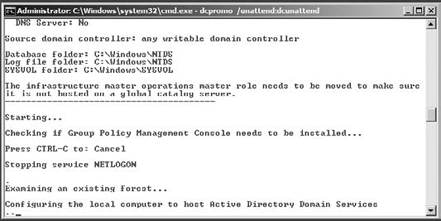
After you create the answer file, you need to drop it on the Server Core and run the dcpromo
command with the unattend switch and a path to the answer file. After
you run the installation, the passwords will be removed from the answer
file. For example, the following command would install the domain
controller with the answer file named dcunattend.txt from the root of the C drive:
DCPROMO.exe /unattend:c:\ dcunattend.txt
During the install, you may see a screen similar to Figure 13.
2.2. Install Other Roles and Features on Windows Server 2008 R2 Server Core
Installing Active Directory is a
unique role installation for Windows Server 2008 R2 Server Core. If you
want to install other roles or features on Server Core, you will run the
dism command. This is the Deployment Image Servicing and Management tool, which is new to Windows Server 2008 R2. dism
will allow you to add and remove roles and features to and from your
Server Core installation. Like installing features through Server
Manager, if you install a role with dism
requiring prerequisite features, you will be prompted to install those
features as well. You can also install multiple features at the same
time. Although this guide will not list all the roles and features you
can install on Server Core, there are a few commands that you need to
learn:
dism /online /get-features
will list a state enabled of disabled for the current server
installation. This command will also provide you with a list of the
features with the appropriate names that can be installed on your Server
Core installation.
dism /online /enable-feature is the base command for installing any new role or feature on the Server Core. You will add the /featurename
switch followed by the name of the feature you want to install. For
example, to install Hyper-V on the Server Core, your command would look
like this:
dism /online /enable-feature /featurename:Microsoft-Hyper-V
dism /online/disable-feature is the base command for uninstalling any new role or feature on the Server Core.
