Contacts represent the various people with whom you do business. For each contact record, you can specify one (and only one) account as its parent customer. Most companies use the Parent Customer field to record the contact’s employer, but you are not obligated to do so.
By specifying a parent
customer for a contact, you create a relationship between those two
records. When you create relationships between accounts and contacts,
you can view all of an account’s contacts by clicking the Contacts link
in the Account’s entity navigation pane. This list of contacts related
to the account is known as the contact associated view.
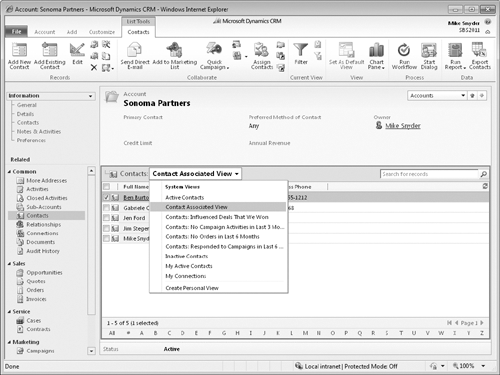
In addition to viewing all of the contacts associated with the account, you can click the view selector to choose different contact filters. Each of the different views
can have its own unique filter criteria and display different columns
of data. Note that the filter will only display contacts associated with
the account you’re viewing. For example, if you select the Inactive
Contacts view, Microsoft Dynamics CRM will show you all of the inactive accounts associated with the account record you’re viewing.
Similar to linking
sub-accounts and parent accounts, linking contacts to an account allows
you to view the contacts related to an account, including a roll-up of
the activities from the related contacts to the parent account.
Therefore, if you log a phone call activity with the Mike Snyder contact
record, whose parent account is Sonoma Partners, you will be able to
view that phone call record when you’re looking at the Sonoma Partners
record.
Tip:
By default, Microsoft
Dynamics CRM lists the contact’s full name and business phone number
when you’re looking at the contact associated view related to an
account. Your system administrator can customize this contact associated
view to include additional columns, such as title, city, or email
address.
As with accounts, there are several methods for creating a contact:
Create a contact from the ribbon by clicking the File tab, and then selecting the New Record menu and clicking Contact.
Create a contact by navigating to a contact view and then clicking the New button on the ribbon.
Create a contact by clicking the Add New Contact button in the grid toolbar of the contact associated view of an account.
Create a contact by clicking the New button in the contact Look Up Record webpage dialog box.
One benefit of creating
a contact from the associated view is that Microsoft Dynamics CRM will
automatically populate several fields on the contact record based on the
account record you’re currently viewing. For example, if you have the
Sonoma Partners account record open and you then click the New Contact
button in the associated view, Microsoft Dynamics CRM will fill out many
of the fields on the new contact record—Street 1, City, State/Province,
and others—with data from the Sonoma Partners account record. Microsoft
Dynamics CRM will also automatically fill out the Parent Customer field
of the new contact as Sonoma Partners. This concept of pre-populating data fields is known as field mapping. Your system administrator can determine how fields are mapped between two types of records.
Tip:
Creating
a new contact from the associated view will automatically fill out the
mapped fields, such as the Parent Customer field and the address fields.
Using this technique will save you time if the contact shares the same
address information with the account.
Tip:
If you create a new contact
record by using one of the first two methods described above, Microsoft
Dynamics CRM will not automatically fill out the mapped fields for you.
This can be useful when the contact has different address information
than the account (as could be the case when an employee works from
home).
Although field mapping will
pre-populate the contact record with data from the parent account, it
will not maintain an ongoing link between the two records. If the
account address changes because the business moves to a new office, you
will need to explicitly update the address of the contacts
related to that account. The edit feature located on the ribbon of the
associated view allows you to update the address of multiple contacts at the same time.
For each account record, you can specify a primary
contact. As you would expect, the primary contact denotes the
individual that your organization should initiate interactions with.
Although most of the time the primary contact works for the account
organization as an employee, this is not a requirement. You can select
any contact in the database as the primary contact for an account.
Consequently, assigning a primary contact to an account does not
automatically map the data fields and pre-populate the mapped values.
In this exercise, you will create two new contacts for the Sonoma Partners account. First, you will create a contact
from the associated view, which will pre-populate certain values for
the contact. Then you will use a different method, in which Microsoft
Dynamics CRM does not pre-populate the mapped fields.
Note:
SET UP
Use the Internet Explorer web browser to navigate to your Microsoft
Dynamics CRM website, if necessary, before beginning this exercise.
Navigate to Accounts and open the Sonoma Partners record.
In the entity navigation pane, click the Contacts link.
 On the ribbon, click the Add New Contact button.
Microsoft
Dynamics CRM opens a new window. Note that the following fields already
contain data: Parent Customer, Street 1, City, and State/Province.
In the First Name field, enter Ben, and in the Last Name field, enter Burton.
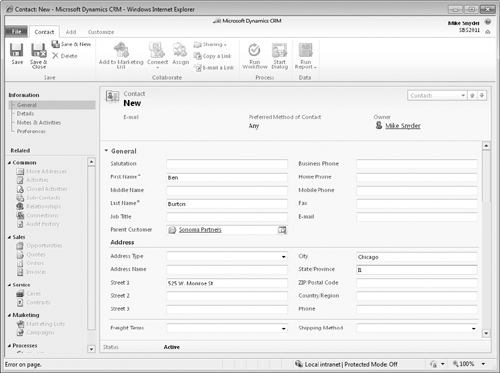
Click Save and Close.
You’ll see that the Ben Burton contact now appears in the contact associated view of the Sonoma Partners account record.
In the main application window, click the File tab, and then click New Record and click Contact to launch the New Contact form.
In the First Name field, enter Alan, and in the Last Name field, enter Jackson.
 In the Parent Customer text box, click the Lookup button to launch the Look Up Record webpage dialog box.
In the Search box, type Sonoma Partners, and then press Enter.
In the results, click the Sonoma Partners record.
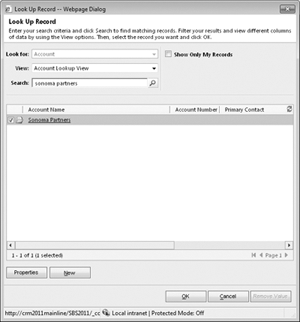
Click the OK button to close the webpage dialog box.
Click Save and Close.
You
will see that now both Ben Burton and Alan Jackson are linked to the
Sonoma Partners account record, but Microsoft Dynamics CRM only
pre-populated the mapped fields on the Ben Burton record because you
created it from the associated view.
