In this section, you will see how to successfully
install the roles of a full installation of Windows Server 2008 R2 as
well as a Server Core installation. You will learn some of the
differences between the two installation methods.
1. Install Roles on a Windows Server 2008 R2 Full Server Installation
In this section, you'll learn
how to install roles on a Windows Server 2008 R2 full server
installation. You will go through the installations for Active
Directory, Hyper-V, and Remote Desktop Services.
1.1. Install the Active Directory Role
As you'll see, you
install Active Directory DS by adding the Active Directory DS role via
Server Manager. After the role is installed, DCPromo will start. You
then use DCPromo to turn the Windows Server 2008 R2 server into a fully
functional domain controller. Here are a few important notes you should
consider:
After you install
the first domain controller, you should consider installing a second
domain controller to give you redundancy. Having a second DC will allow
your users to log on in case of a server outage. Active
Directory will require DNS services. Although you can leverage most
existing DNS services, you should seriously consider utilizing
Microsoft's DNS. It is made with AD in mind. Additionally, if no DNS
server is installed in your network, DNS will be installed as part of
the Active Directory installation. Installing AD will also install three necessary services required for directory replication: DFS namespaces DFS replication File replication
With this in mind, follow these steps:
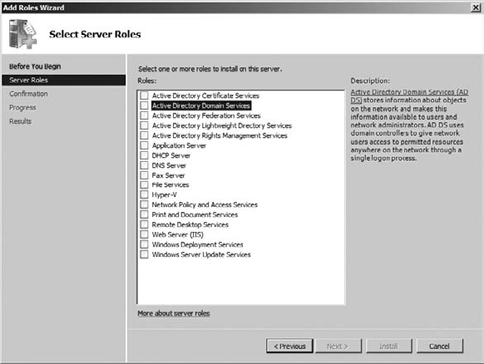
Click Roles in the tree menu on the left. Click Add Roles in the details pane on the right to begin the installation of Active Directory. On the Add Roles Wizard welcome screen, click Next, and you will see Figure 1.
(You can also select the Skip This Page By Default box on the welcome
screen to ignore that page for future role installations.) On
the Select Server Roles screen, select Active Directory Domain
Services. If you are prompted to add required services, review the
services, and click Add Required Services to continue the installation.
Then click Next.
|
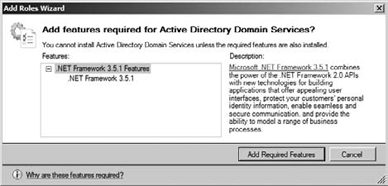
When you install certain
roles and services, you may be required to install features or functions
as part of the role installation. When this occurs, you will be
presented with a dialog box for adding the required services. For
example, when you install Active Directory Domain Services, it requires
the installation of the .NET Framework 3.5.1. If the .NET Framework is
not installed, you will be prompted to install the services, as shown in
Figure 2.
|
On the Active Directory welcome screen, review the information, and click Next. You will be presented with the confirmation screen; click Install to begin the installation of Active Directory. After
the role is installed, to finalize the AD installation, you need to run
the Active Directory Domain Services Installation Wizard (dcpromo.exe) to finish the installation. On the final screen, there is a link to start the wizard automatically. |
If your Windows Server 2008
R2 is joining an existing Active Directory, you need to take a couple
of steps to prepare the schema. You need to prepare the forest and the
domain before joining the existing forest and domain. When you prepare
the forest, you extend the schema to be able to support the new
functionality in Windows Server 2008 R2. To prepare the forest, you need
to be a member of the Enterprise Admins, Schema Admins, or Domain
Admins group on the schema master. To prepare the domain, you need be a
member of the Domain Admins group on the infrastructure master. You also
need to copy the Adprep tools to the servers to run the commands. To do
that, open your Windows Server 2008 R2 DVD, and copy the contents of
the \support\adprep folder to both the schema and infrastructure master
servers, or run the commands directly from the DVD after you insert it.
To prepare the forest on the
schema master, you need to run one of these commands from the adprep
directory you copied to the server:
If you're installing a domain controller from the command prompt, run this command: adprep /forestprep
If you're installing an RODC from the command prompt, run this command: adprep /rodcprep
To prepare the domain on the infrastructure master, from the command prompt, run this command: adprep /domainprep /gpprep
|
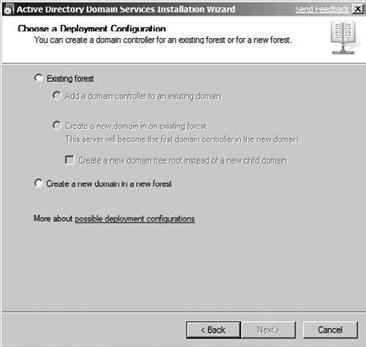
On
the welcome screen, you should click the Use Advanced Mode Installation
option to give you the most flexibility and control over the AD
installation. However, if you want a default installation of AD, you do
not need to select the box. Click Next to proceed. You
will see the operating system compatibility screen. This screen
discusses the new stronger cryptography used by Windows Server 2008 R2
and how NT 4.0 and older clients are impacted. Review the screen, and
click Next to go to the Choose A Deployment Configuration screen. You will be presented with the Choose A Deployment Configuration screen shown in Figure 3.
Choose the appropriate installation path for your infrastructure, and
click Next.
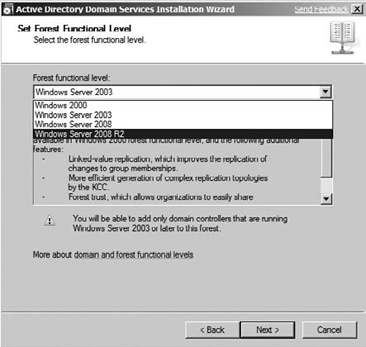
Enter the FQDN for your domain, and click Next Enter or verify the NETBIOS name, and click Next. On the Set Forest Functional Level screen, as shown in Figure 4,
choose the appropriate level of functionality based on your current
infrastructure and what operating systems are running your Active
Directory services. For example, if you have Windows 2003 domain
controllers, you would most likely set your forest functional level to
Windows 2003. Make sure to read the notes and warnings as you choose
your functional level because they differ from one functional level to
the next. Click Next.
On
the Additional Domain Controller Options screen, you will be presented
with the following choices: to add DNS if no DNS server is found, to run
global catalog services, and to turn the server into an RODC. Make the
appropriate choice, and click Next. Depending on your existing DNS
structure, you may have some additional actions presented in additional
dialog boxes. |
When you first install a
new server, you should consider using the built-in DNS provided by
Microsoft to support Active Directory services. Microsoft has optimized
the DNS server to handle AD services and requests. Although there is
nothing wrong with using a third-party DNS server, you need to perform
manual configuration to ensure your AD runs properly across the network.
|
On
the next screen, you will be asked to choose the installation location
for your directory databases, log files, and sysvol folder. Choose the
location for the files, and then click Next. It is recommended you
separate the database and log files on separate volumes to provide
better reliability and performance. Set your Directory Services Restore Mode password, and click Next. On
the summary screen, review the settings, and click Next to complete the
installation of AD, which will take several minutes to complete. If you
are going to be performing future unattended installs of Active
Directory, click the Export Settings button to save your settings file
for future installs. On the results screen, click Finish, and to finalize the installation of AD, you will have to reboot the server.
1.2. Install Hyper-V
Hyper-V allows you to
create virtual servers to handle workloads on your server. Virtual
servers for all purposes are just like any other server in your
infrastructure, and installing the role is straightforward:
Click Roles in the tree menu on the left. Click Add Roles in the details pane on the right to begin the installation of Hyper-V. |
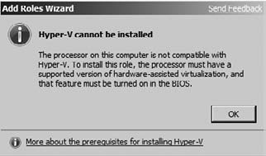
If your processor does not support hardware-assisted virtualization, you will see the screen in Figure 5. If you get this warning, your current hardware will not be able to run the Hyper-V role.
|
On
the Add Roles Wizard welcome screen, click Next. (You may not see this
screen if you selected Skip This Page By Default during previous role
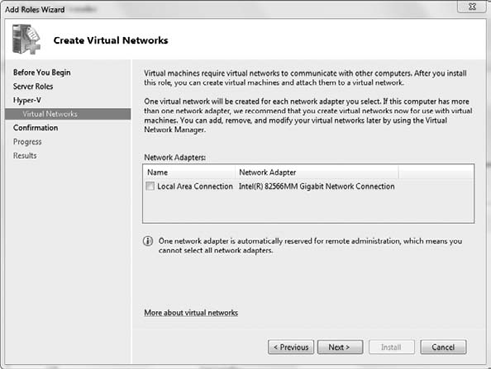
installations.) On the Select Server Roles screen, select Hyper-V. Then click Next. On the Introduction To Hyper-V screen, review the information, which also provides some links to documentation; then click Next. On the Create Virtual Networks screen, as shown in Figure 6,
review the network adapters and virtual networks that will be created.
You can modify your network adapters in Hyper-V Manager after you
complete the installation. After you are finished reviewing the
settings, click Next.
Read the summary of the installation screen, and then click Install. After
the role installation completes, you will see the installation results
windows, which may or may not ask you to restart the server depending on
your current server configuration. After you review the results, click
Close. If you need restart the server, make sure you save all of your
changes before you click Yes to restart the server. If
your server required a restart, after the restart completes, you will
see the final installation results. Click Close to begin using Hyper-V. |
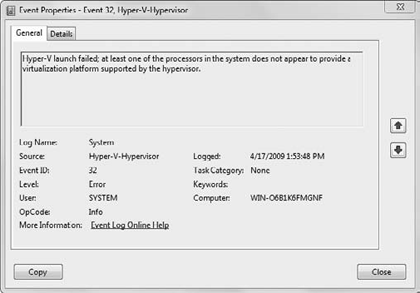
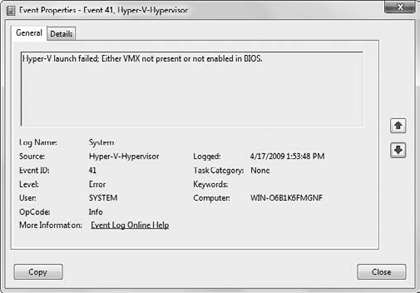
After you install the Hyper-V role, you may see two error messages, as shown in Figures 7 and 8.
The event IDs for the messages with Hyper-V-Hypervisor as the source
are 32 and 41. These error messages are straightforward and generally
indicate you have not enabled the hardware-assisted virtualization
setting in your server's BIOS for your CPUs. The setting is generally
located in the CPU section of your BIOS and in most instances will
require you to fully power down the server for the setting on your
server to take effect. Consult your server's documentation for the full
procedure to enable hardware-assisted BIOS on your particular system.
|
1.3. Install Remote Desktop Services
Remote Desktop Services (RDS)
is the newer version of Terminal Services, and it provides you with the
ability to handle numerous workloads on the server using the Remote
Desktop Protocol (RDP) to handle the requests. In some scenarios, you
can use web browser protocols to accomplish these tasks as well.
Click Roles in the tree menu on the left. Click Add Roles in the details pane on the right to begin the installation of Remote Desktop Services. On
the Add Roles Wizard's welcome screen, click Next. (You may not see
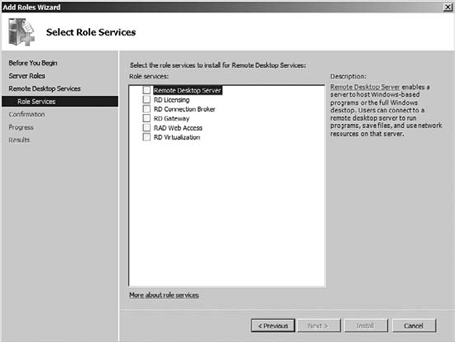
this screen if you selected Skip This Page By Default earlier.) On the Select Server Roles screen, select Remote Desktop Services. Then click Next. Read the welcome screen, and then click Next. On the Select Role Services screen, you are presented with the roles to install as part of the installation, as shown in Figure 9. Select the necessary roles, and then
click Next.
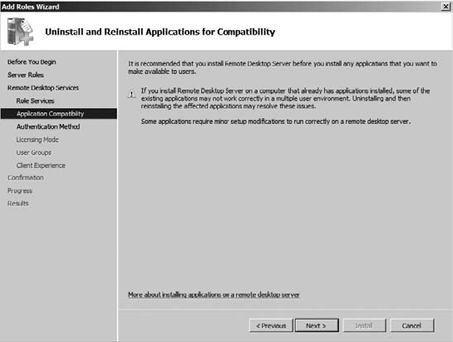
Read the note on Uninstall And Reinstall Applications For Compatibility screen, as shown in Figure 10.
This warning is why it is recommended you install RDS servers prior to
installing any applications on the server. Then click Next.
On
the Specify Authentication Method For Your Server screen, choose the
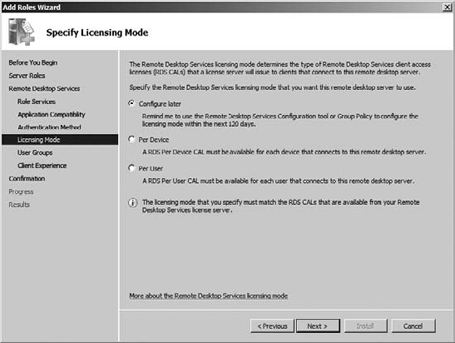
appropriate authentication method for your server, and click Next. Choose the appropriate licensing mode for your RDS setup, as shown in Figure 11.
This licensing configuration also has to match the configuration for
the RDS license server. After you make your selection, click Next.
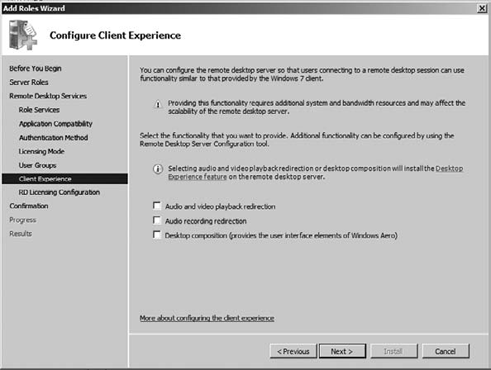
On the next screen, you can configure which users or groups can connect to RDS, select the groups, and click Next. On the Configure Client Experience screen, as shown in Figure 12,
you can select the level of desktop experience for the client. These
provide the remote client with a desktop similar to a native Windows
experience, which provides features for audio and video playback, audio
recording redirection, and desktop composition (features like Windows
Aero). Make your selection, and click Next.
|
An important
consideration when you configure client experiences for your remote
desktop clients is that it can increase the amount of bandwidth and
system resources required for your server. This can also impact the
scalability of your remote desktop servers. Lastly, if you install
either the audio/video playback or the desktop composition, this will
require the desktop experience to be installed on the RDS server.
|
If
you chose to install the RDS licensing role server, you will be
prompted with one last step to configure a discovery scope. The
discovery scope allows other licensing servers to automatically find the
license server. The scope can be either a workgroup, domain, or forest
level. This is not a recommended option, and you should plan on
configuring your servers after the installation completes. On the confirmation screen, click Install. Review
the results. You may be required to restart the server to complete the
installation. When you're ready, click Close to finish the install. On
the warning screen, click Yes if you are ready to reboot the server. If
your server required a restart, after the restart completes, you will
see the final installation results. Click Close to begin using RDS.
|
