Domain Name System (DNS) servers are used to provide
name resolution services to your TCP/IP network. DNS is built on a
client-server model where the server stores a database of records that
maps TCP/IP addresses to the corresponding name type. Clients send
queries to the DNS server in order to resolve names to their
corresponding TCP/IP address. If your clients cannot resolve names to IP
addresses, then communication will be limited at best and nonexistent
at worst. If you can ensure that your clients have access to a DNS
server, your ability to facilitate network connectivity increases.
DNS is very flexible; it can be
run on a Windows Server machine in a stand-alone environment or as part
of a domain-joined Active Directory (AD) network. If Active Directory is
running in your network, you will want to add the DNS Server role to
your domain controllers. The really cool thing about this is that you
can maintain the directory services database and the DNS database
simultaneously. One option for DNS is to install what is called a caching-only
DNS server. These servers simply perform name resolution and maintain a
list of the results of the queries they receive. They do not have
authority for any DNS zone. This option can be very desirable in
situations where you have multiple sites connected by wide area network
(WAN) links that have limited bandwidth.
There is no right or wrong way
to deploy DNS; the key is that you understand the name resolution needs
of your network and then deploy the DNS servers to meet your network's
needs.
1. Add a DNS Server
As you install your first DNS
server, begin with a simple configuration change. Whether you are
planning on running DNS with Active Directory or running it on a
stand-alone server, you will want to configure the local network adapter
card with a static IP address. Please don't use a dynamically assigned
IP address with a DNS server. The headaches are just not worth it.
The interesting thing about
DNS is that it is required for Active Directory installation. If you
were building a new AD forest, you would actually need to configure DNS
first. What if you didn't know you had to configure DNS before you ran
DCPromo (dcpromo.exe) and
installed AD? Not to worry. The AD installation wizard will actually
install and configure a local DNS server for you. Although this process
is certainly easy and it works just fine, we recommend you take the time
up front to install your own DNS.
So, how exactly do you
install DNS? First you will need membership in the Administrators (or
better) group in order to add DNS. Then follow these steps:
Right-click Roles, and choose Add Roles.
Click Next on the Before You Begin page.
Select the DNS Server box, as shown in Figure 1.
Read the DNS info page. There is a lot of good information here.

Now that DNS is
configured as a role service on the server, you need to configure the
DNS server. You can do this with two different tools: DNS Manager, which
is a GUI tool, or dnscmd, which is a
command-line tool. Although it is technically possible to use a
standard text editor to work with DNS entries, it is not recommended.
2. Configure a New DNS Server
When you install DNS on a server that is not an Active Directory domain controller, you will need to do three main things:
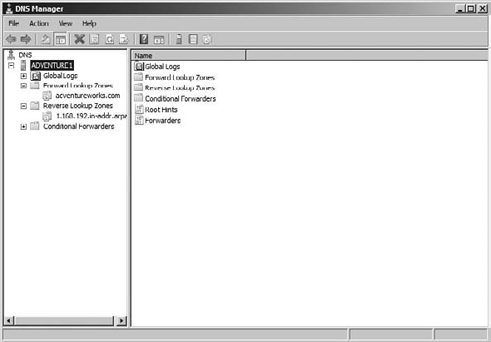
Create a forward lookup
zone to facilitate name resolution to IP address, and create a reverse
lookup zone to facilitate IP address to name resolution, as shown in Figure 2.
Configure each zone for updates and determine how those updates will occur (secure or nonsecure).
Define
what happens when your server gets a query that it cannot solve.
Usually you will want to forward unsolved query requests to another DNS
server.
To configure a new DNS server, follow these steps:
Right-click the name of the DNS server, and choose Configure A DNS Server.
Click Next on the Welcome page of the Configure A DNS Server Wizard.
Select
the radio button to create the zones you desire. You will likely choose
to create both forward and reverse lookup zones on your initial server.
Click Next.
Select the Yes radio button to create a forward lookup zone, and click Next.
Select the type of zone you want to create, and click Next.
Type in the zone name, and click Next.
Choose Create A New File With This File Name.
Choose
the type of updates you will allow this zone to accept. (If you are
installing DNS on a DC, the option to allow only secure dynamic updates
will be enabled.) Click Next.
Choose to create a reverse lookup zone, and click Next.
Select the type of zone you want to create, and click Next.
Choose
to create a reverse lookup for IPV4. You can come back and create a
reverse lookup zone for IPV6 at a later time. Click Next.
Enter the network ID, and click Next.
Accept the new filename for the reverse lookup zone, and click Next.
Choose the type of updates you will allow for the reverse lookup zone, and click Next.
Choose
whether you will forward unresolved queries, add the address of the
server that queries will be forwarded to, and click Next.
Of course, you could do all this configuration from the command line using the dnscmd tool. To view the options and syntax, open a command prompt, and type dnscmd /config /help.
Now that you have
configured your initial forward and reverse lookup zones, have specified
how updates will occur, and have chosen forwarders for unresolved DNS
queries, your DNS server is ready to service host name resolution
requests from your clients. Of course, you will need to tell your
clients that you have a DNS server for them to use. You can do this by
directly configuring the DNS server entry on each network adapter card
configuration, or you can build an option for DNS into your Dynamic Host
Configuration Protocol (DHCP) server.
Once the clients know to look to the DNS server for name resolution, your DNS infrastructure is ready to go.
