3. Add Query Forwarding
Once the DNS Server is
installed and configured, you will want to consider how to get name
resolution for names that your DNS servers are not authoritative for. If
you think about the way DNS servers resolve names, you'll realize they
use a process of recursive queries to find an authoritative server that
will resolve a name to an IP address. Your DNS servers simply do not
know all the possible host names and IP addresses in the world's
networks. To resolve host names for domains outside of the ones your
servers are authoritative for, you will need to configure query forwarding.
Your network will likely
have several DNS servers. If you configure one of those servers to pass
queries from inside your network to the Internet, you have really just
designated that server as a forwarder. You would change your network
firewall settings to allow that DNS traffic from the forwarder through
the firewall and out to the Internet. Queries will be returned from the
Internet to the forwarder, and then the forwarder will pass those
responses to the appropriate internal server. Do not host a local DNS
zone on your forwarder! It is exposed to the Internet, and any zone
stored on the forwarder will also be exposed to the Internet. You really
don't want your internal DNS zone data becoming available online.
Maybe you don't want to
simply forward all your unresolved queries through a single forwarder.
Maybe you want to forward requests for certain domains through a
specific forwarder. This concept of setting conditions under which
queries are forwarded and through which server they are forwarded is
called conditional forwarding.
It offers a little more flexibility than traditional forwarding, and it
can be far more effective than traditional forwarding if you are in a
private network that hosts multiple domains, each with their own DNS
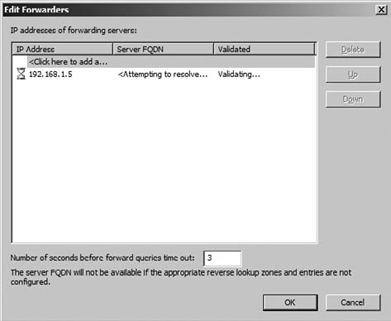
zones. To add forwarders to your DNS architecture, you will use DNS
Manager:
Right-click the server name.
Select the Forwarders tab.
Click Edit. The Edit Forwarders dialog box opens, as shown in Figure 3.
At this point you can add the desired server to your forwarders list.
4. Configure a Caching-Only DNS Server
All DNS servers resolve
queries and then cache the results of queries for a limited time. They
also perform other functions such as updating records and doing zone
database maintenance. You might want a server that simply resolves
queries and caches the results. A caching-only server is especially useful when DNS resolution is needed but when you don't want to create a separate zone for that location.
With a caching-only server,
query information is gathered over time from other DNS servers as the
caching-only server resolves client queries. That information is then
stored by the caching-only server for future use. This process usually
results in a decreasing amount of network traffic over time between the
location containing the caching-only server and those other locations
that contain full-version DNS zones. The benefit comes in the reduced
use of the WAN link for DNS resolution while increasing name resolution
performance for the local clients. The caching-only server does not
perform zone transfers like other DNS servers, and so the WAN is not
impacted by this traffic.
On the server where you want to configure the DNS caching-only server, open DNS Manager.
Right-click the name of the server, and select Configure A DNS Server.
Choose to configure the root hints only. Do not configure a forward or reverse lookup zone.
This process really could not
be much easier. You now have a caching-only DNS server that will take
client requests and perform recursive DNS name queries. When the server
resolves a query, it will store the answer locally. There are no zones
to maintain or update. No zone transfers are necessary, and the clients
get the benefit of a local DNS server.
4.1. Manage Root Hints
We know some of you out there are scratching your heads and thinking, "What in the world is a root hint?" By definition, a root hint
is a piece of DNS data stored in the DNS database that identifies the
authoritative servers for the root of a given DNS namespace. If you want
to resolve a query for a namespace, you have to find the server
responsible for resolving requests for that space. DNS names are
hierarchical in structure, and each level of the hierarchy is separated
by a period (or a dot). So, for example, if you had a client who was trying to resolve the hierarchical name www.microsoft.com, you would begin the process at the root, which in this case is com. Where is the com server? Wouldn't it be nice if you already had a list of commonly used roots (like com, mil, gov, edu, net, org, and so on) and their corresponding IP addresses? These are the root hints.
By default DNS contains a
standard list of commonly used root hints. The root hints contain the
name server (NS) records and the host (A) resource records for the
internet root servers. All of this works very well if you are on the
Internet. What if you are on a private network and want to configure
your own root servers? You can configure your own root zone and add the
associated NS and A records to root hints as follows:
Right-click your DNS server, and choose Properties.
Select the Root Hints tab, as shown in Figure 4.
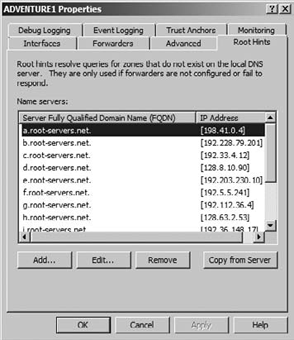
At this point you can add, edit, or remove root hints, or you can choose to copy the root hints from another server.
5. Remove a DNS Server
There may come a time when
you want to remove a DNS server from your network. When you remove a DNS
server, it is important to remember that your DNS server is likely part
of a larger DNS infrastructure, and it likely performs key functions
and contains records referencing those functions to the other DNS
servers and clients in your organization. You would not want to simply
delete the server from DNS and remove the DNS Server role from Server
Manager without first making sure that there will not be an interruption
of the name resolution service. Make sure that as you remove a DNS
server that its functions are being taken over by another server and
that the records and references to those services have been updated in
your DNS database.
This process consists of four steps:
Delete the host (A) record for the server.
Modify the NS records for the zone so that the server being removed is no longer included on the list of authoritative servers.
Modify
the Start of Authority (SOA) record for the zone to point to the new
server responsible for the zone. (If you are using an Active Directory
integrated zone, this is not necessary.)
Use the NSLookup
tool to verify zone delegation to be certain that the resource records
used for delegation are functioning with the appropriate changes and
that they no longer look to the removed server.
Type nslookup (rootserveripaddress), and press Enter.
Type nslookup, and press Enter.
Type set norecurse (this tells the root server not to perform a recursive query), and press Enter.
Type set q=ns (this sends the query for name server records to the root server).
Type
the fully qualified domain name of the domain you are testing followed
by a period. A list of name servers will be displayed.
Verify the NS and A records for the existing name server in the domain.
