3. Configuring server networks
After adding the Failover Clustering feature, you
will be ready to set up networking. This includes the heartbeat network
and if necessary, iSCSI networks.
As best practice, the iSCSI, LAN, and Heartbeat networks should be
separate subnets and physical networks or VLANs. Your network adapter
configuration for each cluster node may look similar to the one
depicted in Figure 4.
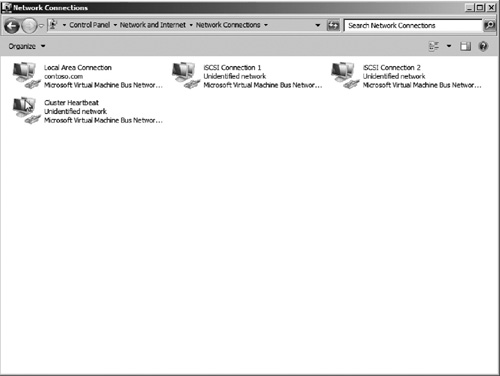
In our example, we will use the following subnet configurations:
192.168.5.0/24—Local Area Network
172.16.0.0/24—iSCSI Network
10.1.1.0/24—Cluster Heartbeat Network
Assign IP addresses to the respective network
adapters for each of these networks and verify connectivity. Just as
you added the Failover Clustering feature, you will need to configure
network settings on each cluster node.
4. Connecting cluster nodes to shared storage
After setting up networking, you are ready to
connect your servers to their respective storage. In our example, we
are using an iSCSI SAN for shared storage. During setup, you will want
to limit LUN access to the
primary node only. If two nodes concurrently access a LUN prior to
completing the cluster setup, the LUN could become corrupted. This can
be accomplished by ensuring that all the disks stay “offline” on the
passive node. If using an iSCSI SAN, you may want to use multipathing.
Multipathing enables the server to use load-balance and failover
between two separate network connections. This provides improved
performance and redundancy for iSCSI connections. If you plan on using
multipathing, you need to install the Multipath IO feature. To add
multipath support, perform the following:
1. | Open Server Manager and select the Features node. |
2. | Click the Add Features link in the middle pane launching the Add Features Wizard.
|
3. | Select the Multipath I/O option as seen in Figure 5. Then click Next.
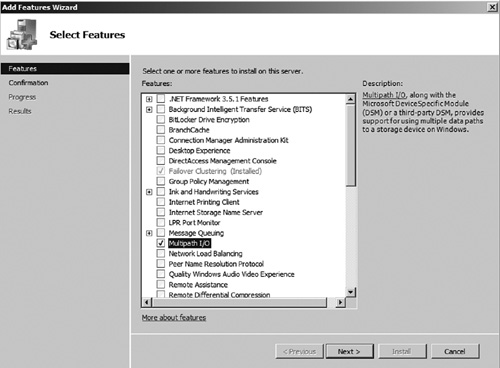
|
4. | Click Install on the Confirmation page.
|
5. | When installation is complete, click Close.
|
6. | Add this feature to each node in the cluster.
|
After
you have installed multipathing support, perform the following steps to
connect each node to the iSCSI SAN, using the Microsoft iSCSI Initiator:
1. | Open the iSCSI Initiator from Start | All Programs | Administrative Tools | iSCSI Initiator.
|
2. | Select the Discovery Tab.
|
3. | Click Discover Portal and enter the IP address of the iSCSI SAN (see Figure 6). Then click OK.
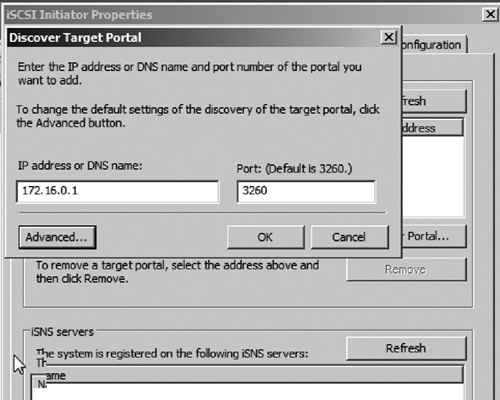
|
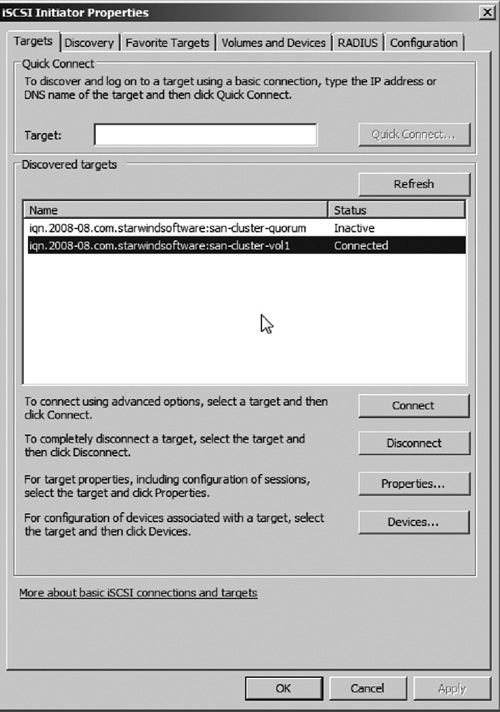
4. | Select the Targets tab. You should now see the assigned iSCSI storage listed in Discovered Targets (see Figure 7).
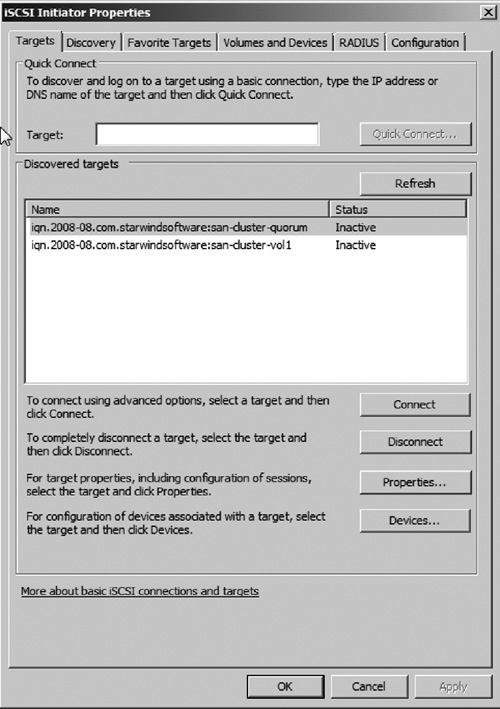
|
5. | Select one of the volumes you want to connect, and then click Connect.
|
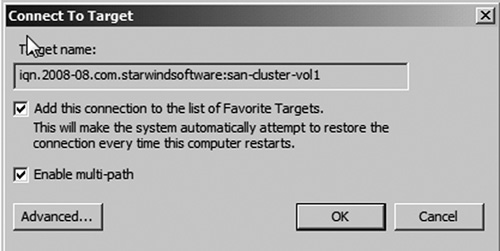
6. | In the Connect to Target window, select the Enable multi-path option as seen in Figure 8. Then click Advanced.
|
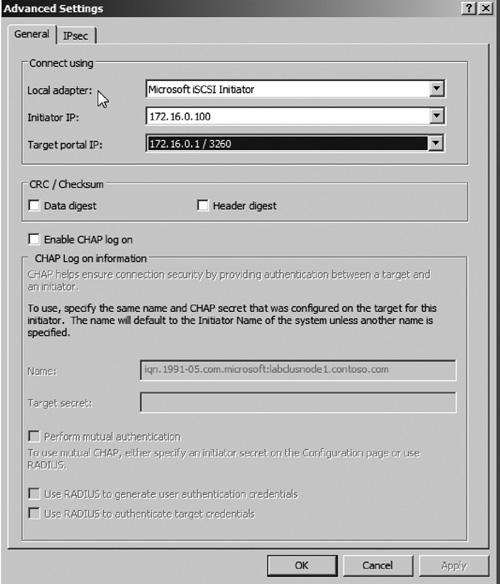
7. | Configure the following iSCSI advanced options (see Figure 9):
- Local Adapter —Select the Microsoft iSCSI Initiator.
- Initiator IP —Select the IP address assigned to the first iSCSI network adapter.
- Target Portal IP —Select the IP Address of the iSCSI SAN.
|
Optionally
you can configure CHAP authentication if required to secure
connectivity to your iSCSI SAN. After configuring the initiator
advanced settings, click OK. Then click OK to close the Connect to Target window.
You should now see the volume connected as seen in Figure 10. You should now perform steps 5 through 7 again for the same volume, except this time selecting the second initiator IP in step 7. This will connect both the
iSCSI adapters to the volume. You will need to repeat this process to
connect each volume to the active node of the cluster and then connect
the passive node to each volume of the cluster.
After connecting to each volume, you can verify whether they are connected by opening Disk Management in Server Manager (see Figure 11).
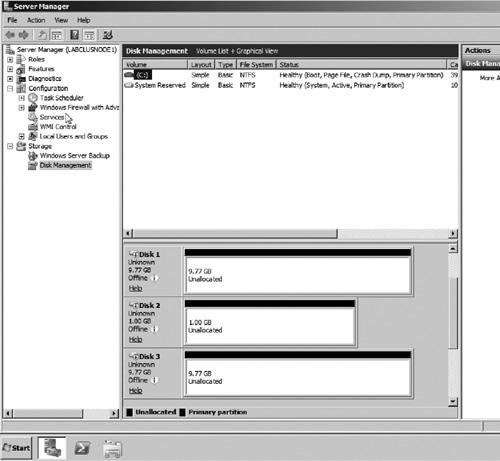
Notice
that since you have multiple connections (each iSCSI network adapter)
opened to each target, the disks are listed twice in Disk Management.
This is due to the fact that you have not yet enabled multipath on the
server. To enable multipath, perform the following:
1. | Open the MPIO control panel (Start | Control Panel | MPIO).
|
2. | Select the Discover Multi-Paths tab.
|
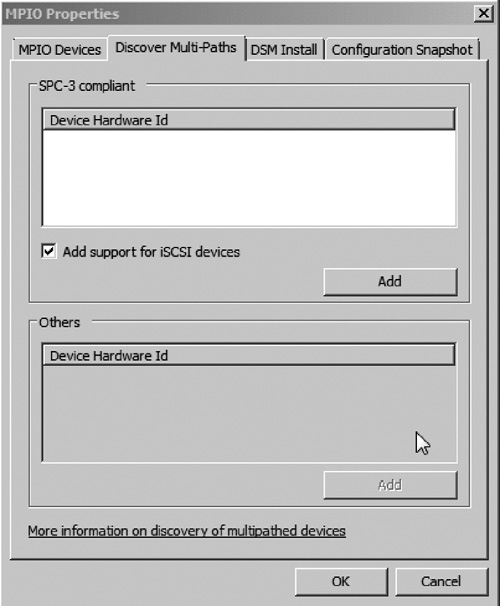
3. | Select the Add support for iSCSI devices option. Then click Add (see Figure 12).
|
4. | You will be prompted to reboot; click Yes to reboot the server.
|
After
the server reboots, multipath will be enabled. You can verify this by
opening Disk Management in Server Manager. You should now see each SAN
disk listed only once. You will again need to perform this on each node
of the cluster.
After each node can see all disks, you will need to
logon to the active node and bring one of the disk drives online and
create a new volume. This can be done via Disk Management in Server
Manager. Perform the following steps to bring the disk that will be
used for quorum online and create a new volume:
1. | Open Server Manager.
|
2. | Select the node Storage | Disk Management.
|
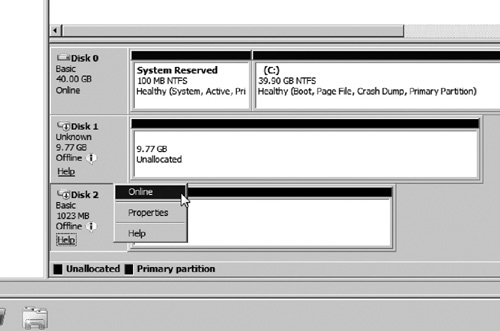
3. | Right click the disk that you want to bring online and select the Online option (see Figure 13).
|
4. | Right click the same disk and choose Initialize. |
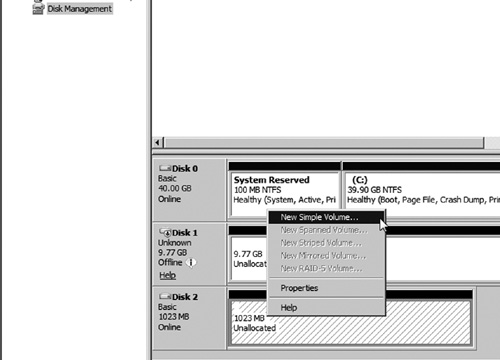
5. | Right click the unallocated space and choose Create Simple Volume (see Figure 14).
|
6. | Complete the New Simple Volume Wizard to create a new volume. Format the volume as NTFS, use the drive letter of Q, and label the volume quorum.
|
The disk should now be ready to be used for cluster quorum settings. You are now ready to validate your cluster configuration.
