Logo
programming4us
programming4us
programming4us
programming4us
Home
programming4us
XP
programming4us
Windows Vista
programming4us
Windows 7
programming4us
Windows Azure
programming4us
Windows Server
programming4us
Windows Phone
 
Windows Server

Windows Server 2008 R2 high-availability and recovery features : Installing and Administering Failover Clustering (part 7) - Create shared folder on cluster, Testing Failover of Cluster

- Free product key for windows 10
- Free Product Key for Microsoft office 365
- Malwarebytes Premium 3.7.1 Serial Keys (LifeTime) 2019
4/21/2014 2:09:00 AM
Create shared folder on cluster

The file server cluster should now be configured and accessible to clients using the cluster name established for client connectivity. You are now ready to create a new file share for clients to access. Perform the following to create a new file share on the cluster:

1.
Open Server Manager.

2.
Expand the Features | Failover Cluster node.

3.
Expand the cluster node | Services and Applications.
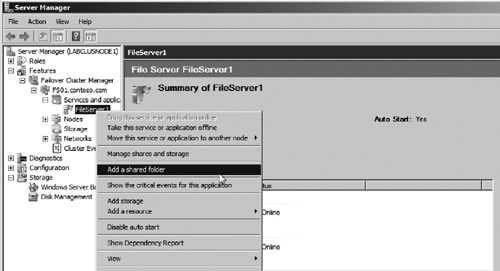
4.
Right click on the cluster name and select Add Shared Folder as seen in Figure 28.

Figure 28. Add shared folder to cluster.

5.
Select the location to create the new share, and then click Next.

6.
Set Permissions on the Share then click Next.
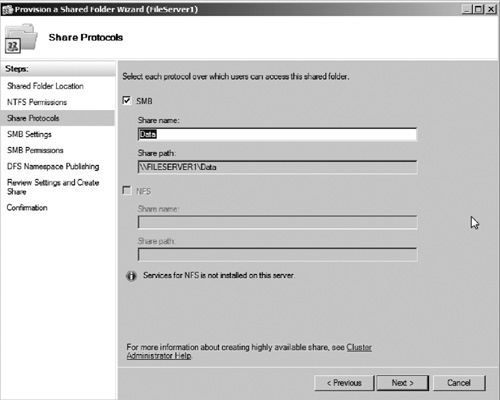
7.
Enter a share name (see Figure 29). Then click Next.

Figure 29. Name Clustered Shared Folder.

8.
Optionally change any SMB settings such as enabling Access-Based Enumeration. Then click Next.

9.
Optionally set share permissions, and then click Next.

10.
If you want to publish the share to a DFS namespace, enter that information now. Then click Next.

11.
Verify settings for the new clustered file share, and then click Create.

12.
Verify that the process has been completed successfully, and then click Close.

You have now successfully completed setup of a shared folder on the clustered file server. Before placing data on the cluster, you should test moving the cluster from one node to another, and test a failover of the cluster by shutting down the active node.

Testing Failover of Cluster

To failover the cluster, perform the following:

1.
Open Server Manager.

2.
Expand the node Features | Failover Cluster.

3.
Expand the cluster node and select Services and applications.
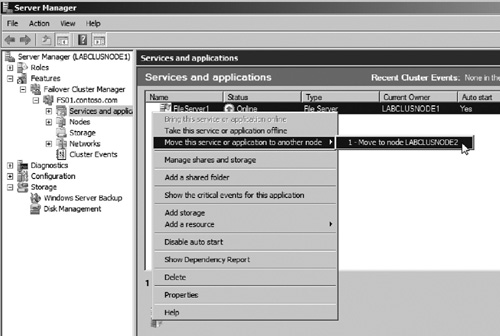
4.
In the middle pane, right click the service and select the option Move this service or application to another node. Choose the node you want to become the active node (see Figure 30).

Figure 30. Move service to another cluster node.

5.
If prompted, confirm that you want to move the cluster to the other node. The move process will begin and the cluster status will move to pending. After the cluster moves to the other node, you should see that node as active.

If you want to test the failover of the cluster, simply shut down the active host. After a few seconds, you should see the cluster automatically failover to the passive node.

After testing failover, you should run the validation wizard one final time to verify whether the cluster is production ready and is in a supported configuration.

Notes on Hyper-V

When building a Failover Cluster for Hyper-V, you can add the Hyper-V role after creating the Failover Cluster. At that point, you can enable clustered shared volumes and enable Live Migration. This will allow you to move running virtual machines from one host to another.

Other -----------------
- Microsoft Exchange Server 2007 : Installing the Client Access Server - Installing the Client Access Server Role
- Microsoft Exchange Server 2007 : Understanding the Client Access Server (part 4) - Availability Service, POP and IMAP
- Microsoft Exchange Server 2007 : Understanding the Client Access Server (part 3) - ActiveSync Remote Wipe, Outlook Anywhere
- Microsoft Exchange Server 2007 : Understanding the Client Access Server (part 2) - ActiveSync
- Microsoft Exchange Server 2007 : Understanding the Client Access Server (part 1) - OWA
- Windows Server 2012 : Enhanced security and compliance (part 2) - BitLocker enhancements, DNSSEC
- Windows Server 2012 : Enhanced security and compliance (part 1) - Dynamic Access Control
- Windows Server 2012 : Full Windows experience (part 2) - Configuring User Profile Disks
- Windows Server 2012 : Full Windows experience (part 1) - RemoteFX enhancements,Configuring RemoteFX, Enhanced USB redirection
- Windows Server 2012 : Support for open standards
 
 
Top 10
- Microsoft Visio 2013 : Adding Structure to Your Diagrams - Finding containers and lists in Visio (part 2) - Wireframes,Legends
- Microsoft Visio 2013 : Adding Structure to Your Diagrams - Finding containers and lists in Visio (part 1) - Swimlanes
- Microsoft Visio 2013 : Adding Structure to Your Diagrams - Formatting and sizing lists
- Microsoft Visio 2013 : Adding Structure to Your Diagrams - Adding shapes to lists
- Microsoft Visio 2013 : Adding Structure to Your Diagrams - Sizing containers
- Microsoft Access 2010 : Control Properties and Why to Use Them (part 3) - The Other Properties of a Control
- Microsoft Access 2010 : Control Properties and Why to Use Them (part 2) - The Data Properties of a Control
- Microsoft Access 2010 : Control Properties and Why to Use Them (part 1) - The Format Properties of a Control
- Microsoft Access 2010 : Form Properties and Why Should You Use Them - Working with the Properties Window
- Microsoft Visio 2013 : Using the Organization Chart Wizard with new data
 
programming4us
Windows Vista
programming4us
Windows 7
programming4us
Windows Azure
programming4us
Windows Server