Logo
programming4us
programming4us
programming4us
programming4us
Home
programming4us
XP
programming4us
Windows Vista
programming4us
Windows 7
programming4us
Windows Azure
programming4us
Windows Server
programming4us
Windows Phone
 
Windows Server

Windows Server 2008 R2 high-availability and recovery features : Installing and Administering Failover Clustering (part 6) - Add primary storage to cluster, Configure service or application

- Free product key for windows 10
- Free Product Key for Microsoft office 365
- Malwarebytes Premium 3.7.1 Serial Keys (LifeTime) 2019
4/21/2014 2:07:16 AM
Add primary storage to cluster

Now that we have successfully created our cluster with a quorum disk, we need to bring the primary disk to be used for file shares online. To do this, perform the following:

1.
Open Server Manager and select the Disk Management console.

2.
Bring the disk online and initialize it. Then create a new simple volume.

3.
After creating a new usable volume, expand the cluster node and select Storage as seen in Figure 22. You will notice that the quorum disk is already online.
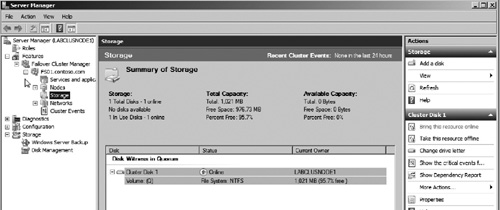
Figure 22. Add New Storage to a Cluster.

4.
Right click the Storage node and select Add Disk.

5.
Select the newly created disk in the Add Disks to Cluster window and click OK.

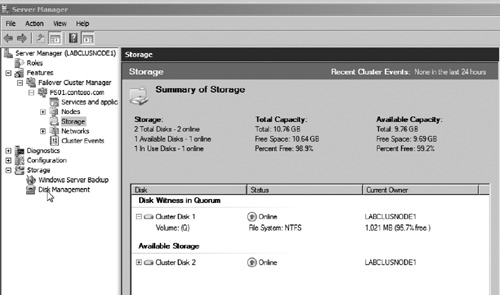
You should now see the newly added disk appear in the Storage node as seen in Figure 23.

Figure 23. New Cluster Storage.

Configure service or application

Now that the cluster is set up, you are ready to set up the service or application you wish to support on the cluster. In our example, we will be using the cluster to provide HA to a windows file server. You now need to add the File Services role to each node of the cluster. After adding the appropriate services, perform the following to set up the cluster as a clustered file server:

1.
Open Server Manager.

2.
Expand the node Features | Failover Cluster.

3.
Select the cluster and click the Configure Service or Application link in the middle pane (see Figure 24). This will launch the HA Wizard.
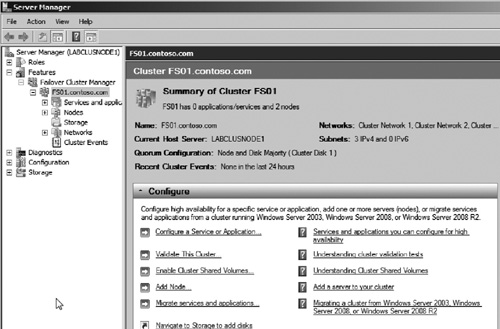
Figure 24. Configure Service or Application for Failover Clustering.

4.
Click Next to begin.

5.
Select the service or application you want to make highly available. In our example, select the File Server option as seen in Figure 25. Then click Next.
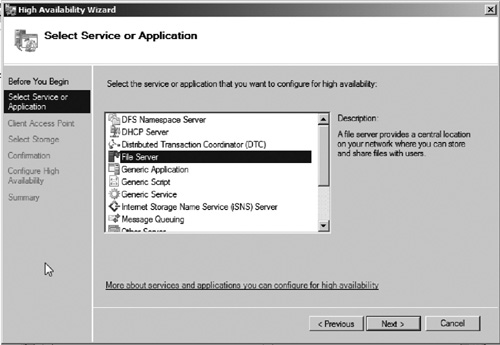
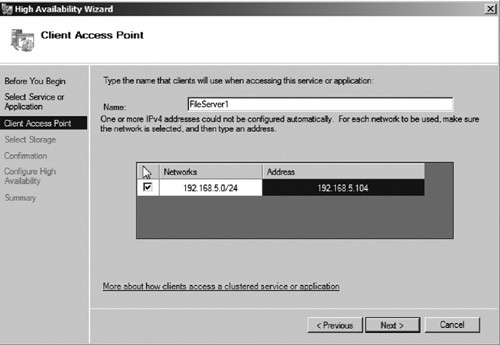
Figure 25. Select Service or Application to be supported by cluster.

6.
Enter a name and IP address that clients will use to connect to the cluster (see Figure 26). Clients do not connect to individual server names but the name of the cluster itself. This is required as part of the clustering service. If clients connected to the name of the server nodes, they would lose connectivity if a node failed. If connected to the cluster name, the cluster will automatically fail the connection over to the second node. After entering the cluster name and IP address, click Next.
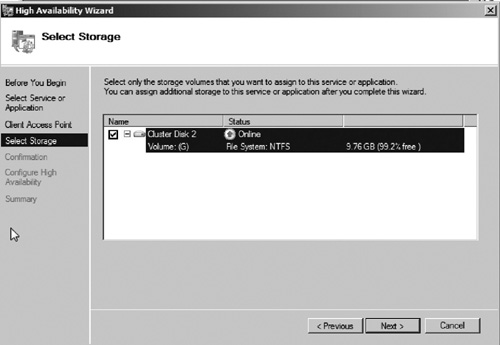


Figure 26. Enter Cluster Name and IP Address.

7.
Select the disk that will hold the file shares (see Figure 27). This is the disk drive and data that will be made highly available. Click Next to continue.

Figure 27. Select Cluster Disk.

8.
Confirm settings and click Next to configure the file server services as highly available.

9.
Click Finish on the success page.
Other -----------------
- Microsoft Exchange Server 2007 : Installing the Client Access Server - Installing the Client Access Server Role
- Microsoft Exchange Server 2007 : Understanding the Client Access Server (part 4) - Availability Service, POP and IMAP
- Microsoft Exchange Server 2007 : Understanding the Client Access Server (part 3) - ActiveSync Remote Wipe, Outlook Anywhere
- Microsoft Exchange Server 2007 : Understanding the Client Access Server (part 2) - ActiveSync
- Microsoft Exchange Server 2007 : Understanding the Client Access Server (part 1) - OWA
- Windows Server 2012 : Enhanced security and compliance (part 2) - BitLocker enhancements, DNSSEC
- Windows Server 2012 : Enhanced security and compliance (part 1) - Dynamic Access Control
- Windows Server 2012 : Full Windows experience (part 2) - Configuring User Profile Disks
- Windows Server 2012 : Full Windows experience (part 1) - RemoteFX enhancements,Configuring RemoteFX, Enhanced USB redirection
- Windows Server 2012 : Support for open standards
 
 
Top 10
- Microsoft Visio 2013 : Adding Structure to Your Diagrams - Finding containers and lists in Visio (part 2) - Wireframes,Legends
- Microsoft Visio 2013 : Adding Structure to Your Diagrams - Finding containers and lists in Visio (part 1) - Swimlanes
- Microsoft Visio 2013 : Adding Structure to Your Diagrams - Formatting and sizing lists
- Microsoft Visio 2013 : Adding Structure to Your Diagrams - Adding shapes to lists
- Microsoft Visio 2013 : Adding Structure to Your Diagrams - Sizing containers
- Microsoft Access 2010 : Control Properties and Why to Use Them (part 3) - The Other Properties of a Control
- Microsoft Access 2010 : Control Properties and Why to Use Them (part 2) - The Data Properties of a Control
- Microsoft Access 2010 : Control Properties and Why to Use Them (part 1) - The Format Properties of a Control
- Microsoft Access 2010 : Form Properties and Why Should You Use Them - Working with the Properties Window
- Microsoft Visio 2013 : Using the Organization Chart Wizard with new data
 
programming4us
Windows Vista
programming4us
Windows 7
programming4us
Windows Azure
programming4us
Windows Server