1. Configuring Screen Resolution
Changing the
screen resolution changes the number of pixels that Windows displays on
your screen. Increasing the resolution—say, from 1024 by 768 to 1600 by
1200—lets you see more action on your display: more windows, more text,
larger graphics, and so on— with various tradeoffs. Text at a given
point size will appear smaller at higher resolutions. A mouse at a given
pointer speed will require more arm and wrist motion to traverse a
high-resolution screen than a low-resolution one. And higher resolutions
use more video memory. In short, the right resolution for you depends
on your hardware, your preferences, and visual acuity.
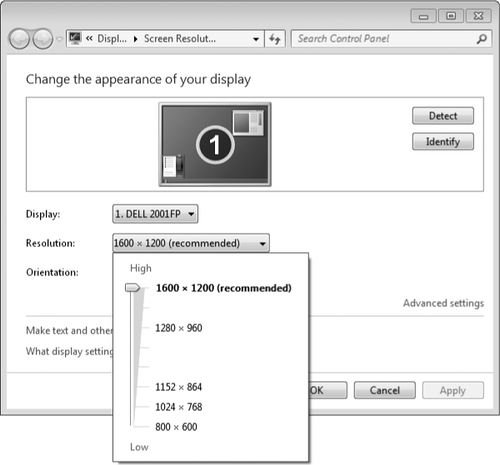
To change the
screen resolution, right-click the desktop and choose Screen Resolution.
To make a change, click Resolution and drag the slider up or down. (See
Figure 1.)
Note:
A change in screen resolution affects all accounts at a particular computer, not just the account that makes the change.

2. Configuring a Multimonitor Display
Extending your desktop
across two or more monitors can be a great way to increase your
productivity. You can do your main work on one screen and keep auxiliary
information, e-mail, or even Windows Media Player open and visible on
the second. Or if you work with large spreadsheets or database tables,
you can spread them across multiple screens so that you can see more data without having to set your resolution to stratospheric levels.
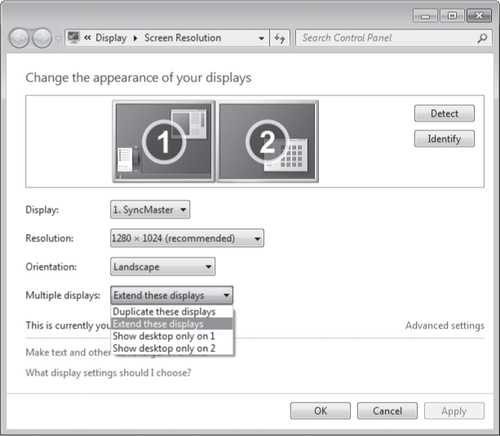
If your display
adapter supports two monitors (these days, most do), the Screen
Resolution dialog box show two boxes, labeled 1 and 2, when you have a
second monitor connected. (Of course, if you have more than two monitors
attached, Windows displays
a numbered box for each one.) You can click these boxes to configure
the monitors independently. If adjusting the settings for monitor 1
appears to be affecting what you consider to be monitor 2, click
Identify. Windows displays large white numerals on your screen
temporarily to let you know which screen is which. If it happens that
screen 2 is on the left of screen 1, drag the boxes in Screen Resolution
so that they match the physical layout of your monitors.
Assuming you want to add screen space to your visual layout, be sure to select Extend These Displays in Multiple
Displays. If you prefer to have your second monitor function as a
duplicate display (for example, to make a presentation easier for a
group of clients to see), select Duplicate These Displays.

Some third-party
programs exist to enhance your multimonitor experience. For example,
with DisplayFusion from Binary Fortress Software (w7io.com/0408), you can put a different desktop background on each monitor or have a single image span multiple monitors.
|
Windows logo key+P, the
keyboard shortcut for switching to a network projector, also provides a
quick and easy way to switch among multimonitor display arrangements.

|
3. Making Text Easier to Read
In earlier versions of Windows, users who wanted larger text sometimes bumped up the point size for one or more screen elements. Scaling
up this way was problematic, though, because not all elements of the
Windows user interface could be scaled successfully. Dialog box text in
particular was a problem, so users sometimes found themselves looking at
large title bars and scroll bars and large menu text, but small
dialog-box text. Windows 7 offers a better way.
If you like to work at high screen resolutions but you find yourself straining to read the text, you can try the following:
Look for scaling
("zoom") commands in the text-centric programs you use. Many programs,
including most modern word processors, include these scaling features.
Scaling text up to a readable size this way is a good solution for
particular programs but doesn't change the size of icon text, system menus (such as the Start menu), or system dialog boxes.
To enlarge part of the screen, use the Magnifier tool.
Use
the scaling options in the Display control panel—the "better way"
offered by Windows 7. Adjusting the scaling to a higher level enables
you to have readable text at higher screen resolutions.
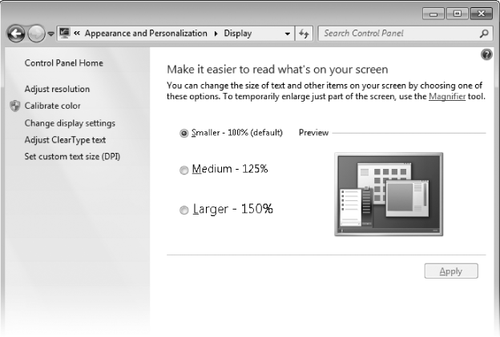
To adjust display
scaling, right-click the desktop and choose Personalize. In
Personalization, click Display, a link in the left pane. (Alternatively,
type display in the Start menu search box and click Display.) Select one of the options shown below.

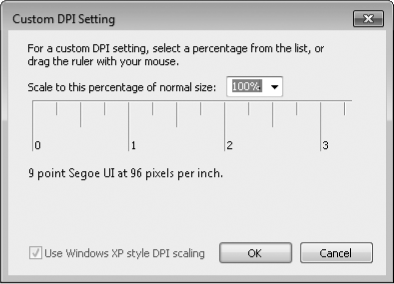
For a greater range of settings, as well as greater precision, click Set Custom Text Size (DPI). (DPI stands for dots per inch.) Figure 2 shows the Custom DPI Setting dialog box.

To change the scaling
factor, drag any part of the ruler. Alternatively, you can either select
a value in the Scale To This Percentage Of Normal Size list or type
directly into this box. What scaling factor is right? It depends on many
things—the size and resolution of your screen, the programs you use,
your eyes, and your preferences. You will likely need to try more than
one combination of screen resolution and scaling factor to get your
system exactly the way that works best for you.
The Use Windows XP Style DPI Scaling check box offers a measure of compatibility for (mostly older) applications that are not written to use high DPI
settings. Some compromise is required: when selected, some elements
(dialog box text or icons, for example) might not align or resize
properly, whereas clearing this option causes blurry text in some
applications. By default, for DPI settings of 120 (125y or below, the
option is selected; for larger sizes it is cleared.
When you change DPI
scaling, you must log off before the change takes effect. After you log
on again, test some text-centric applications to see if you like the
result. If you don't, return to the Display dialog box and try another
setting.
|
Some programs produce fuzzy text
If you're running Aero and have applied a nondefault font
scaling factor, some of your older programs might produce fuzzy text.
Newer DPI-aware programs get information about the current scaling
factor from the operating system and adjust themselves accordingly.
Older applications that were not designed with DPI scaling in mind
assume they are running under the default scale of 96 DPI, and the
operating system scales them. A side effect of this is that fonts and
icons can sometimes appear fuzzy. If you find a particular program's
display unsatisfactory, right-click its entry in the Start menu, choose
Properties from the shortcut menu, and click the Compatibility tab. In
the Settings section, select Disable Display Scaling On High DPI Settings.
|
4. Using Font Smoothing to Make Text Easier on the Eyes
ClearType
is a font-smoothing technology that reduces jagged edges of characters,
thus easing eye strain. Although it is optimized for LCD (flat panel)
displays, ClearType is
turned on by default on all systems, regardless of display type.
Microsoft believes that ClearType improves readability on both
cathode-ray tube (CRT)
and LCD displays, but if you're a CRT user you should probably try
turning ClearType off to see which works better for you. (You can also
turn font-smoothing off altogether by clearing the Smooth Edges Of
Screen Fonts check box on the Visual Effects tab of Performance Options,
but it's hard to imagine any benefit from doing so.)
To check or change your font-smoothing settings, type cleartype
in the Start menu search box and click Adjust ClearType Text. Doing so
opens ClearType Text Tuner, which, in its first screen, has a check box
that turns ClearType on when selected. The ensuing screens that appear
each time you click Next offer optometrist-style choices ("Which is
better, number 1 or number 2?") to help you reach ClearType perfection.
Windows includes seven new
fonts that are optimized for ClearType. The names of six of
these—Constantia, Cambria, Corbel, Calibri, Candara, and Consolas—begin
with the let ter c—just to help c ement the connection with ClearType.
If you're particularly prone to eye fatigue, you might want to consider
favoring these fonts in documents you create. (Constantia and Cambria
are serif fonts, considered particularly suitable for longer documents
and reports. The other four are sans serif fonts, good for headlines and
advertising.) The seventh ClearType-optimized font, Segoe UI, is the
typeface used for text elements throughout the Windows user interface.
(Windows also includes a ClearType-optimized font called Meiryo that's designed to improve the readability of horizontally arrayed Asian languages.)
Note:
For information about how ClearType works, visit Microsoft's ClearType site, at w7io.com/0404.
5. Calibrating Your Display's Colors
To get the most
accurate rendition of images and colors on your screen, you should
calibrate it. You've probably noticed, but perhaps not fiddled with, the
buttons on your monitor that control various display settings. A new tool included with Windows 7, Display Color
Calibration, helps you to calibrate your screen using your monitor's
display controls as well as various Windows settings. With Display Color
Calibration, you set gamma, brightness, contrast, color balance, and
other settings, all of which are explained in the on-screen
descriptions.
To run Display Color Calibration, in the Start menu search box, type display and then click Calibrate Display Color. (Even easier, type dccw,
the name of the executable file for Display Color Calibration, and
press Enter.) Calibrate Color is also an option in the Display control
panel. No matter how you start it, Display Color Calibration opens a
full-screen application that leads you through the steps of adjusting
your display by making settings and adjusting monitor controls until the
images displayed at each step look their best.