2. Selecting Colors and Modifying Color Schemes
With a beautiful desktop background in place, your next personalization step might be to select a complementary color
for the window borders, Start menu, and taskbar. To do that,
right-click the desktop, choose Personalize, and then click Window
Color.
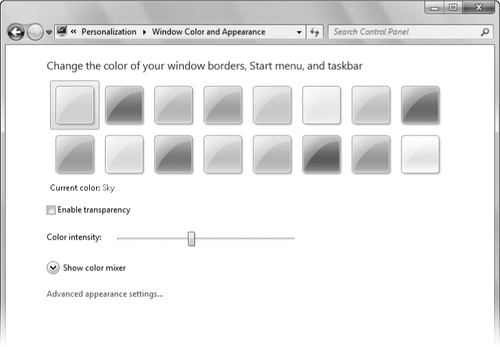
If you're using an Aero theme, Window Color And Appearance appears, as shown below. If none of the 16 choices meets your needs exactly, you can click Show Color Mixer and dial in your own blend of Hue, Saturation, and Brightness.

You can also adjust the transparency of your window frames. Dragging the Color Intensity slider to the right makes window frames darker and less transparent. If you want lighter colors
but don't fancy transparency at all, clear the Enable Transparency
check box. You might find this "Aero sans trans" approach convenient at
times if you need to generate pictures of windows for presentation
purposes and don't want the pictures to include distracting "behind the
scenes" material.
If you're not using an
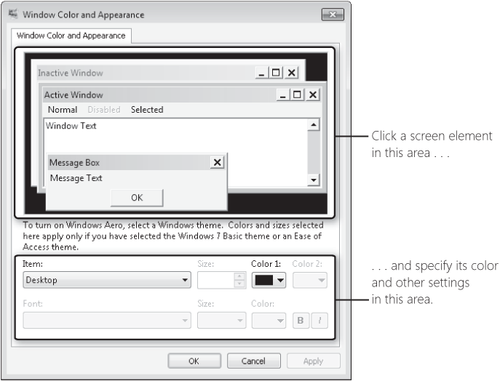
Aero theme, clicking Window Color displays a different Window Color And
Appearance dialog box, as shown next.

Note:
This same dialog box appears when you click Advanced Appearance Settings in the Aero version of Window Color
And Appearance. There's no particular reason to go there if you're
using Aero, however, as most settings in this dialog box apply only to
basic and high-contrast (that is, non-Aero) themes.
Each basic and
high-contrast theme comprises a group of settings that specifies fonts
and sizes of certain interface elements, as well as colors. In the sample window of the Window Color
And Appearance dialog box, click the screen element you want to change.
Then use the lists and buttons at the bottom of the dialog box to make
your color, font, and size selections. For title bars, you can specify two colors;
Windows creates a gradient from Color 1 (at the left end of the title
bar) to Color 2 (at the right end). The Item list includes some items
that don't appear in the sample window, so you might want to review it
in its entirety before you move on.
The Color button for each
item opens a selection of standard colors. If you don't see the one
you're looking for, click the Other button. Windows then displays a
Color dialog box. Should you fail to find exactly the color you want in
the Basic Colors palette, you can define your own custom
colors. Change the color that appears in the Color box, either by
adjusting the positions of the hue/saturation crosshair and the
luminosity arrow or by specifyingnumeric values. When you have found the
color you want, click Add To Custom Colors. If you want to replace an existing custom color, select it before you specify your new color.
Warning:
The Window Color And
Appearance dialog box itself has a distinctly 20th-century appearance.
The squared-off windows in its sample area betray its ancient heritage,
and the text below the sample window gives fair warning. You won't find
Undo or Default buttons anywhere. Experiment carefully and keep your own
mental cookie trail. If you want to be absolutely sure you can find
your way out of the woods, create a restore point before you proceed.
3. Selecting Sounds for Events
To specify the sounds
that Windows plays as it goes through its paces, right-click the
desktop, choose Personalize from the shortcut menu, and then click
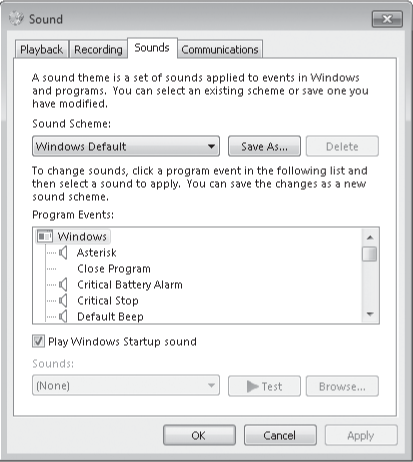
Sounds. In the Sound dialog box (shown below), you can select a
predefined collection of beeps, gurgles, and chirps that Windows plays
in response to various system and application events. Simply choose an
item in the Sound Scheme list.

In the same dialog box, you can customize the sound schemes.
To see what sounds are currently mapped to events, scroll through the
Program Events list. If an event has a sound associated with it, its
name is preceded by a speaker icon, and you can click Test to hear it.
To switch to a different sound, scroll through the Sounds
list or click Browse. The list displays .wav files in %Windir%\Media,
but any .wav file is eligible. To silence an event, select (None), the
item at the top of the Sounds list.
If you rearrange the mapping of sounds to events,
consider saving the new arrangement as a sound scheme. (Click Save As
and supply a name.) That way, you can experiment further and still
return to the saved configuration.
The Sound dialog box is
also the place to silence the Windows Startup sound. Perhaps you've had
this experience: You arrive a moment or two late for a meeting or class,
discreetly turn on your computer at the end of the table or back of the
room, and then cringe as your speakers trumpet your arrival. True, the
Windows Startup sound is less raucous in Windows 7 than it was in
Windows XP. But it's still a recognizable item, apt to cause annoyance
in libraries, classrooms, concert halls, and other hushed venues. You
can't substitute your own tune, but you can turn the startup sound off.
In the Sound dialog box, clear the Play Windows Startup Sound check box.
If you like event
sounds in general but occasionally need complete silence from your
computer, choose No Sounds in the Sound Scheme list when you want the
machine to shut up. (Be sure to clear the Play Windows Startup Sound
check box as well.) When sound is welcome again, you can return to the
Windows Default scheme—or to any other scheme you have set up. Switching
to the No Sounds scheme won't render your system mute (you'll still be
able to play music when you want to hear it), but it will turn off the
announcement of incoming mail and other events.
If you want to control sound levels on a more granular level—perhaps muting
some applications altogether and adjusting volume levels on
others—right-click the volume icon in the notification area and choose
Open Volume Mixer. (Alternatively, click the icon and then click Mixer.) Volume Mixer provides a volume slider (and a mute button) for each output device and each running program that emits sounds.