4. Choosing a Screen Saver
Screen
savers don't save screens. (In long-gone days when screens were
invariably CRTs and many offices displayed the same application at all
hours of the working day, having an image move about during idle times
probably did extend the service life of some displays.) And they
certainly don't save energy. But they're fun to watch. To see the
current offerings, right-click the desktop, choose Personalize from the
shortcut menu, and then click Screen Saver.
Note:
If you use a multimonitor setup, some of the screen
savers supplied with Windows (specifically, 3D Text and Photos),
unfortunately, "save" only the primary screen. The others go blank when
the screen saver goes into action.
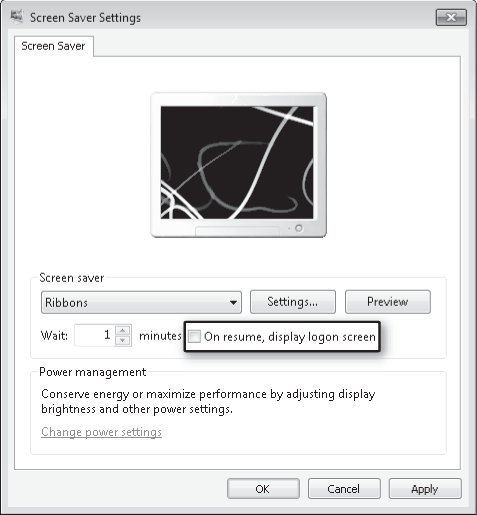
The Screen Saver
Settings dialog box (shown below) includes a handy On Resume, Display
Logon Screen check box. If you work in an environment where privacy is
not a big concern, you can save yourself some hassle by clearing this
check box.

5. Customizing Mouse Pointers
As you have
undoubtedly noticed, Windows has dispensed with the time-dishonored
hourglass mouse pointer. That might be a welcome development,
particularly if you've logged a lot of hours with earlier versions of
Windows. On the other hand, if you think an hourglass depicts the
passage of time more unambiguously than a rolling doughnut, you can
easily bring back the old shape. You can customize the entire array of
pointer shapes your system uses by right-clicking the desktop, choosing
Personalize, and then clicking Change Mouse Pointers (in the left pane
of Personalization, shown in Figure 1).
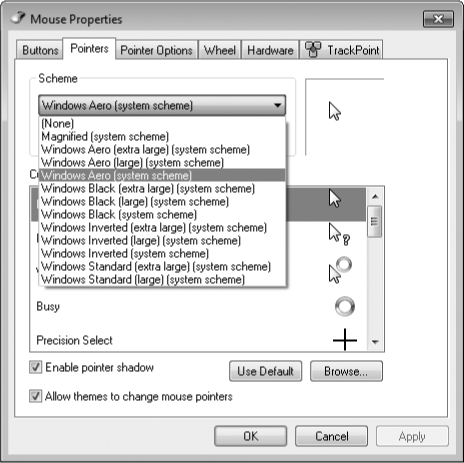
On the Pointers tab of the Mouse Properties dialog box, you can select a
pointer type in the Customize box, and then click Browse to select an
alternative pointer shape. (The Browse button takes you to
%Windir%\Cursors and displays files with the extensions .cur and .ani.
The latter are animated cursors.)
Just as Windows
encapsulates a collection of sound choices as a sound scheme, it wraps
up a gamut of pointer shapes as a mouse-pointer scheme. The system comes
with a generous assortment of predefined schemes, making it easy for you to switch from one set of pointers to another as needs or whims suggest. Figure 3 shows the list.

If you sometimes use
your portable computer in lighting conditions that make it hard for you
to find the pointer, consider switching to one of the large or extra
large schemes. If nothing else, those will give your eyeballs a larger
target to pursue.
For something perhaps more novel than large or animated pointers, try one of the inverted schemes. These make your mouse pointer appear to pass behind the text on your screen, rather than in front of it. (It's an acquired taste.)
If you're inclined to
roll your own mouse scheme (by using the Browse button to assign cursor
files to pointer types), be sure to use the Save As command and give
your work a name. That way you'll be able to switch away from it and
back to it again at will.
It's worth taking a
minute or two to explore the remaining tabs in the Mouse Properties
dialog box. Some of the more useful options there are Button
Configuration (on the Buttons tab), which lets you swap the roles of
the left and right mouse buttons; Display Pointer Trails, in the
Visibility section of the Pointer Options tab (this one makes the mouse
cursor even easier to find in lousy lighting conditions); and Select A
Pointer Speed, in the
Motion section of the Pointer Options tab. This last option governs the
rate at which the pointer travels in response to mouse movement. If you
have switched to a high-DPI setting
and a higher-resolution display, you might also need to increase the
pointer speed to accommodate the increased number of pixels on your
screen.
6. Configuring Desktop Icons
A fresh, cleanly installed Windows 7 desktop
(as opposed to one generated by an upgrade installation) includes a
single lonely icon—Recycle Bin. If you want other system icons,
right-click the desktop,
choose Personalize, and click Change Desktop Icons (in the left pane).
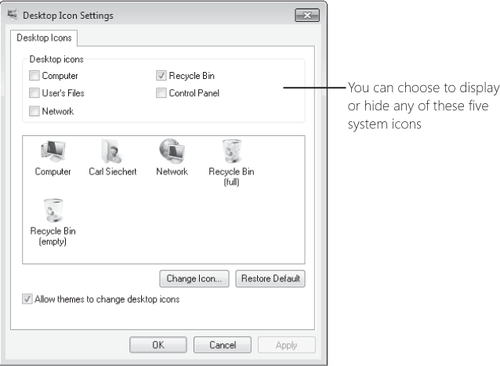
The Desktop Icon Settings dialog box, shown below, provides check boxes
for five system folders—Computer, the root folder of your own profile
(User's Files), Network, Recycle Bin, and Control Panel.

If you're really into
customization, you can change any of the five icons that appear in the
large box in the center. Note that the Control Panel icon does not
appear in this center box even if you select its check box; Windows
doesn't provide a way to change it.
To change an icon, select it in the center box and click Change Icon.
You'll find an interesting assortment of alternative icons in the file
%Windir%\System32\ Imageres.dll. (Be sure to use the horizontal scroll
bar to see them all.) If none of those suit you, try browsing to
%Windir%\System32\Shell32.dll.
Note:
The icons you choose
for system folders become part of a theme, if you save the con
figuration as described in the next section. However, other settings for
desktop icons,
including which ones you choose to display, their size, and their
arrangement, are not saved in the theme file, allowing you to safely
change themes without the risk of changing any of these customizations.
After you've populated your desktop
with icons, you might want to control their arrangement. If you
right-click the desktop, you'll find two commands at the top of the
shortcut menu that will help in this endeavor. To make your icons
rearrange themselves when you delete one of their brethren, click View
and then click Auto
Arrange Icons. To ensure that each icon keeps a respectable distance
from each of its neighbors (and that the whole gang stays together at
the left side of your screen), click View, Align Icons To Grid. And if
your icons occasionally get in the way (for example, if you want to take
an unimpeded look at the current desktop background image), click View,
and then click Show Desktop Icons. (Return to this command when you want the icons back.)
|
If you're really into
desktop icons, you might find it worthwhile to move the ones you have
closer together—so that you'll have room for more or to keep the current
collection from completely overrunning the desktop. The most effective
way we've found to do that is by adjusting the Icon size in the Window
Color And Appearance dialog box for non-Aero themes. (In the Start menu
search box, type color.
Then click Change Window Colors And Metrics.) The Size setting for the
Icon item, curiously enough, does not change the size of icons. (We
explain how to change icon size in a moment.) The Size setting does
change the icons' spacing, however. Reducing the value from the default
32 to 16 (the minimum) produces a compact icon display without
sacrificing readability. You can also change the spacing, of course,
with the Icon Spacing (Horizontal) and Icon Spacing (Vertical) items,
which have a default value of 43.
To adjust the icon
size, click the desktop, hold the Ctrl key, and then turn the mouse
scroll wheel forward or back. This method produces a continuous zoom
effect; if you want to get back to a standard size, right-click the
desktop, click View, and select a size.
|
To change the sort order of your desktop icons, right-click the desktop and click Sort By. You can sort on any of four attributes: Name, Size, Item Type, or Date Modified. Sorting a second time on any of these attributes changes the sort order from ascending to descending (or vice versa).
7. Saving, Sharing, and Finding Theme Settings
If you've got all the
visual and aural aspects of your profile set up just the way you want
them, and you want to be able to experiment further but still return to
the current settings, it's time to revisit Personalization (right-click
the desktop and choose Personalize).
At the top of the themes list, in the My Themes category, you'll see
Unsaved Theme if you have made changes to whatever theme was previously
in effect. To make those changes reusable, click Save Theme and supply a
name. (The name you furnish is the display name that appears in
Personalization; you needn't follow restrictive file-naming rules that
prohibit several common punctuation symbols.)
If you make additional
changes, you'll once again generate an Unsaved Theme entry. There's no
limit to the number of themes you can create. Windows saves each group
of settings as a .theme file in your
%LocalAppData%\Microsoft\Windows\Themes folder. (A .theme file is a
standard text file that describes all the theme settings. For complete
details about theme files, see "Creating and Installing Theme Files" at w7io.com/0402.)
You can delete unwanted items from the My Themes list; simply
right-click the item you no longer want and choose Delete Theme. Note
that you can't delete the theme that's currently in use.
After you create a theme
you like, you might want to use it on your other computers or share it
with other users. Because a .theme file is just a text file, it doesn't
contain the graphic images of your desktop, the sound files you use for
various events, or other necessary files that make up the entire theme
experience. For the purpose of sharing themes, Windows uses a .themepack
file, which includes the .theme file as well as all other nonstandard
theme elements. A .themepack file uses the standard compressed folder
(.zip archive) format to envelop its component files. To create a
.themepack file of an item in My Themes, first select it to make it the
current theme. Then right-click it and choose Save Theme For Sharing.
Unless you specify otherwise, Windows saves the .themepack file in the
default save location of your Documents library.
To use a theme that was saved
in .theme or .themepack format, simply double-click it. (Of course, a
.theme file won't offer the full experience if the theme components
aren't available on your computer in folders to which you have access.)
Because themes are
so easily portable, you can find many compelling Windows 7 themes
online. Start your quest by clicking Get More Themes Online (under My
Themes in Personalization), where Microsoft offers a nice selection.
Warning:
If you search for themes
elsewhere on the internet, be sure to download theme files only from
people or companies you know and trust. Some theme elements (most
notably, screen savers, which include executable program code) have long
been notorious vectors for viruses
and spyware. (A study released in 2009 by the security software vendor
McAfee found "screen savers" to be the web's most dangerous search term,
because the results pages often lead to malware downloads. As Windows 7
gains in popularity, searches for "free themes" are likely to produce
risky results too. You can read the study at w7io.com/0403.)
Also, other types of malware could be disguised as a theme pack. (That
is, you think that by double-clicking a file you're installing a theme,
but you could in fact be installing a nefarious program instead.)