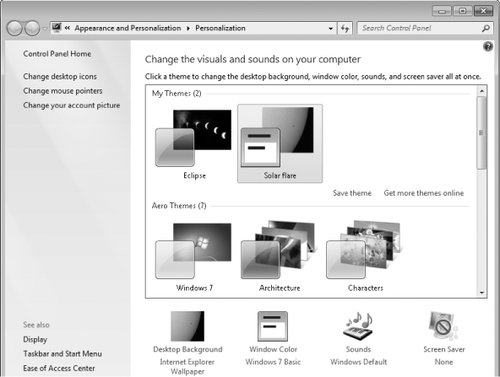
The most obvious way to personalize your Windows
experience is to customize its visual appearance—the desktop background,
the window colors, and so on—and to select the sounds that Windows uses
to let you know what it's up to. Those settings are made in the aptly
named Personalization,
a Control Panel tool that appears when you right-click the desktop and
choose Personalize. You can also open Personalization, which is shown in
Figure 1, by starting to type personalization in the Start menu search box or in the Control Panel search box, and then clicking the Personalization link that appears.

A theme in Windows 7 is an über configuration that combines and names the various personalization settings that you can make. Themes can incorporate the following:
Note that these are all settings that pertain to your own profile;
that is, they're specifc to your user account. Settings that apply to
all users at your computer, such as screen resolution, are not included
in the current theme.
Windows 7 includes some terrific predefined themes,
and you can select one simply by clicking it in Personalization. The
theme is applied right away, so if you don't like what you see and hear,
you can select another before you close Personalization.
Note:
For information about saving your own settings as a theme and using themes that others have created, see Section 4.5.7 on Section 4.5.7.
|
This article contains several references to Windows Aero,which is the default graphical user interface in most editions of Windows. The Aero interface uses desktop composition to achieve effects such as these:
Transparent window frames Live previews of running programs via buttons on the taskbar Live previews of the windows that you can switch to by pressing Alt+Tab Flip
3D—a feature that shows all open windows (and the desktop) as a
three-dimensional stack when you press the Windows logo key+Tab Smoother window dragging Interactive window controls (Close buttons that glow on hover, for example) Animated window closings and openings
With desktop composition on, applications write to video card memory buffers instead of directly to the screen, and the Desktop
Window Manager feature of Windows 7 arranges the video surfaces in the
appropriate order and presents the results to the screen.
In a nutshell, the requirements to use Aero are as follows:
Windows 7 Home Premium, Professional, Ultimate, or Enterprise (Aero is not available with Windows Starter edition) A DirectX 9-class graphics processing unit (GPU) with a Windows Display Driver Model (WDDM) 1.0 or higher display driver An Aero-based theme (one from the Aero Themes category in Personalization or one based on any of those themes)
Turning Aero Off
Even if you're not wild
about transparency and animation, there's plenty to like about Aero.
Smoother window dragging, the preview icons on the taskbar, and the
improved task-switching features are well worth the price of
admission—for most users. Nevertheless, admission is not entirely free;
the Aero interface uses more graphics memory than the non-Aero
interface—especially because achieving smoother window movement requires
Aero to store the contents of all open windows in video memory, not
just the windows that are currently visible.
If Aero slows you down
or annoys you for any other reason, you can turn it off. In
Personalization, choose any of the themes in the Basic And High Contrast
Themes category. For a solid, if stolid, user interface that retains
the new look and feel of Windows 7 without taxing your graphics
subsystem, choose Windows 7 Basic.
What if you like
transparency but don't care for the animated opening and closing of
windows or certain other effects? In the Start menu search box, type
effects and then click Adjust The Appearance And Performance Of Windows.
Clearing the Animate Windows When Minimizing And Maximizing check box,
on the Visual Effects tab in Performance Options, turns off these animated transitions. Other options let you squelch other unwanted Aero effects.
|
1. Customizing the Desktop Background
You can perk up any
desktop with a background image. Your background can be supplied by a
graphics file in any of several common formats (.bmp, .gif, jpg, .png,
and .tif). And you're not stuck with a static image, either. You can set
up a slide show of images, and you can even use an RSS feed to supply
new images.
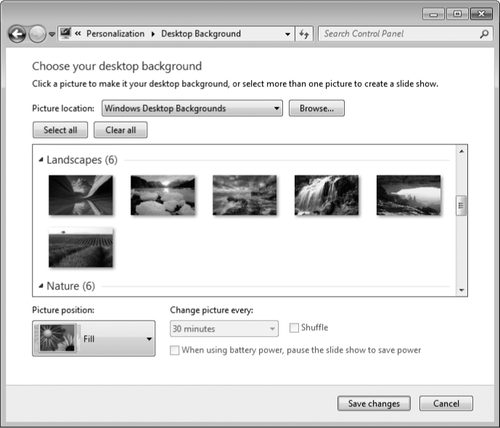
To select a background,
right-click the desktop, choose Personalize from the shortcut menu, and
then click Desktop Background. The Picture Location box in Desktop
Background (shown in Figure 2)
provides a selection of useful categories. The Windows Desktop
Backgrounds category itself is divided into several image categories.
The Top Rated Photos category includes pictures from your own Pictures
library to which you've assigned a four-star or five-star rating. You
might want to maximize the dialog box to get a better look at the
offerings.

If you don't find what
you need, click Browse. Folders to which you navigate via the Browse
button will subsequently appear in the Location list, making it easy for
you to go back and grab a different image from the same folder.
|
In the Windows Desktop
Backgrounds picture location, you might've noticed a category with your
country name or region as its name; the category includes a number of
photographs taken in that place. With a little digging, you can find
pictures of other places already installed on your hard drive. To do so,
follow these steps:
Display
"super-hidden" files. In the Start menu search box, type folder
options. On the View tab of Folder Options, select Show Hidden Files,
Folders, And Drives and clear Hide Protected Operating System Files
(Recommended). Then click Apply. In
Desktop Background, click Browse, and navigate to
%Windir%\Globalization\ MCT. (On most systems, %Windir% is C:\Windows.)
The MCT folder has a subfolder for each installed country. Expand one of
those, and then select the subfolder with the country name spelled out.
(For example, the full path might be
C:\Windows\Globalization\MCT\MCT-ZA\South Africa.) Return to Folder Options, undo the changes you made in step 1 (or simply click Restore Defaults), and click OK.
The newly found pictures
appear in Desktop Background. And it's easy to get back to these
pictures later; the country name now appears as an option in the Picture
Location list.
|
You can select one or more images
in Desktop Background. (To select multiple images, click a category
name or select the check box that appears when you point to each image
you want to use. Alternatively, Ctrl+click each image.) When you select
multiple images, Windows switches among the selected images
periodically, creating a slide show effect.
After you have chosen
your images, select one of the five Picture Position options to let
Windows know how you want to handle images that are not exactly the same
size as your screen resolution.
Then, if you've selected
more than one image, specify how often you want Windows to change the
background; the settings range from 10 seconds to 1 day. Selecting
Shuffle causes the backgrounds to be chosen randomly from your selected
images; otherwise, Windows cycles through the images in the same order
they appear in Desktop Background.
|
If you want an
ever-changing collection of pictures to use as your desktop background,
you can configure a theme to obtain images from an RSS
feed. If you post your own photos to a photo-sharing site, for example,
you could configure your computer to pick up those pictures and use
them. (Not every photo feed works, however. You must use one that
includes the photo as an enclosure. Flickr is one service that uses enclosures.) Because Windows 7 doesn't provide an interface for enabling RSS-fed images as desktop
backgrounds, the easiest way to set one up is to edit an existing
.theme file that includes a slide show. Open it in Notepad and, in the
[Slideshow] section, remove the ImagesRootPath line and all ItemnPath lines. Replace them with a line like this (using the URL to the RSS feed, of course):
RSSFeed=http://www.example.com/rssfeed
For complete details about .theme files, see the MSDN article "Creating and Installing Theme Files" at w7io.com/0402.
|
Here are some other ways to change the wallpaper:
Right-click
an image file in Windows Explorer, Windows Photo Viewer, or Windows
Live Photo Gallery and choose Set As Desktop Background. This centers
the selected image.
Right-click
an image in Internet Explorer and choose Set As Background. This
displays the selected image using the current picture position setting.
Open
any image file in Paint, open the Paint menu (the icon to the left of
the Home tab), and choose Set As Desktop Background. A submenu lets you
choose among Fill, Tile, and Center picture positions.