Targeting Attributes
Upon
closer inspection of the Appearance panel, you’ll notice disclosure
triangles to the immediate left of the Stroke and Fill attributes.
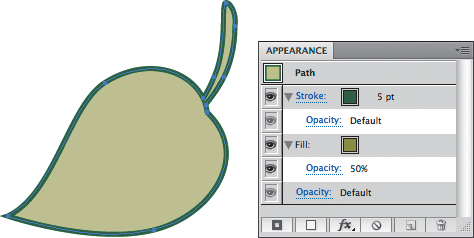
Clicking these disclosure triangles reveals an Opacity setting that lets
you control the opacity of an object’s stroke and fill independently (Figure 8).
In fact, a single path contains three Opacity settings by default: one
for its stroke, one for its fill, and one for the overall object. When
you apply an Opacity value to a single attribute, you’re targeting that
specific attribute. And in case you were wondering, yes, it’s certainly
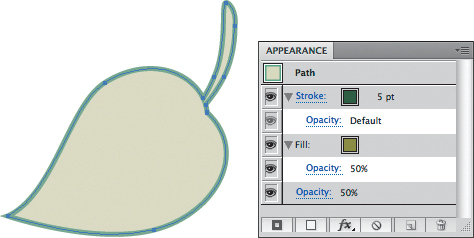
possible to apply a 50% Opacity value to an object’s fill and also apply
a 50% Opacity value to an overall object (resulting in a 25% opacity,
if you think about it; see Figure 9).
Since it can be confusing
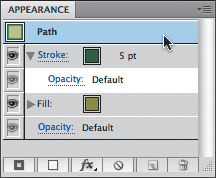
at times, it’s important to realize that when you click an attribute in
the Appearance panel, the attribute becomes highlighted to indicate that
it is targeted. If you want to target the overall path or object, click
the target that is listed at the top of the Appearance panel, near the thumbnail (Figure 10). Alternatively, you can click in the empty area that appears beneath all the attributes listed in the Appearance panel.
Applying Multiple Attributes
Objects that have a single fill and a single stroke are referred to as having a basic appearance.
However, vector objects aren’t limited to just one fill and one stroke.
In fact, a single object can contain as many fills or strokes that your
creative mind craves. An object with more than just one fill or stroke
is referred to as having a complex appearance.
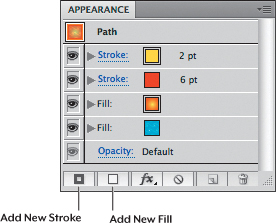
To add an attribute to an object, click the Add New Stroke or Add New Fill button at the bottom of the Appearance panel (Figure 11).
You can also target any existing attribute and click the Duplicate
Selected Item button. Once you’ve added an attribute, you can change its
place in the stacking order by dragging it above or beneath other
attributes in the Appearance panel. You can also remove targeted
attributes by clicking the Delete Selected Item button.
Tip
To
reduce a selected object to a single fill and a single stroke with
those attributes set to None, click the Clear Appearance button at the
bottom of the Appearance panel. |
You may be wondering
what good two fills or two strokes do in an object, because one always
covers the one beneath it. Earlier, we discussed the ability to target a
specific attribute so that you can apply settings to each individually.
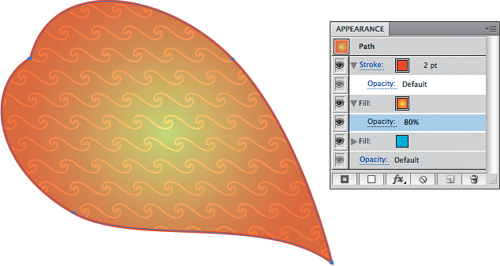
By applying different attributes to two different fills and by applying
an overprint or an Opacity setting to the top fill, you can create some
interesting effects (Figure 12).
Note
Even if
you don’t use the Appearance panel to add multiple Fill or Stroke
attributes to an object, you may work with someone else’s file that does
contain a complex appearance. As such, it’s always important to use the
Appearance panel when working in any document. |
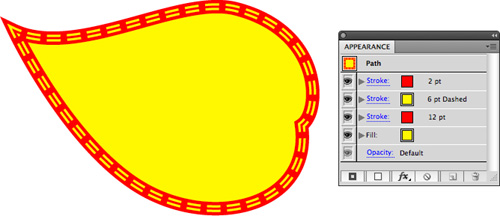
Likewise, you can add numerous
strokes, each with different widths, colors, and dash patterns,
resulting in useful borders and effects (Figure 13).
Although you can certainly use more traditional methods to simulate
these effects by overlapping multiple objects on top of each other,
adding multiple attributes to a single path means you have just one path
to work with and edit (as opposed to multiple paths). Considering the
Illustrator limitation of being able to edit only a single control
handle of a single path at any one time, seemingly simple edits to
multiple paths could prove extremely difficult and require much time and
effort.
|
Ordinarily,
Illustrator styles a newly drawn object based on the last object that
was selected. For example, if you click an object with a black stroke
and a yellow fill, the next object you draw will have a black stroke and
a yellow fill. However, if you select an object with a complex
appearance and then create a new shape, the default behavior is that
Illustrator will not style the new object with the complex appearance.
Instead, Illustrator uses the basic appearance of the previously
selected object (Illustrator uses the topmost Fill and Stroke attributes
and does away with any that appear beneath them in the appearance’s
stacking order).
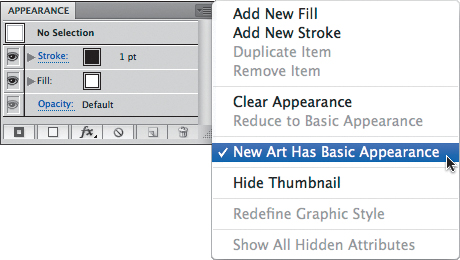
In the Appearance panel menu, you can deselect the New Art Has Basic Appearance setting (Figure 14),
which instructs Illustrator to draw new shapes using the full complex
appearance of any previously selected object. If you ever want to reduce
an object to its topmost fill and stroke while removing all additional
attributes that appear underneath, you can choose Reduce to Basic
Appearance from the same panel menu.
|
Expanding Appearances
Note
Although
some people don’t trust Illustrator and expand all appearances before
sending final files off to print, we don’t condone such behavior. There
is no risk in printing files with appearances—they print just fine.
Additionally, expanding your appearances limits your options if you have
to make a last-minute edit or if your printer has to adjust your file. |
You’ll notice that you can’t
target a specific fill or stroke of an object from the artboard—the only
place to access this functionality is through the Appearance panel.
This makes the Appearance panel infinitely important, but it may make
you wonder how an object with a complex appearance will print. After
all, how does the printer or export format know how to draw these
multiple attributes on a single path?
The answer is that
Illustrator breaks these complex appearances down into multiple
overlapping paths, and each path contains a basic appearance. This
process, called expanding, doesn’t happen on your artboard—it happens in the print stream or the export process.
Sometimes
you may want to manually expand your appearances to access the multiple
attributes as individual objects on the artboard. To do so, choose
Object > Expand Appearance. Remember that once you’ve expanded an
appearance, you are dealing with a group of multiple objects, not a
single object anymore (even fills and strokes are separated into
individual objects). Each of the individual objects has a basic
appearance, and you have no way to return to the original complex
appearance.