Modifying an AutoShape
AutoShapes can be formatted in many of the same ways
as photos and clip art illustrations. You can find the formatting
options on the Drawing Tools Format tab. You can also access
shape-dependent formatting options by right-clicking the shape and then
clicking Format Shape to open the Format Shape dialog box. Remember,
the available formatting options depend on the type of shape you select.
Here’s a quick list of modifications you can make to an AutoShape:
- To move a
shape, select it. When you point to it, the pointer turns into a
four-way arrow, which means Word is ready for you to drag the shape
around the screen. Drag the shape wherever you want, and drop it there.
|
Shapes are not inserted as inline images, so you can
drag them around freely without having to set a text wrapping option
first. However, you can wrap text around a shape in the same way you
wrap it around a picture. By default, AutoShapes are assigned the In Front of Text wrapping option.
|
- To quickly change a shape’s
appearance, click the More button (on the Format tab) to open the Shape
Styles Gallery. The gallery displays different colors and effects for
the type of shape you have selected. Styles can include different outline and fill colors, shadows, fonts (for placing text inside a closed shape), and other options.
- To
fill a closed shape with a different color, click the Shape Fill button
(on the Format tab) and pick a color. This menu also gives you the
option of placing a picture, a gradient, or a texture in a closed
shape. The Shape Fill button is not available when an open shape is
selected.
- To change the color of an outline, click the
Shape Outline button and select a color. You can also change the
outline’s weight or convert the outline from a solid line to a dashed
line. If the shape is an arrow, you can select a different line weight
and arrowhead from this menu. The Shape Outline button is available for
both open and closed shapes.
- To add a preset effect to
a shape, click the Shape Effects button. This button’s menu offers
effects such as shadows, reflections, and 3-D rotations. The options
available depend on the type of shape you are editing.
Adding Text to a Shape
Many AutoShapes, but not all, can hold text. When
you add text to a shape, Word essentially converts it to a text box.
Take these steps to add text to a shape:
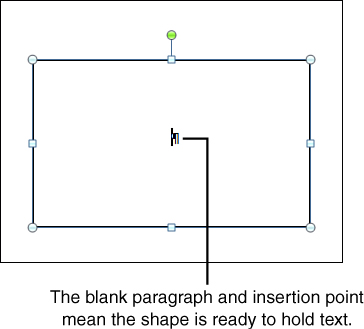
1. | Right-click
a closed shape (such as a rectangle) to open a shortcut menu; then
click Add Text. A blank paragraph return and a blinking insertion point
appear in the shape, as shown in Figure 4.
|
2. | Type your text into the shape. The text can completely fill the shape, if you want.
|
3. | If
there is too much text for the shape, you can resize the shape by
dragging its sizing handles or using one of the other methods described
earlier.
|
Grouping Shapes or Drawn Objects
If you add multiple shapes to a
document—for example, to create a diagram or an org chart—you can group
them so Word treats them as a single object. Grouping ensures that all
the parts of the drawing stay together when you move them.
Here’s how to group multiple drawn objects:
1. | Select all the objects. To select multiple objects, hold down the Ctrl key while clicking each object.
|
2. | Right-click the selection to open a shortcut menu, and then click Group.
|
3. | On the Group submenu, click Group.
|
If you need to change any of the objects in
the group, you need to ungroup the objects. To do this, right-click the
group, click Group, and then click Ungroup. You can regroup the objects
again whenever you want by repeating the preceding steps.
