4. Troubleshooting Disk Performance Problems
For many common tasks on a computer, the hard disk limits overall performance. Opening and saving files requires reading from and writing to the hard
disk, which is much slower than accessing system RAM. In addition, if Windows needs to allocate
more memory than it has physical RAM available, Windows uses the hard disk as virtual memory,
reducing performance for any task that requires the memory stored on the hard disk.
Fortunately, there are several things you can do to improve performance without upgrading
to a faster hard disk. The sections that follow discuss fragmentation and virtual
memory.
4.1. Fragmentation and Free Space
To reduce fragmentation, increase the amount of free disk space. When a disk begins to
run out of space, Windows needs to divide files into several different fragments, a process
known as fragmentation. Because hard disks perform best when a file is
not fragmented, fragmentation slows disk performance. As a general rule, you should keep at
least 15 percent of a disk's space free, but having more free disk space can further improve
performance.
Note:
FRAGMENTATION AND FLASH DRIVES
Traditional, magnetic hard disks have a drive head that must move across several spinning round platters to
read data, much like a record player. These drives perform best when reading and writing
sequentially, which does not require the drive head to move to a different part of the disk.
To read a fragmented file, the drive head must move several times, slowing
performance.
Flash drives do not have a drive head, and fragmentation does not
reduce their performance. Therefore, you never have to worry about fragmentation with a
flash drive. Windows 7 automatically disables defragmentation for flash
drives.
You can use the Windows 7 Disk Cleanup tool to free up disk space automatically by following these steps:
Click Start, and then click Computer.
Right-click the drive you want to clean, and then click Properties.
On the General tab, click Disk Cleanup.
To remove system files (a task that requires administrative privileges), click Clean Up
System Files.
Select the files that you want to delete. You can click each file type for a
description of the files that will be removed. Click OK.
The Disk Cleanup tool removes the files you specified.
Windows 7 automatically defragments your files, so you should never need to defragment
manually. If you would like to defragment files manually, perform these steps:
Click Start, and then click Computer.
Right-click the drive you want to defragment, and then click Properties.
On the Tools tab, click Defragment Now.
To configure the defragmentation schedule, click Configure Schedule.
In the Disk Defragmenter tool, select the disk you want to defragment, and then click
Defragment Disk.
The Disk Defragmenter begins defragmenting the drive. You don't have to wait for it to
complete before closing the window, however.
Click Close, and then click OK.
4.2. Virtual Memory
Depending on the disk configuration, you can maximize the performance of virtual memory
by storing virtual memory on a different physical hard disk from other files. For example, if
a computer has a separate C: and D: drive, Windows by default uses the C: drive for virtual
memory. By moving the virtual memory to the D: drive, Windows might be able to read and write
files stored on the C: drive at the same time it accesses virtual memory.
Note:
STORING VIRTUAL MEMORY ON A SEPARATE DISK
Although you can achieve performance benefits by storing virtual
memory on a separate hard disk, you will not see any benefits by storing virtual memory on a
different volume or partition of a single hard disk. For best performance with multiple
disks, configure the disks in a redundant array of independent disks (RAID) array, and store
all data on that RAID array.
To configure which disk Windows stores virtual memory on, perform these steps:
Click Start, right-click Computer, and then click Properties.
Click Advanced System Settings.
On the Advanced tab of the System Properties dialog box, click Settings in the
Performance group.
On the Advanced tab of the Performance Options dialog box, click Change.
Clear the Automatically Manage Paging File Size For All Drives check box.
Select the drive that you want to use to store virtual memory (also known as a
paging file). Click System Managed Size, and then click OK.
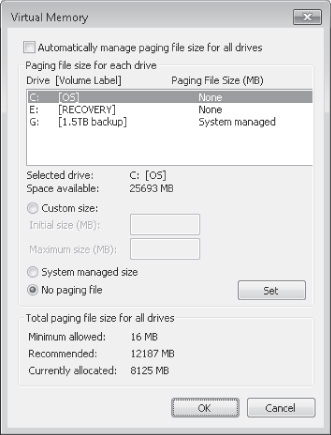
Select the system drive which currently has the paging file assigned to it. Click No
Paging File, and then click Set. Figure 7 shows
a computer that has had virtual memory assigned to the G: drive and removed from the default
C: drive. Click Yes when prompted.
Click OK four times, and then click Restart Now to restart your computer.
5. Configuring Power Settings
Some aspects of a computer are a compromise between performance and power usage. For mobile computers running on battery power, the
greater the power usage, the shorter the battery life. To maximize battery life, Windows 7
provides different power plans and switches between them automatically when a computer is
plugged in or running on battery.
However, the default battery power plan can reduce performance. To set the power plan
manually, perform these steps:
Click the power icon in the system tray, and then click More Power Options.
Click Change Plan Settings.
Click Change Settings That Are Currently Unavailable.
Change the display and sleep settings for times when the computer is plugged in or
running on battery.
To change other settings, click Change Advanced Power Settings. Adjust the settings, and
then click OK. Some of the more useful performance-related settings include:
Turn Off Hard Disk After Windows can turn the hard disk off to save power if it is not used for a
specific amount of time. Realistically, though, applications continue to use the hard disk
even if the user is not actively working with the computer.
Wireless Adapter Settings Wireless adapters can use a
significant amount of battery power because they must transmit and receive radio signals.
By default, Windows 7 enables power saving for wireless connections when running on battery
power. If wireless performance significantly decreases while on battery power, you can
change the power saving mode to Maximum Performance while on battery power.
Sleep In Windows Vista and Windows 7, Sleep is a
power-saving mode that combines both Standby (a low-power state that
allows the computer to recover in a few seconds) and Hibernation (a
zero-power state that stores the computer's memory to disk, but takes longer to recover). By default, Sleep in Windows 7
initially enters Standby mode and then enters Hibernation 20 minutes later. Adjust this
setting to change that default.
USB Settings USB devices draw power from a computer.
With USB selective suspend, Windows 7 can reduce the power usage of some USB devices. By
default, USB selective suspend is enabled while Windows 7 is on battery power.
Power Buttons And Lid By default, Windows 7
automatically enters sleep mode when the lid of a mobile computer is closed. You can change
this setting and configure how the power button functions.
PCI Express Some mobile computers have a PCI Express
interface. This setting configures the power savings mode used for the PCI Express
interface when on battery power or plugged in.
Processor Power Management Most modern processors can
run at different speeds depending on the current processing requirements. When less
processor time is needed, the processor runs slower, requiring less power. You can use
these settings to change the minimum and maximum speed of the processor.
Multimedia Settings You can use this setting to adjust
video quality when on battery power. Enabling a higher video quality increases battery usage.
Battery Adjust how Windows responds when a battery
begins to run out of power.
6. System Configuration
Troubleshooting often involves experimentation. For example, when troubleshooting a
performance problem, you might stop a program or service from starting automatically and then
test the computer to determine if the performance problem has been resolved. The challenge with
this, however, is that you might disable useful applications and services not related to the
problem.
The System Configuration Utility (Msconfig.exe) allows you to disable startup programs and
system services individually or several at a time. Once you identify the source of the problem,
you can easily re-enable the startup programs and services. To disable a startup program or
service by using the System Configuration Utility, use these steps:
Click Start, type msconfig, and then press Enter.
To disable a service at startup, select the Services tab and clear the check box for the
service.
To disable a startup program, select the Startup tab and clear the check box for the
application.
Click OK. When prompted, click Restart.
When Windows restarts, the changes you have made take effect.
When the computer restarts, determine whether your changes improved the computer's
performance. If disabling the startup program or service did solve the problem, you can
investigate it further. If there was no benefit, use the System Configuration utility to
re-enable the startup program or service.
You can remove a startup program permanently using Control Panel. To prevent a service
from starting automatically, use the Services console.
6.1. PRACTICE: Collect and Analyze Performance Data
6.1.1. PRACTICE: Collect and Analyze Performance Data
In this practice, you collect performance data using a data collector set and then
analyze it using a report and Performance Monitor.
EXERCISE 1 Perform System Diagnostics
In this exercise, you collect performance data by using a built-in data collector
set.
Click Start, right-click Computer, and then click Manage.
In the Computer Management console, expand System Tools, Performance, Data Collector
Sets, and then System.
Right-click System Diagnostics, and then click Start. Notice that a green arrow
appears on the System Diagnostics icon.
While the System Diagnostics data collector set is running, click System Diagnostics.
Browse through the various data collectors. In particular, view the properties of the
following data collectors:
Performance Counter
NT Kernel
Operating System
UAC Settings
Windows Update Settings
The green arrow disappears from the System Diagnostics icon after the data collector
set has finished running in one minute. Now, right-click System Diagnostics, and click
Latest Report.
Examine the Diagnostic Results section and investigate any error or warning
conditions. Then, investigate each of the other sections of the report to identify the
following pieces of information:
Processor utilization
The number of processors and whether the processors are hyperthreaded or not
Memory utilization
Total physical memory
Whether the operating system architecture is 32-bit or 64-bit
The name of the workgroup or domain the computer is a member of
The name of the anti-spyware, antivirus, and firewall software installed, if
any
Whether User Access Control (UAC) is enabled
Whether the Computer Browser, Server, Workstation, and Windows Update services are
running
Which service is using the most processor time
Whether IRQ 3 is in use
The Windows Experience Index rating for the processor, memory, and hard disk
Basic input/output system (BIOS) type and version
The Internet Protocol (IP) address that is sending the most bytes to the local
computer
The number of IPv4 and IPv6 connections
The file causing the most disk input/output (I/O)
The application with the largest working set
EXERCISE 2 Create a Performance Graph
In this exercise, you use Performance Monitor to analyze graphically the data you
gathered in Exercise 1.
In the Computer Management console, select the System Tools\Performance\ Monitoring
Tools\Performance Monitor node.
Click the View Log Data button on the toolbar to open the Source tab of the
Performance Monitor Properties dialog box.
Select Log Files. Then, click Add. Select the
C:\Perflogs\System\Diagnostics\<Computer_Name>_yyyymmdd-######\Performance
Counter.blg file to open the performance counter log created when you ran the System
Diagnostics data collector set. Click Open.
Click OK to return to Performance Monitor.
Now you are viewing the logged performance data. However, because you have not added
any counters to the chart, nothing is visible.
Click the Add button on the toolbar. Add the following counters to the chart, and then
click OK:
IPv4\Datagrams/sec
IPv6\Datagrams/sec
Memory\% Committed Bytes In Use
PhysicalDisk\Disk Bytes/sec
Processor\% Processor Time
System\Processes
Press Ctrl+H to highlight the selected counter. Browse through the available counters
and examine their performance during the one minute log period.
Drag your mouse horizontally across the middle of the chart to select about 30 seconds
of the chart. Then, right-click the chart and click Zoom To. Notice that the chart displays
a smaller period of time.
Use the slider below the chart to select the entire chart time period. Then,
right-click the chart and click Zoom To.
EXERCISE 3 Disable a Service Temporarily with the System Configuration
Utility
In this exercise, you temporarily disable a service with the System Configuration
utility.
Click Start, type msconfig, and then press
Enter.
In the System Configuration Utility dialog box, on the Services tab, clear the check
box next to the Computer Browser service.
In the System Configuration dialog box, click Restart. Windows restarts.
Log back on to Windows. Click Start, type msconfig, and
then press Enter.
On the Services tab, is the Computer Browser service stopped or started?
Stopped.
Select the check box next to the Computer Browser service, and then click OK.
In the System Configuration dialog box, click Restart.
