Logo
programming4us
programming4us
programming4us
programming4us
Home
programming4us
XP
programming4us
Windows Vista
programming4us
Windows 7
programming4us
Windows Azure
programming4us
Windows Server
programming4us
Windows Phone
 
programming4us
Windows 7

Troubleshooting and Recovering from Disaster : Using System Restore to Repair Windows

- Free product key for windows 10
- Free Product Key for Microsoft office 365
- Malwarebytes Premium 3.7.1 Serial Keys (LifeTime) 2019
11/18/2011 3:33:57 PM
System Restore debuted back in Windows Millennium Edition (Me, which we're all still trying to forget) and it has proven itself to be a life saver over the years. This feature carries forward in slightly improved form in Windows 7. System Restore automatically backs up key system files at opportune times, such as when you're installing a new hardware driver. (Otherwise, an automatic restore occurs once every 24 hours.) That way, if a driver or application wreaks havoc with your PC, you can use System Restore to reload older system file versions and get back up and running again. Microsoft describes this behavior as "restoring Windows to any earlier point in time," but we're pretty sure no actual time travel is involved.

System Restore has the following two main interface points:

  • System protection: 
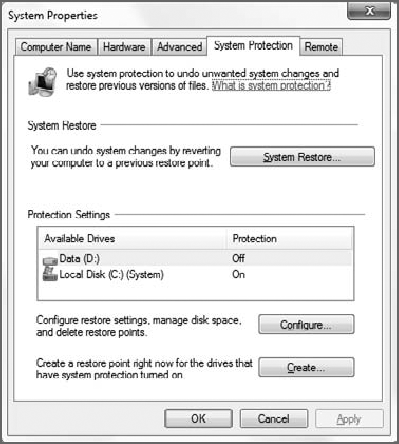
This is located in the System Properties window, which can be found by opening the Start menu, right-clicking Computer, choosing Properties, clicking Advanced system, and then clicking System protection in the tasks list. As shown in Figure 1, this interface enables you to configure which disks or partitions you will automatically protect (typically only the system volume, which is usually drive C:). You can also manually create a system restore point by clicking the Create button. You need to supply a name for the restore point.

    Figure 1. From System Protection, you can configure System Restore.
  • System Restore wizard: This wizard restores your PC's key system files to a previous point in time. To launch this wizard, open the Start menu and navigate to All Programs Accessories => System Tools => System Restore. (Or just type system restore in Start Menu Search.)

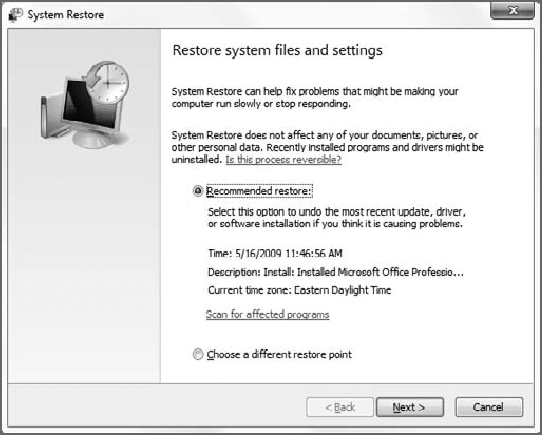
    In the introductory page of the wizard, shown in Figure 2, select Choose a different restore point and then click Next to choose a restore point.

    Figure 2. Automatic or manual? With System Restore, the choice is yours.

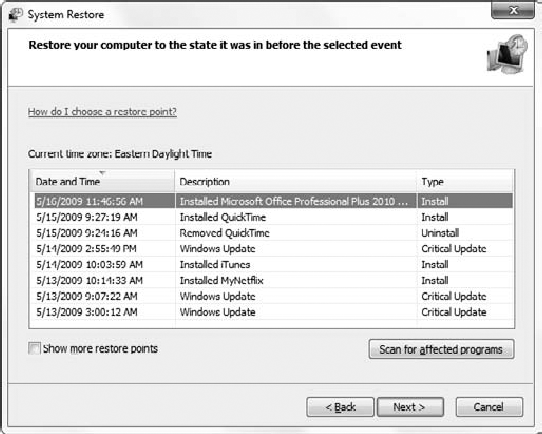
    As shown in Figure 3, you will now see a list of restore points. Most of these were automatically created by the system and will include a description of what was going on when each restore point was created. If you manually created your own restore points from System Protection, those restore points will have "Manual:" appended to the front of the restore point name.

    When you select a restore point, Windows will move into the secure desktop and begin restoring your system to its previous state. This requires the PC to reboot. Note that any applications you have installed since that restore point will almost certainly need to be reinstalled.

You can also access System Restore from the Windows Recovery Environment . This is useful when an install has made Windows particularly unstable. As shown in Figure 4, accessing System Restore from this environment is similar to doing so from within Windows.

Figure 3. Here, you can choose the restore point you'd like to use.

Figure 4. System Restore can also be accessed from the Windows Recovery Environment.
Other -----------------
- Microsoft Visio 2010 : Editing Existing Hyperlinks & Adding Multiple Hyperlinks
- Microsoft Visio 2010 : Setting the Hyperlink Base
- Microsoft OneNote 2010 : Finding Tagged Notes, Color-Coding Notebooks, Sections, and Pages
- Microsoft OneNote 2010 : Customizing Tags
- Customizing Microsoft Project 2010 : Creating Custom Fields
- Microsoft Project 2010 : Sharing Data with Others
- Designing a Zero-Touch Deployment (part 2) - Deploying ZTI Task Sequences to Target Computers
- Designing a Zero-Touch Deployment (part 1) - Using System Center Configuration Manager & Creating Task Sequences Using SCCM
- Troubleshooting and Recovering from Disaster : Using the Windows Recovery Environment
- Troubleshooting and Recovering from Disaster : Getting Help with the Problem Steps Recorder
 
 
Top 10
- Microsoft Visio 2013 : Adding Structure to Your Diagrams - Finding containers and lists in Visio (part 2) - Wireframes,Legends
- Microsoft Visio 2013 : Adding Structure to Your Diagrams - Finding containers and lists in Visio (part 1) - Swimlanes
- Microsoft Visio 2013 : Adding Structure to Your Diagrams - Formatting and sizing lists
- Microsoft Visio 2013 : Adding Structure to Your Diagrams - Adding shapes to lists
- Microsoft Visio 2013 : Adding Structure to Your Diagrams - Sizing containers
- Microsoft Access 2010 : Control Properties and Why to Use Them (part 3) - The Other Properties of a Control
- Microsoft Access 2010 : Control Properties and Why to Use Them (part 2) - The Data Properties of a Control
- Microsoft Access 2010 : Control Properties and Why to Use Them (part 1) - The Format Properties of a Control
- Microsoft Access 2010 : Form Properties and Why Should You Use Them - Working with the Properties Window
- Microsoft Visio 2013 : Using the Organization Chart Wizard with new data
 
programming4us
Windows Vista
programming4us
Windows 7
programming4us
Windows Azure
programming4us
Windows Server