1. Outlook Anywhere
Outlook Anywhere allows clients
on the Internet to access internal Exchange resources without having to
connect using a VPN or a technology such as DirectAccess. As clients on
the Internet use Outlook Anywhere to access internal Exchange resources,
the Client Access server hosting Outlook Anywhere needs to be
accessible to clients on the Internet. The Client Access server may be
on a screened subnet or may be indirectly accessible through a product
such as Forefront Threat Management Gateway. To prepare a Client Access
server to support Outlook Anywhere, you must first do the following:
Obtain a
valid SSL certificate from a certificate authority trusted by the
potential Outlook Anywhere clients. This means obtaining an SSL
certificate from a trusted third-party CA if you are supporting clients
from outside your organization.
The RPC over HTTP feature must be present on the Windows Server 2008 or Windows Server 2008 R2 host.
The external name used with Outlook Anywhere must be able to be resolved by a client on the Internet.
Once you have met these prerequisites, you can enable Outlook Anywhere by performing the following general steps:
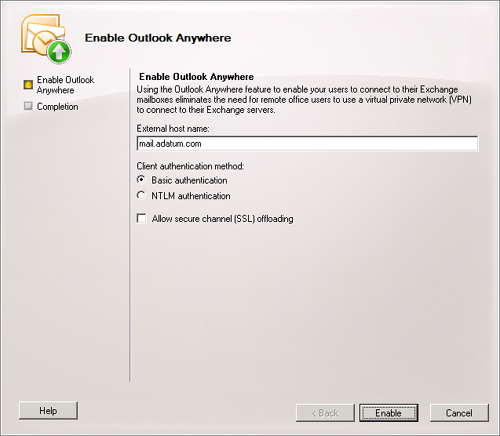
Navigate to the Server Configuration \ Client Access node in the EMC and click on Enable Outlook Anywhere in the Actions pane.
On the Enable Outlook Anywhere Wizard, shown in Figure 1,
enter the external host name that clients will use for access and
specify whether basic or NTLM authentication will be used. Use the SSL
offloading option only if an SSL accelerator is present.
You can also enable Outlook Anywhere from the EMS by using the Enable-OutlookAnywhere
cmdlet. For example, to enable Outlook Anywhere on server CAS1 with the
external host name mail.adatum.com and using NTLM for authentication,
enter the following command:
Enable-OutlookAnywhere -Server 'CAS1' -ExternalHostname 'mail.adatum.com'
-DefaultAuthenticationMethod 'NTLM'
Outlook Anywhere supports NTLM and the less secure basic authentication. You can switch between authentication types using the Set-OutlookAnywhere cmdlet. Once you have set it up, you can verify that Outlook Anywhere is functioning by using the Test-OutlookConnectivity cmdlet with the protocol parameter set to http.
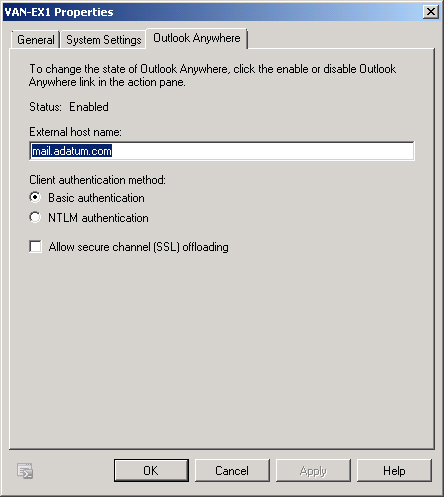
Once you have enabled Outlook Anywhere, you can modify its properties either using the Set-OutlookAnywhere
cmdlet or by viewing the properties of the Client Access server when
you have the Server Configuration\Client Access node selected in the
EMC. On the Outlook Anywhere tab, shown in Figure 2,
you can reconfigure the external host name and authentication method
and whether the Client Access server supports SSL offloading.
Note:
MANAGING OUTLOOK ANYWHERE
To learn more about managing Outlook Anywhere, consult the following article on TechNet: http://technet.microsoft.com/en-us/library/bb123513.aspx.
2. Configure RPC Client Access
The method by which clients
running Outlook interact with Client Access servers changed between
Exchange 2007 and Exchange Server 2010. In Exchange 2007 organizations,
Outlook clients could connect directly to a Mailbox server to access the
contents of mailboxes. In Exchange Server 2010 organizations, Outlook
access to mailboxes is mediated through a Client Access server. This
ensures that high-availability functions, such as Database Availability
Group failover, occur seamlessly.
Administrators should note that
there may be some transition issues for clients using older versions of
Outlook when an organization moves to Exchange Server 2010. Clients
running Outlook 2007 and Outlook 2010 will find the transition from
Exchange 2007 to Exchange 2010 to be seamless, as these clients
automatically support RPC encryption. Clients running Outlook 2003 will
need to be configured to use RPC encryption, which is not enabled by
default and which you can accomplish through group policy. As an
alternative, you can disable RPC encryption on the Client Access server, though this step is not recommended. You can accomplish this using the Set-RpcClientAccess cmdlet with the EncryptionRequired parameter set to $false. You can also use the Set-RpcClientAccess
cmdlet to restrict clients by version. For example, you can use the
BlockedClientVersions parameter to block all versions of Outlook, except
Outlook 2010, from accessing the Client Access server.
Note:
RPC CLIENT ACCESS
To learn more about RPC client access, consult the following article on TechNet: http://technet.microsoft.com/en-us/library/ee332317.aspx.
3. Configure Client Access Array
A client access array is a
collection of load balanced Client Access servers. There can be one
client access array per active directory site, and a single client
access array cannot span multiple sites. Client access arrays are
created using the New-ClientAccessArray
cmdlet. For example, to create a new client access array named
clientarray.adatum.com in the Maffra site, use the following command:
New-ClientAccessArray -FQDN clientarray.adatum.com -Site Maffra -Name "clientarray
.adatum.com"
Once the client access array is created, you assign the client access array to mailbox databases using the Set-MailboxDatabase
cmdlet with the RpcClientAccess parameter. For example, to configure
mailbox database ALPHA to use client access array
clientarray.adatum.com, use the following command:
Set-MailboxDatabase ALPHA -RpcClientAccess clientarray.adatum.com
Note:
CLIENT ACCESS ARRAYS
To learn more about creating client access arrays, consult the following article on TechNet: http://technet.microsoft.com/en-us/library/dd351149.aspx.
4. Client Throttling Policies
Client throttling policies allow
you to manage Client Access server performance by monitoring how users
consume resources and enforcing bandwidth limits where necessary. Client
throttling policies allow you to stop users from intentionally or
unintentionally degrading Client Access server performance when they use
a disproportionate amount of Client Access server resources. When you
first deploy Exchange Server 2010, a default throttling policy is
applied. You can view the properties of this policy by using the Get-ThrottlingPolicy cmdlet in the EMS. Throttling policies apply to the following Exchange components:
Exchange ActiveSync
Exchange Web Services
IMAP
OWA
POP
Windows PowerShell
You manage throttling policy settings using the following EMS cmdlets:
Get-ThrottlingPolicy Get the properties of existing throttling policies
Set-ThrottlingPolicy Configure the properties of an existing throttling policy
New-ThrottlingPolicy Create a new throttling policy
Remove-ThrottlingPolicy Remove an existing throttling policy
Note:
CLIENT THROTTLING
To learn more about client throttling policies, consult the following article on TechNet: http://technet.microsoft.com/en-us/library/dd297964.aspx.
Note:
Remember what the prerequisites are for Outlook Anywhere.
