Deploying New Virtual Machines on CSV Failover Clusters
After the desired cluster configuration is achieved, the cluster is ready for the deploying of virtual machines:
1. | On one of the cluster nodes, open Failover Cluster Management.
|
2. | Expand the Cluster and select Services and Applications.
|
3. | Now
that Cluster Storage Volumes have been configured, the Virtual Machines
application is available in the Actions pane. Click Virtual Machines,
New Virtual Machine and select the cluster node on which to deploy the
virtual machine.
|
4. | The
New Virtual Machine Wizard will launch. Click Next at the
introduction screen.
|
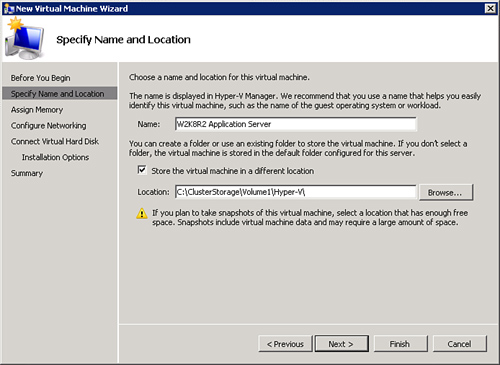
5. | Provide
a name for the new virtual machine and click the Store the Virtual
Machine in a Different Location check box. Enter the path to the
C:\ClusterStorage\Volume1, as shown in Figure 5, and click Next.
Note
It is recommended on Hyper-V
servers using Live Migration to change the default location to store
virtual machines to the Cluster Shared Volume path. This is configured
in Hyper-V Settings of the Hyper-V Manager console.
|
6. | Assign the desired amount of memory for the new virtual machine.
|
7. | Select the virtual network, or choose Not Connected to configure it later. Click Next.
|
8. | Create a new virtual hard disk in the C:\ClusterStorage\Volume1 folder or select an existing VHD and click Next.
Note
Both the virtual
machine configuration file and its associated virtual hard disk (VHD)
files must reside in the CSV folder location for Live Migration to work.
|
9. | Select
how you will install the operating system for the new virtual machine,
either using a boot CD-DVD ROM, ISO image, floppy disk, or from a
network-based installation server, and click Next.
|
10. | Review
the summary of the options you have selected and either click Finish if
the settings you’ve chosen are fine, or click Previous to go back and
make changes.
|
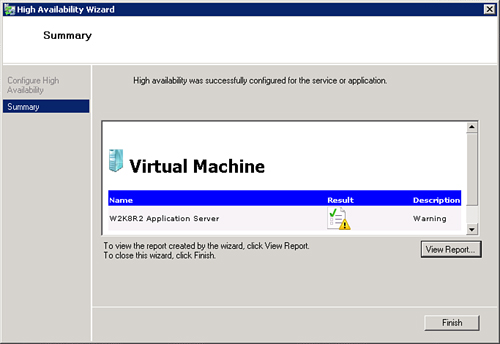
11. | Click
Finish to create the new virtual machine. After the virtual machine is
saved to the CSV path, the High Availability Wizard will configure the
virtual machine for use in Live Migration, as shown in Figure 6. Click View Report to review the step the High Availability Wizard used to configure the virtual machine for Live Migration.
Note
It is normal for the High
Availability Wizard to report a warning if the operating system for the
virtual machine will be installed from the host’s physical CD-DVD ROM,
an ISO file, or a floppy drive. This is because the drive or file used
for installation is not in a location available to the cluster. Most of
the time, this does not matter, but it can be overcome if needed by
installing the operating system from an ISO located on the CSV location.
|
12. | Click Finish to complete the configuration of the new virtual machine.
|
13. | Change
the virtual machine settings, if desired, to increase the number of
virtual processors, change the drive configuration, and so on.
|
14. | Right-click
the virtual machine in Failover Cluster Manager and select Start
Virtual Machines to start the virtual machine and install the operating
system.
|
Once the operating system is installed, Live Migration can be used to move the cluster from one node to another.
Deploying Existing Virtual Machines on CSV Failover Clusters
If
the LUN provisioned as a CSV disk in the cluster contains existing
virtual machine images, these can be made highly available. You can also
copy any virtual hard disk to the CSV volume and make it highly
available:
1. | On one of the cluster nodes, open Failover Cluster Management.
|
2. | Expand the cluster and select Services and Applications.
|
3. | Right-click
Services and Applications and select Configure a Service or
Application. This will open the High Availability Wizard.
|
4. | Click Next on the Before You Begin page.
|
5. | On the Service or Application page, click Virtual Machine and click Next.
|
6. | Select the virtual machine(s) to be made highly available and click Next.
|
7. | Review the Summary page in the wizard and click Finish.
|
8. | Select the virtual machine in the Service and Application pane and click Start Virtual Machines in the Actions pane.
|
Performing a Live Migration
The virtual machine runs on one
of the cluster nodes, known as the owner. When a Live Migration is
performed, multiple steps are performed. These steps can be broken down
into three stages: preflight migration, virtual machine transfer, and
final transfer/startup of the virtual machine.
The first step in Live
Migration occurs on the source node (where the virtual machine is
currently running) and the target node (where the virtual machine will
be moved) to ensure that migration can, in fact, occur successfully.
The detailed steps of Live Migration are as follows:
1. | Identify the source and destination machines.
|
2. | Establish a network connection between the two nodes.
|
3. | The preflight stage begins. Check if the various resources available are compatible between the source and destination nodes:
Are the processors
using similar architecture? (For example, a virtual machine running on
an AMD node cannot be moved to an Intel node, and vice versa.) Are there a sufficient number of CPU cores available on the destination? Is there sufficient RAM available on the destination? Is there sufficient access to required shared resources (VHD, network, and so on)? Is
there sufficient access to physical device resources that must remain
associated with the virtual machine after migration (CD drives, DVDs,
and LUNs or offline disks)?
Migration cannot occur if there are any problems in the preflight stage.
If there are, the virtual machine will remain on the source node and
processing ends here. If preflight is successful, migration can occur
and the virtual machine transfer continues.
|
4. | The
virtual machine state (inactive memory pages) moves to the target node
to reduce the active virtual machine footprint as much as possible. All
that remains on the source node is a small memory working set of the
virtual machine.
The virtual machine configuration and device information are transferred
to the destination node and the worker process is created. Then, the
virtual machine memory is transferred to the destination while the
virtual machine is still running. The cluster service intercepts memory
writes and tracks actions that occur during the migration. This page
will be retransmitted later. Up to this point, the virtual machine
technically remains on the source node.
|
5. | What
remains of the virtual machine is briefly paused on the source node.
The virtual machine working set is then transferred to the destination
host, storage access is moved to the destination host, and the virtual
machine is reset on the destination host.
|
The only downtime on the virtual
machine occurs in the last step, and this outage is usually much less
than most network applications are designed to tolerate. For example, an
administrator can be accessing the virtual machine via Remote Desktop
while it is being Live Migrated and will not experience an outage. Or a
virtual machine could be streaming video to multiple hosts, Live
Migrated to another node, and the end users don’t know the difference.
Use the following steps to perform a Live Migration between two cluster nodes:
1. | On one of the cluster nodes, open Failover Cluster Management.
|
2. | Expand the Cluster and select Services and Applications.
|
3. | Select the virtual machine to Live Migrate.
|
4. | Click
Live Migrate Virtual Machine to Another Node in the Actions pane and
select the node to move the virtual machine to. The virtual machine will
migrate to the selected node using the process described previously.
|
Note
If there are
processor differences between the source and destination node, Live
Migration will display a warning that the CPU capabilities do not match.
To perform a Live Migration, you must shut down the virtual machine and
edit the settings of the processor to “Migrate to a Physical Computer
with a Different Processor Version”.
