Building the BizTalk components
This exercise builds upon the previous one. In this
step, we will define a new mapping and build an orchestration that calls
the Dynamics CRM Create operation:
Right-click the BizTalk project and add a new item. Choose the Map type and name the map Customer_To_CrmContactCreate.btm. Set the source of the map to the Customer_XML message type. For the destination schema, select the organizationservice_schemas_microsoft_com_xrm_2011_contracts_se&;rvices type and pick the Create message.
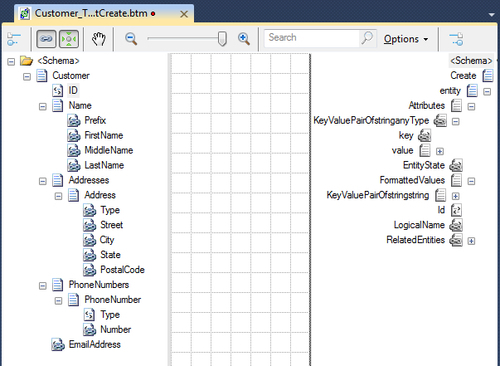
In this case, we have to get each source field copied over to the repeating KeyValuePairOfstringanyType
node. We will leverage the feature of BizTalk Server 2010 that lets you
neatly segment map aspects into logical containers called pages. Rename
the first page to Entity Name. Drag a Value Mapping functoid from the Advanced Functoids tab on the mapping surface. Double click the Value Mapping functoid and manually set the value of the first parameter (Condition) to true, and manually set the Result parameter to contact.
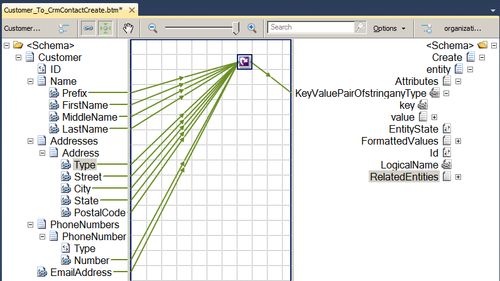
Create a new page in the map and name the page Looping.
While we could choose to build up the destination schema using nothing
but custom XSLT, this exercise shows you how to use the BizTalk
functoids to make that task a bit easier. If you connect a set of nodes
to a Looping functoid&;&;,
and then connect the output of the Looping functoid to a target node,
you create an environment that lets us copy the individual nodes from
the source into the repeating node of the destination. Drag a Looping functoid from the Advanced Functoids section of the Toolbox onto the map. Connect the following nodes to it: Prefix, FirstName, MiddleName, LastName, [Address] Type, Street, City, State, PostalCode, Number, EmailAddress.
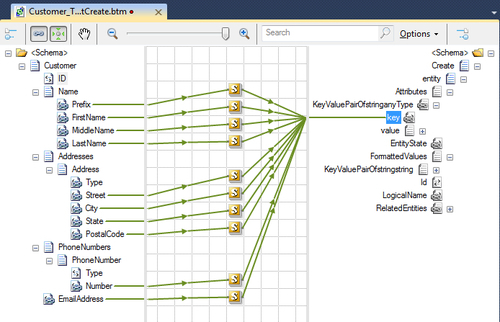
Create another map page named Any Pairs. On this page, connect the individual nodes to the repeating destination node. However, there are a few caveats. First, the key node underneath KeyValuePairOfstringanyType
expects to hold the name of the Dynamics CRM entity attributes. Our
canonical schema does not exactly match the names of the Dynamics CRM
entity attributes. Therefore, we have to do a bit of translation to set
the right value. In addition, because the KeyValuePairOfstringanType can hold any data type as the column value, we must explicitly "type" the value node when it is created. For instance, we must add a "string" attribute for string values. Drag the Scripting functoid onto the mapping surface and connect it to the Prefix source node and key destination node. Set the Script type to Inline XSLT Call Template. Add the XSLT found below. Note that the xsi:type attribute is added to the value node and the type is set as xs:string: <xsl:template name="SetPrefixValue">
<xsl:param name="param1" />
<key xmlns="http://schemas.datacontract.org/2004/07/System.Collections.Generic">salutation</key>
<value xmlns="http://schemas.datacontract.org/2004/07/System.Collections.Generic" xmlns:xs="http://www.w3.org/2001/XMLSchema" xmlns:xsi="http://www.w3.org/2001/XMLSchema-instance">
<xsl:attribute name="xsi:type">
<xsl:value-of select="'xs:string'" />
</xsl:attribute>
<xsl:value-of select="$param1" />
</value>
</xsl:template>
Repeat
this process for every source node that previously connected to the
looping functoid and make sure to use a different XSLT template name for
each script. Excluded from the list is the [Address] Type node which
must be handled differently, as we will see shortly. Note that my
mapping is as follows: |
Source Node
|
XSLT Template Name
|
CRM Key Name
|
|---|
|
Prefix
|
SetPrefixValue
|
salutation
| |
FirstName
|
SetFNameValue
|
firstname
| |
MiddleName
|
SetMNameValue
|
middlename
| |
LastName
|
SetLNameValue
|
lastname
| |
Street
|
SetStreetValue
|
address1_line1
| |
City
|
SetCityValue
|
address1_city
| |
State
|
SetStateValue
|
address1_stateorprovince
| |
PostalCode
|
SetPostalValue
|
address1_postalcode
| |
Number
|
SetPhoneValue
|
telephone1
| |
EmailAddress
|
SetEmailValue
|
emailaddress1
|
Now we
are ready to tackle the Address Type attribute which is not a string,
but rather an entry within a list of values (called Option Sets). Drag a
new Scripting functoid to the mapping surface and set it to use Inline XSLT Call Template. Add the following XSLT: <xsl:template name="SetAddrTypeValue">
<xsl:param name="param1" />
<key xmlns="http://schemas.datacontract.org/2004/07/System.Collections.Generic">address1_addresstypecode</key>
<value xmlns="http://schemas.datacontract.org/2004/07/System.Collections.Generic"
xmlns:xs="http://www.w3.org/2001/XMLSchema"
xmlns:xsi="http://www.w3.org/2001/XMLSchema-instance"
xmlns:a="http://schemas.microsoft.com/xrm/2011/Contracts">
<xsl:attribute name="xsi:type"><xsl:value-of select="'a:OptionSetValue'" /></xsl:attribute>
<Value xmlns="http://schemas.microsoft.com/xrm/2011/Contracts"><xsl:value-of select="$param1" /></Value>
</value>
</xsl:template>
Connect the Type node under the Address node to this functoid and connect the other end of the functoid to the key node under the KeyValuePairofstringanyType.

With
the map complete, the final task is to build an orchestration that
consumes the Dynamics CRM service and emits the result. In this case,
the result of a call to the Create operation is a GUID representing the
new record's unique ID. Add a new orchestration named CreateCrmCustomer.odx to this BizTalk project. Create three orchestration messages: Customer_Input of type&; Chapter3-DynamicsCRM.AccountInt.Customer_XML, ContactCreate_Requestof type Chapter3-DynamicsCRM.AccountInt.organizationservice_schemas_microsoft_com_xrm_2011_contracts_services.Create, and ContractCreate_Responseof type Chapter3-DynamicsCRM.AccountInt.organizationservice_schemas_microsoft_com_xrm_2011_contracts_services.CreateResponse. Build
an orchestration flow that receives a message, transforms a message,
sends a request to a service, receives a response, and sends out a final
message. The top Receive shape, named Receive Request, is associated with the Customer_Input message. The Construct shape, named Construct Create, builds the ContactCreate_Request message. The Transform shape uses the Customer_To_CrmContactCreate map that was just built. The next Send shape, named Send Request, uses the ContactCreate_Request message while the Receive shape that follows, named Receive Result, gets back the ContactCreate_Response message. The last Send shape, named Send Result also uses the ContactCreate_Response message. Add a one-way orchestration port that receives messages and is tied to the Receive Request shape. Add a one-way orchestration port that sends messages and connects to the Send Result shape. Create a two-way orchestration port that sends a message and receives a response. Set the Operation name of this port to Create. Recall that the operation name here must correspond to the operation name of the Dynamics CRM web service method being called. Build and deploy the BizTalk project.
We have now built the map and orchestration necessary to successfully call this service.
|
