Configuring and administering DFS Replication
DFSR is a feature Microsoft developed to provide
reliable replication between multiple DFS and standard shared folders.
By using DFSR, you can have multiple copies of the same shared folder
spread across different servers within your organization. Users can then
connect to DFS root, which will then link them to the copy of the
shared folder that is closest to them on the network. If the user makes
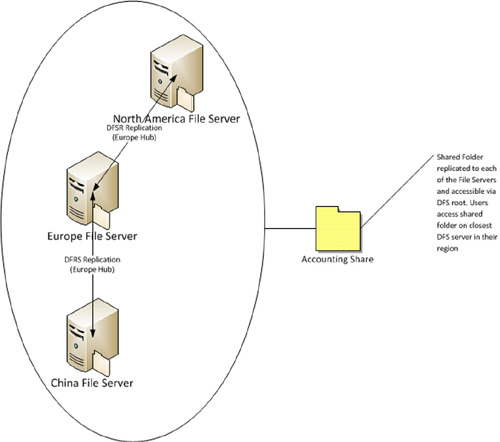
any updates to files within the shared folder, DFSR will replicate those changes to all copies of the shared folder as depicted in Figure 10.
DFSR does not necessarily require DFS Namespaces. It
can also be used with standard shared folders. For example, you could
configure DFSR to replicate data from file
servers in branch offices back to a central datacenter. In the event
that a branch office file server crashed, you would have a second copy
of the data in your primary datacenter. DFSR uses advanced algorithms to
compress data and replicate only changes to files making it very
efficient for wide area networks (WANs). In the following exercise, we
will add the DFSR role services and set up DFSR to create a replica of
the ClientData share being published in the DFS Namespace.
1. | Open Server Manager and select the node Roles | File services.
|
2. | In the middle pane, click the link Add Role Services.
|
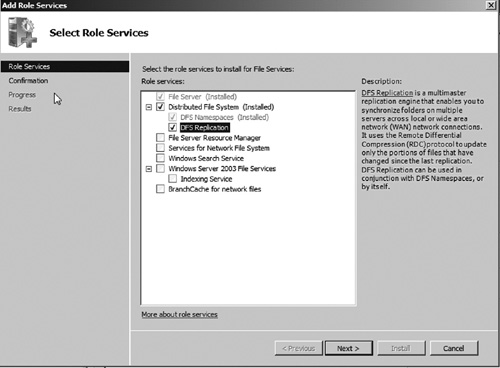
3. | Select the option DFS Replication as seen in Figure 11. Then click Next.
|
4. | Click Install.
|
DFSR should now be installed. Next, we will set up a new shared folder target to replicate the existing ClientData folder to.
1. | Log on to the server that will host the second copy of the data and create a new shared folder named ClientData.
|
2. | Log on to the DFS Root host server and open Server Manager and select the node Roles | File Services | File Services | DFS Management | Namespaces | contoso.com\Data | ClientData.
|
3. | Right click the selected ClientData node and choose the option Add folder target as seen in Figure 12.

|
4. | Enter the UNC Path to the second target folder. Then click OK.
|
5. | You will be prompted to set up replication to keep the target folders synchronized. Click Yes to enable replication between the two folders. This will launch the Replicate Folder Wizard.
|
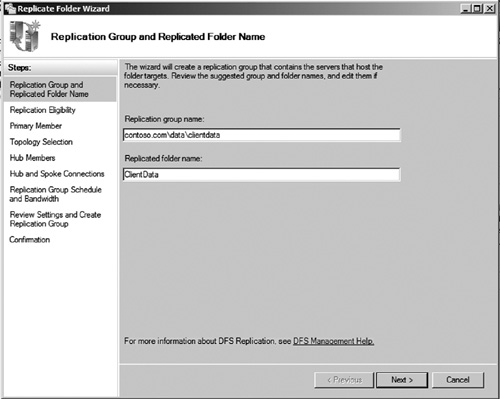
6. | The first step is to name the replication group and enter the replicated folder name as seen in Figure 13. Verify whether this information is correct, and then click Next to continue.
|
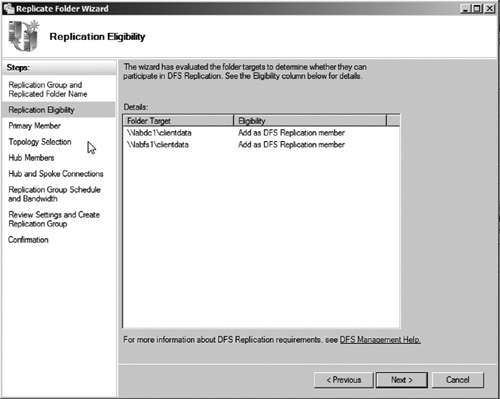
7. | The wizard should display the two shared folders that were set up in the DFS Namespace (see Figure 14 ). Verify whether these are correct, and then click Next to continue.
|
8. | You
now need to select the primary member of the replication group. This is
the initial data source to be used to replicate to the other folder. In
our example, the initial ClientData shared folder was set up on labfs1
so we will choose this as our initial source. After choosing the primary
member, click Next to continue.
|
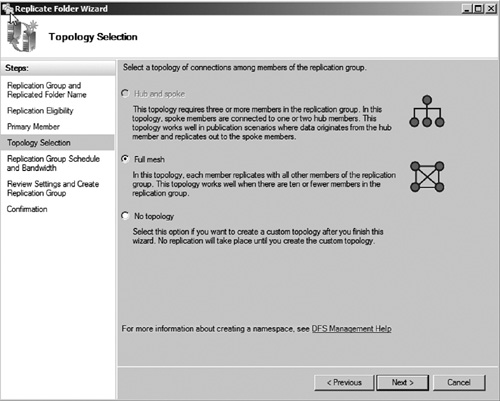
9. | Next
you will need to select the topology to use for replication. DFSR
supports two primary topology types, Hub and Spoke and Full Mesh:
- Hub and Spoke—Hub and Spoke
requires at least three member servers and should primarily be used when
data are published to a master share (hub), and then replicated to
spokes. In this topology, the hub share will always overwrite the
spokes.
- Full Mesh—A
fully meshed topology means that all folder targets are able to
replicate changes to all other folder targets. This means that updates
to files can be made on any member server and have them replicated to
all other member servers. Full Mesh requires two or more member servers
in the replication group.
In our example, we will be using Full Mesh as we only have two member
servers. We also want either member server to be able to replicate
updates to the other member server. Select Full Mesh (see Figure 15) and then click Next.
|
10. | The
next step is to select any bandwidth limits or schedules for
replication to occur. You can use these features to limit the usage of
WAN links for replication traffic. In our example, we will not be
limiting bandwidth and replication should occur continuously. Click Next to continue.
|
11. | Verify whether the replication settings are correct on the summary page, and then click Create to set up DFSR. You should see a success confirmation page after replication has been set up. Click Close to close the wizard.
|
Replication should now begin
between the two folders. Depending on the amount of data in the initial
source server (labfs1), it may take a while for all data to be
replicated to the secondary DFS shared folder. You can verify whether
replication is occurring by logging onto the second server and browsing
the shared folder. You should see that files from the primary server
appear in this folder as replication occurs. After initial replication,
you should be able to create a file on either shared folder and it
should replicate to the other.
Users accessing the DFS root should now be directed
to the server which can most efficiently provide access to the chosen
shared folder. If either of the DFS members
fails, the target folder, ClientData, should remain online and
accessible by sending users to the server still online.
DFS save conflicts
If multiple people are
accessing the same file from different DFS access points and the file is
saved by all of them, which version is saved? To handle conflicts, the
last write wins, meaning that the version of the file that was last
saved is the one that will be replicated to all copies of the file.