Do
power settings really make a difference? In a word, yes. You can not
only achieve greater battery life on a portable computer with the
appropriate settings, but you can save considerable amounts of energy on
desktop computers. The green effect of reducing power consumption can
be signifcant, whether you interpret "green" to mean saving dollars or
saving the environment. Microsoft has published a white paper that
describes the changes in Windows 7 power management and helps you to
assess the energy savings, financial savings, and environmental savings
of proper power management; download it from w7io.com/0405.
You can calculate your own savings using the Energy Star Computer Power
Management Savings Calculator, a Microsoft Office Excel spreadsheet you
can download at w7io.com/0406.
|
Windows 7 includes
a command-line tool called Powercfg that can analyze your system for
common energy efficiency and battery life problems. The tool is used
primarily by hardware manufacturers and device driver developers, but it
can provide useful information for end users. To use it, close all
applications, and then open a Command Prompt window (in the Start menu
search box, type cmd and press Enter). At the command prompt, type powercfg -energy. After the program finishes running and the command prompt returns, type energy-report.html, and a diagnostic report opens in your web browser.
The report can also tell
you what is preventing a computer from sleeping (or waking) as it
should. This problem can be caused by a driver, application, or service
that doesn't respond properly to sleep notifications. Drivers and
applications that have been certi fied for Windows 7 have been tested
not to block sleep.
|
1. Selecting a Power Plan
Power management
in Windows 7 is significantly different from power management in Windows
XP, both in its user interface and in its under-the-hood operation.
Windows provides three predefined power plans, and some computer
manufacturers include additional predefined plans. To select a power
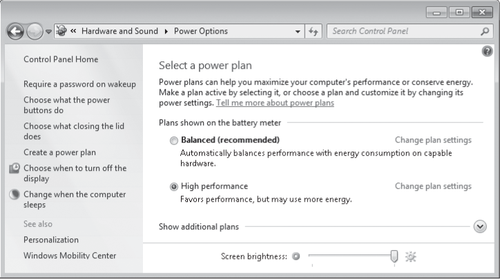
plan, open Power Options (in the Start menu search box, type power and click Power Options), shown in Figure 1.

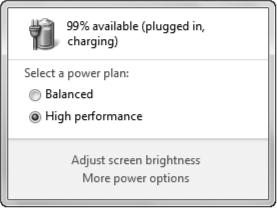
On a portable computer, there's an easier way to switch plans: click the Power icon in the notification area and make your selection.

2. Customizing a Power Plan
To customize the
current power plan, click one of the links in the left pane of Power
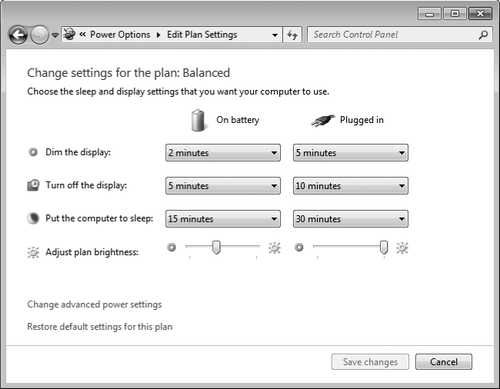
Options, or click Change Plan Settings next to the name of any plan. As
you dig into Power Options, you'll discover a wealth of useful settings,
especially on notebook computers, where you can make adjustments that
are different based on whether a system is running on batteries or on AC power.

You can do additional fine-tuning by clicking Change Advanced Power Settings in the window shown above.
Note:
If you've made
changes to a predefined power plan, you can restore its default settings
by clicking Change Plan Settings and then clicking Restore Default Settings
For This Plan. Not sure what those default settings are? The United
States Environmental Protection Agency will tell you; visit w7io.com/0407.
3. Understanding Sleep States
When you click
Choose What The Power Buttons Do (in the left pane of Power Options),
you'll see that for each power switch, you can specify Do Nothing, Sleep, Hibernate, or Shut Down. What do these terms mean?
Do Nothing disables the switch.
Sleep switches to a low-power sleep state that allows quick resumption.
Hibernate copies an image of memory to the hard disk and powers off the computer, enabling you to return to where you left off.
Shut Down performs an orderly shutdown of Windows and switches off the power.
By default, when you choose Sleep, Windows 7 uses hybrid sleep,
which combines the benefits of the low-power sleep state (the system
uses just enough power to keep everything in volatile memory, ready to
resume quickly) and hibernation
(saves the contents of memory to a hard disk so that nothing is lost if
power is shut off or the battery drains completely).
4. Working with Fonts
The days when your
choice of fonts ended just beyond Arial and Times New Roman are long
gone; if you include all the language variants and style variants (bold,
italic, and so on), Windows 7 comes with hundreds of fonts. Something
else that is gone (and won't be missed): the Add Fonts dialog box, which has been in every version of Windows virtually unchanged since Windows 3.1.
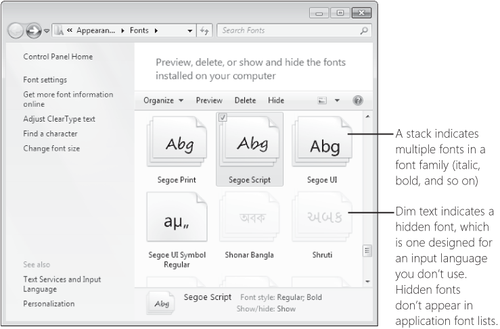
The headquarters for font management
is Fonts in Control Panel, which is shown next. From this list of
fonts, you can select a font (or a font family, which appears as a
stack) and then click Preview to open a window that shows the font's
characters in sizes ranging from 12 point to 72 point. (A point is a printer's measurement that is still used in modern digital typography. There are 72 points to an inch.)

The primary font format used by Windows is OpenType, which is a format jointly developed by Microsoft and Adobe as an extension of Apple's TrueType format. Windows also supports TrueType fonts and PostScript Type 1 fonts.
To install a new font, you can drag its file from a folder or
compressed .zip archive to Fonts in Control Panel. But it's not
necessary to open Fonts; the simplest way to install a font is to
right-click its file in Windows Explorer and choose Install. Because
font file names are often somewhat cryptic, you might want to
double-click the file, which opens the font preview window, to see what
you're getting. If it's a font you want, click the Install button.
Warning:
Download and install fonts only from people or companies you know and trust.
Note:
PostScript
Type 1 fonts normally comprise two or three files. The one you use to
install the font—regardless of which method you use—is the .pfm file,
whose file type is shown in Windows Explorer as Type 1 Font File.