1. Using Windows Server Backup
Exchange Server 2010 provides high availability and site resilience features
that enable you to deploy redundant, highly available mailbox databases.
However, redundancy and fault tolerance cannot protect against every possible
failure or disaster. You need to create and implement a backup and recovery plan
that ensures the protection of critical data in your Exchange organization. You
need to understand how data can be protected and determine the data protection
strategy that best suits your organization’s needs.
1.1. Backup Technologies Supported by Exchange Server 2010
Unlike Exchange Server 2007 and Exchange Server 2003, Exchange Server 2010
does not support the Extensible Storage Engine streaming Application
Programming Interfaces for backup and restore of program files or data.
Exchange Server 2010 supports only Volume Shadow Copy Service
(VSS)–based backups and includes a plug-in for Windows Server Backup
that enables you to make VSS-based backups of Exchange data.
To back up and restore Exchange Server 2010, you must use an
Exchange-aware application that supports the VSS writer for Exchange 2010,
such as Windows Server Backup (with the VSS plug-in), Microsoft System
Center Data Protection Manager, or a third-party Exchange-aware VSS-based
application.
You can use the VSS
plug-in that ships with Exchange Server 2010 to back up volumes containing
active mailbox database copies or stand-alone (nonreplicated) mailbox
databases. You cannot use this plug-in to back up volumes that contain
passive mailbox database copies. You need either Microsoft System Center
Data Protection Manager or a third-party Exchange-aware VSS-based
application to back up passive mailbox database copies.
If, however, you use either of these methods to back up a passive mailbox
database copy, you cannot perform a VSS restore directly to a passive
mailbox database copy. You can instead perform a VSS restore to an alternate
location, suspend replication to the passive copy, and copy the database and
log files from the alternate location to the location of the passive
database copy in the file system.
The VSS plug-in is implemented by an executable file named WSBExchange.exe
and runs as a service named Microsoft Exchange Server Extension for Windows
Server Backup (WSBExchange). It is automatically installed on all Exchange
2010 Mailbox servers and configured by default for manual startup. To use
the plug-in, you must have the Windows Server Backup feature installed. The
command-line tool WBAdmin.exe is also installed at the same time, and you
can run this tool from the command prompt.
1.2. Using Windows Server Backup to Perform an Exchange Backup
You can use Windows Server Backup on an Exchange Server 2010 server
running the Windows Server 2008 or Windows Server 2008 R2 operating system
to back up and restore your Exchange databases. During the backup operation,
the Exchange data files are checked for consistency to ensure that they can
be used for recovery. Windows Server Backup runs the consistency check on
the snapshot taken for the backup.
Manual backups taken with Windows Server Backup take place at the volume
level. You should consider which volumes you want to back up and whether
backups will include system state recovery data, application data, or both.
To back up a database and its log stream, you need to back up the entire
volume containing the database and logs. Windows Server Backup with the VSS
plug-in runs locally on the server being backed up and cannot be used
directly to take remote VSS backups. You can, however, use Terminal Services
or Remote Desktop Services to remotely manage backups. The manual backup can
be written to a local drive, DVD media, or a remote network share. You
require a separate, dedicated hard disk or storage system to run scheduled
backups. After you configure a disk for scheduled backups, Windows Server
Backup automatically manages disk usage and reuses the space of older
backups when creating new backups.
When you create or schedule backups, you will need to specify the volumes
that you want to include. You also need to specify a storage location for
backups. If you use an internal hard disk for storing backups, this limits
how much of your system you can restore. You can recover the data from a
volume, but you cannot rebuild the entire disk structure.
If you use an external hard disk for storing backups, the disk is
dedicated to backup storage and is not be visible in Windows Explorer. The
external, dedicated disk or disk system is formatted, removing any existing
data. If you use a remote shared folder to store backups, your backup will be overwritten each time
you create a new backup. You should not choose this option if you want to
store multiple backups for each server. If you use removable media or DVDs
for storing backups, you can recover only entire volumes, not applications
or individual files. The media you use must be at least 1 GB in size.
You perform a manual backup using Windows Server Backup locally on a
computer running Exchange Server 2010 in a practice session exercise later
in this lesson. The Windows Server Backup feature must be installed on the
local computer. The high-level procedure to perform such a backup is as
follows:
Start Windows Server Backup and click Backup Once on the Actions
pane to start the Backup Once Wizard.
Select Different Options on the Backup Options page and then
select the type of backup that you want on the Select Backup
Configuration page. You can choose to back up selected volumes. You
can also choose whether to back up system state data or perform a
bare metal backup. Note that volumes that contain operating system
components must be included.
Select the location where you want to store the backup on the
Specify Destination Type page. If you select Remote Shared Folder,
you need to specify a UNC path for the backup files.
If necessary, select VSS Full Backup on the Specify Advanced
Options page.
Click Backup on the Confirmation page. Click Close when the backup
is complete.
If the server that hosts the data you want to back up is a member of a
database availability group (DAG) and holds both active and passive database
copies, you must disable the Microsoft Exchange Replication service VSS
writer; otherwise, the backup operation will fail. Disabling this service
requires that you edit the registry on the local computer as follows:
Start the Registry Editor (Regedit.exe).
Navigate to
HKEY_LOCAL_MACHINE\Software\Microsoft\ExchangeServer\v14\Replay\Parameters.
Add a new DWORD value named EnableVSSWriter. Set its value to
0.
Close the Registry Editor and restart the Microsoft Exchange
Replication service.
1.3. Using Windows Server Backup to Perform an Exchange Recovery
Windows Server Backup can recover an Exchange database to the point of
failure by restoring the most recent normal (full) backup and then applying
each incremental backup in order. The following procedure uses Windows
Server Backup to perform a recovery:
Click Recover on the Windows Server Backup Actions pane to start
the Recovery Wizard.
If the data being recovered was backed up from the server on which
Windows Server Backup is running, select This Server (ServerName) on
the Getting Started page. Otherwise, select A Backup Stored On
Another Location.
If you are recovering from the local computer and there are
multiple backups, select the location of the backup on the drop-down
list on the Select Backup Location page.
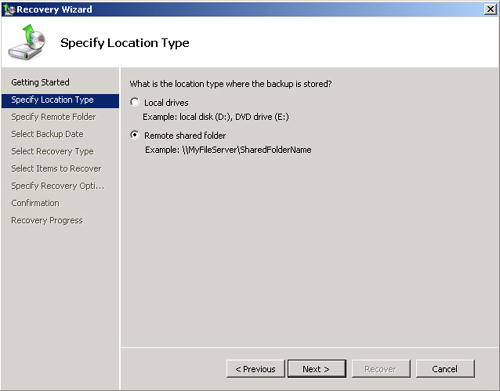
If you are recovering data from another computer, specify that the
backup you want to restore is on a remote shared folder on the
Specify Location Type page, shown in Figure 1. You can then specify
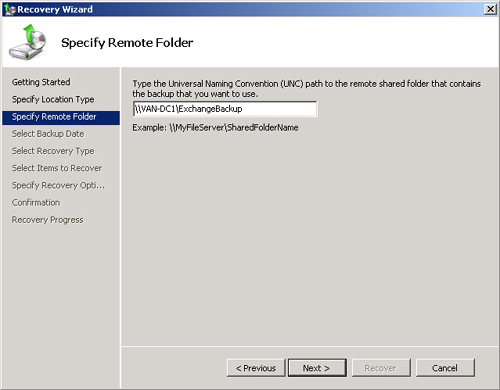
location-specific settings by typing the path to the folder that
contains the backup on the Specify Remote Folder page, as shown in
Figure 2. If you are recovering
from a local drive, select the location of the backup from the
drop-down list on the Select Backup Location page.
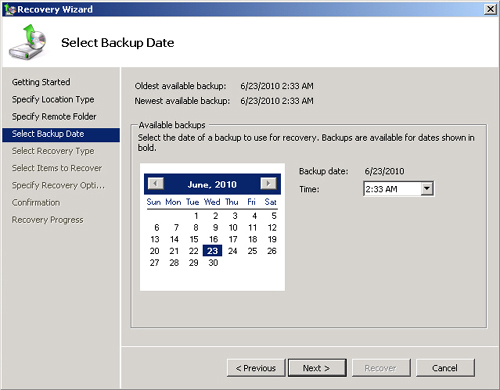
If more than one backup exists, select the date and time of the
backup that you want to recover on the Select Backup Date page,
shown in Figure 3.
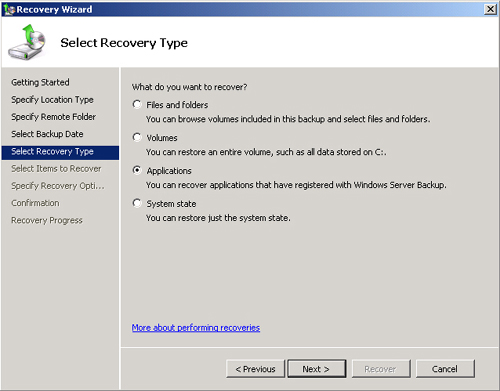
Select from the options available on the Select Recovery Type
page, shown in Figure 4,
depending on what you want to restore. If, for example, you want to
restore a backed-up database, select Applications. If you want to
recover certificates, logs, or users, select Files And
Folders.
If you
select Applications, verify that Exchange is selected in the
Applications field on the Select Application page. Click View
Details to view the application components of the backups. If you
are recovering the most recent backup, the Do Not Perform A
Roll-Forward Recovery Of The Application Database check box
displays. Select this check box if you want to prevent Windows
Server Backup from rolling forward the database being
recovered.
On the Specify Recovery Options page, select where you want to
recover the data. You can select Recover To Original Location to
recover backed-up data to its original location. This option is
available if you are restoring one or more databases and results in
all backed-up databases being restored to their original location.
Alternatively, you can select Recover To Another Location and
specify the alternate location. If you use this option, you can
restore a single database or multiple databases into a custom
location. After being restored, the data files can then be moved
into an RDB and moved back to their original location using mailbox
merge.
Note:
DIRTY AND CLEAN SHUTDOWN
STATES
When you restore a database to an alternate location, the
restored database is in what is known as a dirty shutdown state
and cannot be mounted. You can bring a database into a clean
shutdown state by using Exchange Server Database Utilities
(Eseutil.exe). If you are restoring to the original location,
you can mount the restored database without needing to use
Eseutil.exe to bring it into a clean shutdown state.
Review your recovery settings on the Confirmation page and then
click Recover.
Click Close when the recovery operation has completed.
If you use Windows Server Backup to restore data, you can restore Exchange
data to its original location or to an alternate location. If you restore
the data to its original location, Windows Server Backup and the plug-in
automatically handle the recovery process, including dismounting any
existing databases and replaying logs into the recovered database. Although
the restore process does not directly support the RDB, if you restore to an
alternate location, you can manually move a restored data from that
alternate location into the RDB if you need to do so.
