2. Creating an Exchange Server Disaster Recovery Plan
Backup and recovery are particularly important in an Exchange organization,
where data loss is seldom acceptable and failover and fast recovery is required
to meet Service Level Agreements and user expectations. As an Exchange
administrator, you need to create, test, and document a detailed backup and
recovery plan. You need take a close look at the overall architecture of your
Exchange organization and make any changes required to ensure that the
architecture meets availability and recoverability expectations.
2.1. Backup and Recovery Plan Considerations
You need to decide on the number of Exchange servers running specific
Exchange Server roles in your organization. Do you need additional servers
to ensure high availability? Do you need additional servers to improve
performance? Do you need additional servers because your organization spans
several geographic areas?
You need to decide the number of databases held on each Exchange server
and how the groups are organized. Should you create databases for each
department or division or for different business functions in your
organization? Are separate databases required for public folders and other
types of data?
When you have reviewed the architecture of your Exchange organization and
implemented any necessary changes or changes that you can convince senior
management are necessary, you need to create a backup and recovery plan to
support your organization. You should decide what data you need to back up,
how often you should back up this data, and what types of backup you should
use. You need to plan your restore policy with considerable care and test
that it works by carrying out trial restores.
You need to judge the importance of any mailbox or public folder database
you intend to include in your backup plan. For critical data, such as a
departmental mailbox database, you should plan redundant backup sets that
extend through several backup periods. For less important data, such as
public folders that hold nonessential documents, you can use a less complex
plan, although you still need to ensure that you back up the data regularly
and that you can recover the data easily.
One of the most important considerations is how quickly you need to
recover the data. To get critical data, such as the primary mailbox
database, back online swiftly, you might need to amend your backup plan. You
could for example create multiple mailbox databases and place them in
different availability groups. You can then recover individual databases or
individual servers as the situation warrants.
What equipment is available to perform backups? To perform timely backups,
you might need several backup devices and several sets of backup media.
Backup hardware can include tape drives, tape library systems, storage
arrays, and removable disk drives. You need to decide on the best time to
carry out backups. If you schedule backups for when the system use is as low
as possible, this speeds up the backup process, but this is not always
possible.
You need to determine who is responsible for the backup and recovery plan.
There needs to be a primary contact. This person (probably you) could also
be responsible for performing the backups. However, several people need to
be able to perform a restore, and at least one responsible person needs to
be available at any given time. If data is corrupted and a restore operation
is required, it is required immediately. The backup and restore plan and all
the procedures need to be documented. If, in the worst-case scenario, your
entire technical support team is struck with a mystery illness, the
consultants that management brings in would need to have clear
instructions.
Typically, you need to store backups
off-site. A natural disaster, such as a major fire or an earthquake, could
destroy both your system and your in-house backups. Storing backups off-site
lets you recover your Exchange Server infrastructure, provided that your
off-site storage location also includes copies of all the software you need
to recover Exchange Server.
2.2. Choosing Backup Options
You can perform backups with Exchange services running (online backups) or
with Exchange services stopped (offline backups). With online backups, you
can archive the following:
System State data, including Exchange configuration data
Exchange user data
Files and folders that contain Windows and Exchange files
Offline backups cannot archive Exchange configuration or user data and can
archive only the following:
You can perform the following types of backup with Exchange Server
2010:
Normal/full
backups
These back up all selected Exchange data, including databases
and current transaction logs. A full backup indicates that you
have performed a complete backup, and Exchange Server 2010
clears the transaction logs.
Copy backups
These back up all selected Exchange data, including related
databases and current transaction logs. A copy backup does not
clear the log files.
Differential
backups
These backup any data that has changed since the last normal
backup by backing up transaction log files and not actual
databases. A differential backup does not clear the log files.
To recover Exchange Server, you apply the most recent normal
backup and the most recent differential backup.
Incremental
backups
These backup any data that has changed since the last normal
backup or incremental backup by backing up transaction log files
and not the actual databases. An incremental backup clears the
log files after it completes. To recover Exchange Server, you
apply the most recent full backup and then apply each
incremental backup in order.
In your backup plan, you could, for example, perform full backups on a
weekly basis and supplement them with more frequent differential or
incremental backups. You might also want to create a regular copy backup to
removable media for off-site storage and archiving.
2.3. Scheduling Backups
You can create a backup plan by scheduling backups. Windows Server Backup
lets you schedule full or incremental backups so that they occur one or more
times per day. You can configure backup jobs that perform manual backups and
schedule these using Windows Task Scheduler. An expected update to Windows
Server Backup will allow you to create multiple master
schedules for any day of the week or month. When you implement this update,
which may be available by the time you read this book, you will be able to
configure separate schedules for full and incremental backups on the same
server.
The high-level procedure to create a backup schedule using Windows Server
Backup is as follows:
Click Backup Schedule on the Windows Server Backup Actions pane to
start the Backup Schedule Wizard.
Read the information on the Getting Started page.
Select Full Server or Custom on the Backup Configuration page. If
you select Custom, you can choose the items you want to back up in
the same way as you do for a manual backup.
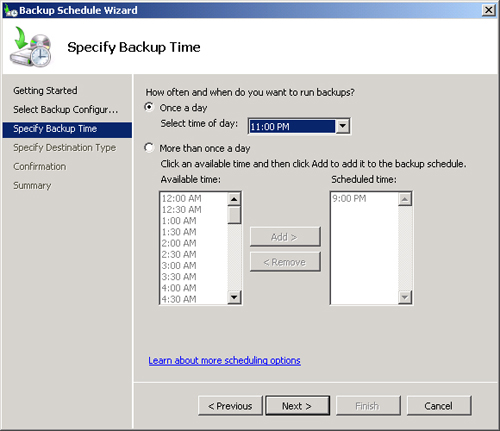
On the Specify Backup Time page, shown in Figure 5, you can choose to backup
once per day or more than once per day and choose your backup time
or times.

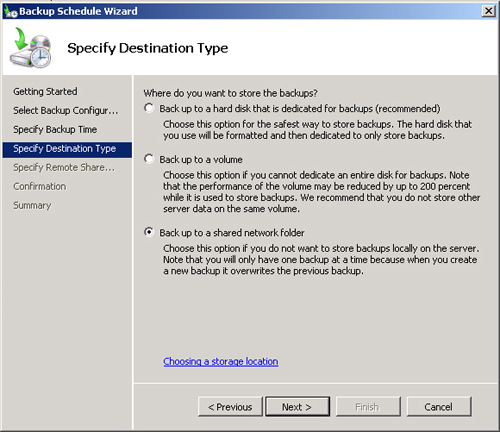
On the Specify Destination Type page, shown in Figure 6, you can specify
whether to back up to a hard disk, a volume, or a network share. If
you specify an external hard disk, this disk is dedicated to backup,
and any non-backup data it contains will be deleted. If you specify
more than one hard disk, the backup uses each of them in
turn.
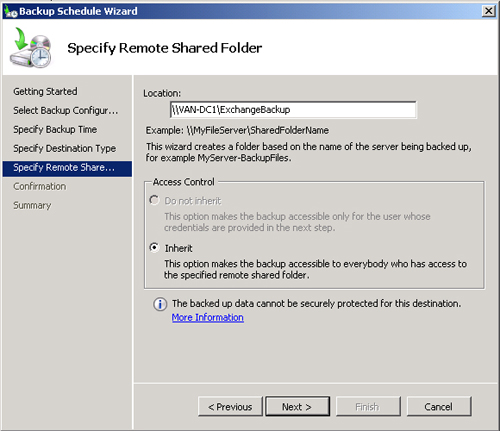
If you choose a remote shared folder as your backup destination,
you receive a warning that backups will overwrite any previous
backups. On the Specify Remote Shared Folder page, shown in Figure 14-7, you can specify
the UNC path to the shared folder. Note that only the Inherit Access
Control option is available for scheduled backups.


If prompted, provide a user name and password and then click
Finish on the Confirmation page.
2.4. Recovering Exchange Server
Earlier in this lesson, you saw how to
recover lost or corrupted Exchange data by using Windows Server Backup to
recover Exchange databases to either their original or another location.
However, this is not always the most appropriate procedure. In the worst
possible case, an entire server has failed through a crashed Windows Server
operating system and needs to be recovered. At the opposite end of the
scale, a single mailbox is corrupted and needs to be restored.
2.5. Performing a Full Server Recovery
If you need to recover a full server because of corrupted or missing
system files, you can use the Windows Server 2008 startup repair features.
The startup repair process can also recover from certain types of boot
failures that involve the boot manager. If the boot manager itself is
corrupt and you cannot start the server as a result, you can use the Windows
Server 2008 or Windows Server 2008 R2 installation disc or a recovery
partition to restore the boot manager and enable startup.
If startup repair fails and you are not able to start the server, you can
attempt to recover the server from a backup using the following
procedure:
Insert the Windows disc into the DVD drive and turn on the
computer. If needed, press the required key to boot from the disk.
The Install Windows Wizard appears.
Specify the language settings and click Next.
Click Repair Your Computer. Setup searches the hard disk drives
for an existing Windows installation and then displays the results
in the System Recovery Options Wizard. If you are recovering the
operating system onto separate hardware, the list should be empty,
and there should be no operating system on the computer. Click
Next.
Click Windows Complete PC Restore on the System Recovery Options
page. This starts the Windows Complete PC Restore Wizard.
Either click Use The Latest Available Backup (Recommended) or
click Restore A Different Backup and then click Next.
If you choose to restore a different backup, do one of the
following on the Select The Location Of The Backup page:
Click the computer that contains the backup that you want
to use and then click Next. On the Select The Backup To
Restore page, click the backup that you want to use and then
click Next.
To browse for a backup on the network, click Advanced and
then click Next. Browse the network to select the backup to
restore and then click Next.
On the Choose How To Restore The Backup page, you can optionally
perform the following tasks:
Select the Format And Repartition Disks check box to
delete existing partitions and reformat the destination
disks to be the same as the backup.
Click
the Exclude Disks button and then select the check boxes
associated with any disks that you want to exclude from
being formatted and partitioned. The disk that contains the
backup that you are using is automatically excluded.
Click Install Drivers to install device drivers for the
hardware to which you are recovering.
Click Advanced to specify whether the computer is
restarted and the disks are checked for errors immediately
after the recovery operation is completed.
On the Confirmation page, review the details for the restoration
and then click Finish. The Windows Complete PC Restore Wizard will
then perform the restore, depending on the options you have
selected.
2.6. Using an RDB
An RDB is a special kind of mailbox database that allows you to mount a
restored mailbox database and extract data from the restored database as
part of a recovery operation. This lets you recover data from a backup or
copy of a database without disturbing user access to current data. You can
use the Restore-Mailbox Exchange Management Shell (EMS)
cmdlet to extract data from an RDB. An example of this is given later in
this section. After extraction, the data can be exported to a folder or
merged into an existing mailbox. Mounting recovered data as an RDB lets you
restore individual mailboxes or individual items in a mailbox.
Note:
If you restore to the original location, you need to restore all the
databases you have backed up. If you restore to an alternate location,
you can restore a single database. This can significantly reduce the
recovery time when only a single database or an item in that database
needs to be recovered.
A database and log files can be restored to any disk location. Exchange
analyzes the restored data and replays the transaction logs to bring the
databases up to date. You can then configure an RDB to point to the
recovered database files.
Before you can move a recovered or restored mailbox database into an RDB
and then extract data from the recovered database, you first need to create
an RDB for this purpose. You use the
New-MailboxDatabase EMS cmdlet to create an RDB.
You cannot use the EMS for this purpose. For example, the following command
creates the recovery database RecoverDB on the Mailbox server
VAN-EX1:
New-MailboxDatabase -Recovery -Name RecoverDB -Server VAN-EX1
Figure 8 shows the output from this
command.

You need to bear the following information in mind when working with
RDBs:
You cannot use an RDB to insert mail into or remove mail from the
messaging system. All client protocol access to an RDB (including
Simple Mail Transfer Protocol, Post Office Protocol version 3, and
Internet Message Access Protocol version 4) is blocked.
RDB mailboxes cannot be connected to user accounts. If you need to
permit user access to the data in an RDB mailbox, you need to merge
this mailbox into an existing mailbox or export it to a
folder.
Client access to Messaging Application Programming Interface
(MAPI) using Microsoft Office Outlook or Outlook Web App (OWA) is
blocked. MAPI access to an RDB is available only to recovery tools
and applications.
An RDB cannot be deleted by the system during the recovery
process.
A recovered database mounted as an RDB is not tied to the original
mailbox database in any way.
Circular logging cannot be enabled for RDBs.
Online maintenance is not performed on RDBs.
You cannot use an RDB to recover public folder data.
You cannot create mailbox database copies of an RDB.
You can mount only one RDB on a Mailbox server at any time.
The use of an RDB does not count against the 100-database limit on
a Mailbox server.
An RDB can be used to recover Exchange Server 2010 mailbox databases only.
Mailbox databases from previous versions of Exchange are not supported, and
the target mailbox used for data merges and extraction must be in the same
Active Directory forest as the database mounted in the RDB. An RDB can be
used to recover data in the following scenarios:
Same-server dial tone
recovery
You can perform a recovery from an RDB as part of a dial tone
recovery operation after the original database has been restored
from backup. Dial tone recovery is discussed later in this
lesson.
Alternate-server dial tone
recovery
You can use an alternate server to host a dial tone database
and recover data from an RDB after the original database has
been restored from backup.
Mailbox recovery
You
can recover an individual mailbox from backup after its deleted
mailbox retention period has elapsed. You then extract data from
the restored mailbox and copy it to a target folder or merge it
with another mailbox.
Specific item
recovery
You can restore data that has been deleted or purged from a
mailbox from backup.
Note:
You should not use an RDB when you are recovering public folder
content, when you need to restore entire servers, when you need to
restore multiple databases, or when you need to change or rebuild your
Active Directory topology.
Before you can restore Exchange data using an RDB, the RDB must exist and
the database and log files containing the recovered data must be copied into
the RDB folder structure. The database must be in a clean shutdown state.
All databases restored to an alternate restore location are in a dirty
shutdown state by default, and you need to use the Eseutil utility in
recover mode (for example, eseutil /r E00, where E00 is the log file prefix)
to put the database in a clean shutdown state before moving the restored
database data into an RDB.
When you have moved the restored database into an RDB, you can mount the
RDB and merge its contents into the database you want to restore. You merge
the databases by exporting the data from the RDB and importing it into the
original database one mailbox at a time using the
Restore-Mailbox EMS cmdlet. For example, the
following command merges the contents of the RDB RecoverDB into the mailbox
database MyDatabase:
Get-Mailbox -Database MyDatabase | Restore-Mailbox -RecoveryDatabase RecoverDB
Note:
You need to use the Eseutil utility if you want to put a mailbox
database in a clean shutdown state. You can use the Isinteg utility to
repair a mailbox database but not to bring a mailbox database that is in
a dirty shutdown state into a clean shutdown state. No EMS cmdlet can be
used to put a mailbox database in a clean shutdown state.
You can also recover a single mailbox or specified messages within a
mailbox by using the Restore-Mailbox cmdlet. For
example, you are recovering the DonHall mailbox from a recovery database
named RecoverDB. The following command recovers all messages located in the
Inbox folder of the DonHall mailbox that contain the word
“Marketing” in the subject and places them in the DonMarketing
folder of the KimAkers mailbox:
Restore-Mailbox -Identity DonHall -RecoveryDatabase RecoverDB -SubjectKeywords
"Marketing" -IncludeFolders \Inbox -RecoveryMailbox KimAkers -TargetFolder DonMarketing
Note:
The recovery database replaces the recovery storage group found in
previous versions of Exchange.