3. Database Portability
Database portability enables you to move and mount an Exchange 2010 mailbox
database on any other Exchange 2010 Mailbox server in the same organization. If
you make use of database portability, you can improve reliability by removing
several manual steps from the recovery processes. In addition, database
portability reduces the overall recovery times for various failure scenarios.
Only Exchange 2010 mailbox databases are portable. Public folder databases are
not, and neither are mailbox databases from previous versions of Exchange. The
preferred way to move public folder data between servers is to use public folder
replication.
To move a mailbox database using database portability, you first need to
ensure that the database is in the clean shutdown state. You can then use a
command based on the New-MailboxDatabase EMS cmdlet to
create a database on the new server. For example, the following command creates
a database called MyNewDatabase on the Mailbox server VAN-EX2:
New-MailboxDatabase -Name MyNewDatabase -Server VAN-EX2 -EdbFilePath
C:\Databases\MyNewDatabase\MyNewDatabase.edb -LogFolderPath C:\Databases\MyNewDatabase
Figure 9 shows the output
from this command.

The next step is to set the This Database Can Be Over Written By Restore
attribute using a command based on the Set-MailboxDatabase
EMS cmdlet:
Set-MailboxDatabase MyNewDatabase -AllowFileRestore:$true
The database files (.edb file, log files, and Exchange Search catalog) can now
be moved to the appropriate location and the new database mounted:
Mount-Database MyNewDatabase
The final step is to modify the user account settings so that the user
accounts point to the mailbox on the new Mailbox server. For example, the
following command moves all the users (but not the
system mailboxes) from the old database MyOldDatabase to the new database
MyNewDatabase:
Get-Mailbox -Database MyOldDatabase | where {$_ObjectClass -NotMatch
'(SystemAttendantMailbox|ExOleDbSystemMailbox)'} | Set-Mailbox -Database MyNewDatabase
After Active Directory replication occurs, all users can access their
mailboxes on the new Exchange server. Microsoft Outlook 2010, Office Outlook
2007, and Windows Mobile 6.1 (and later) clients are redirected via the
Autodiscover service, OWA users are automatically redirected, and (if the server
name has changed) older Outlook clients need to be manually configured to point
to the new server.
3.1. Dial Tone Portability
Dial tone portability enables a user to have a mailbox in a dial tone
database for sending and receiving email while his or her original mailbox
is being restored or repaired and thus provides a business continuity
solution. The dial tone database can be on the same Exchange 2010 Mailbox
server or on any other Exchange 2010 Mailbox server in the same Exchange
organization. Clients that support Autodiscover, such as Microsoft Outlook
2010 or Office Outlook 2007, are automatically redirected to the new server
without the need to manually update the user’s desktop profile. After
the original mailbox data has been restored, you can merge the recovered
mailbox and the mailbox in the dial tone database into a single, up-to-date
mailbox.
A recovery process using dial tone portability is called a dial
tone recovery. A dial tone recovery involves creating an
empty database on a Mailbox server to replace a failed database. This empty
database, referred to as a dial tone database, allows users to send and
receive email while the failed database is recovered and moved into an RDB.
Note that dial tone restores are necessary only when the original database
is offline when restoration occurs and service to users has been
interrupted. After the failed database is recovered and moved into the RDB,
the data from the RDB is merged into the dial tone database, which is now
operating as the recovered production database.
The procedure to carry out a dial tone recovery of a mailbox database is
as follows:
Save any noncorrupted files that exist on the database being
recovered. These may be required for further recovery
operations.
Create a dial tone database. For example, the following EMS
command creates a dial tone database named MyDialToneDB on the
Mailbox server VAN-EX1:
New-MailboxDatabase -Name MyDialToneDB -Server VAN-EX1 -EdbFilePath C:\DialTone\
MyDialToneDB.edb
Transfer the user mailboxes hosted on the database being recovered
(for example, MyOriginalDB), as shown in the following
example:
Get-Mailbox -Database MyOriginalDB | Set-Mailbox -Database MyDialToneDB
Mount
the dial tone database, as shown in the following example:
Mount-Database -Identity MyDialToneDB
Create an RDB (for example, RecoverDB). Restore the database and
log files containing the data you want to recover to an alternate
location and copy them into the RDB. The procedure to create an RDB
was described earlier in this lesson.
After you copy the data to the RDB but before mounting the
restored database, copy any log files from the failed database to
the RDB log folder so that they can be played against the restored
database.
Mount the RDB and then dismount it:
Mount-Database -Identity RecoverDB

Dismount-Database -Identity RecoverDB
Move the current database and log files within the RDB folder to a
safe location to prepare for swapping the recovered database with
the dial tone database.
Dismount the dial tone database, as shown in the following
example. Note that your users experience an interruption in service
between the time you dismount this database and the time you mount
it again:
Dismount-Database -Identity MyDialToneDB
Move the database and log files from the dial tone database folder
into the RDB folder.
Move the database and log files from the safe location containing
the recovered database into the dial tone database folder and then
mount the database:
Mount-Database -Identity MyDialToneDB
The dial tone database is now operating as the recovered
production database, and service to the user is resumed. However, to
ensure that recovery is as complete as possible, the contents of the
RDB need to be merged with the contents of the dial tone
database.
Mount the RDB:
Mount-Database -Identity RecoverDB
Merge the databases by exporting the data from the RDB and
importing it into the recovered database:
Get-Mailbox -Database MyDialToneDB | Restore-Mailbox -RecoveryDatabase RecoverDB
After the restore operation is complete, dismount and remove the
RDB:
Dismount-Database -Identity RecoverDB

Remove-MailboxDatabase -Identity RecoverDB
4. Recovering a Mailbox within the Deleted Mailbox Retention Period
Deleted mailbox retention enables you to
recover mailboxes after they have been removed (or disconnected) without needing
to restore them from backup. By default, Exchange Server 2010 retains
disconnected mailboxes for 30 days after deletion, and mailbox recovery must
occur during this retention period. You recover a deleted mailbox within the
retention period by using either the EMS or the Exchange Management Console
(EMC).
To list the deleted (or disconnected) mailboxes in the Recoverable Items
folder (or dumpster) on, for example, the Mailbox server VAN-EX1 and the dates
on which they were deleted, enter the following EMS command:
Get-MailboxStatistics -Server VAN-EX1 | where {$_DisconnectDate -ne $null} | select
DisplayName,DisconnectDate
If you do not specify the Server parameter, the command will list the
disconnected mailboxes on the Mailbox server on which it runs. Note that this
command returns statistics only for those mailboxes where the user has logged on
at least once to the Exchange organization. A mailbox can also be disconnected
but not yet marked as disconnected. You can use the
Clean-MailboxDatabase cmdlet to scan Active Directory
for such mailboxes in the Microsoft Exchange mailbox database and update the
status of those mailboxes in the Exchange mailbox store.
4.1. Connecting a Mailbox
You recover a disconnected a mailbox by connecting it to a user account.
In this example, the account Paul West exists in Active Directory but does
not have an associated mailbox. You can check whether this user account
exists and is not disabled by entering the following EMS command:
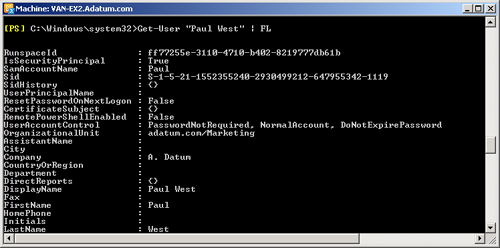
Get-User "Paul West" | FL
Figure 14-10 shows some of
the output from this command.
To reconnect a disconnected mailbox in the Research mailbox database to
user Paul West when the user object exists in Active Directory Directory
Service and has no associated mailbox, run the following command:
Connect-Mailbox -Database "Mailbox Database 1514648952" -Identity "Paul West" -User
"Paul West"

Note that if you want to try running
this command, you must first create a mailbox for the user Paul West in your
default mailbox database (which might not be called Mailbox Database
1514648952) and then disable this mailbox.
If you have a number of disconnected mailboxes in a mailbox database, you
can attempt to reconnect all of them with a single command, such as the
following:
Get-MailboxStatistics -Database "Mailbox Database 1514648952" | where {$_disconnectdate
-ne $null} | ForEach {Connect-Mailbox -Id $_mailboxguid -Database "Mailbox Database
1363123687"}
This command works for disconnected mailboxes that have equivalent Active
Directory user accounts that are not already associated with
mailboxes.
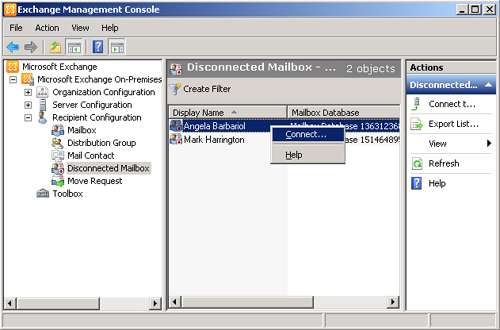
You can also use the EMC to connect a disconnected mailbox. A user account
that does not have an associated mailbox needs to exist in Active Directory
so that you can connect the mailbox to it. In the EMC, expand Recipient
Configuration and click Disconnected Mailbox in the Console tree. If
required, click Connect To Server on the Actions pane to specify the Mailbox
server that holds the disconnected mailbox. Right-click the mailbox you want
to connect and click Connect, as shown in Figure 11. Follow the steps in the
Connect Mailbox Wizard. Note that in order to replicate this figure, you
need to create and disable mailboxes for Mark Harrington and Angela
Barbariol.

4.2. Configuring the Deleted Mailbox Retention Period
Disconnected mailboxes are retained
for 30 days by default and can be recovered at any point during this 30-day
period by associating them with an Active Directory user account. You can
use the EMS but not the EMC to configure the deleted mailbox retention
period. If, for example, you wanted to change the deleted mailbox retention
time to 20 days for mailboxes in the database Mailbox Database 1514648952,
you would enter the following EMS command:
Set-MailboxDatabase -Identity "Mailbox Database 1514648952" -MailboxRetention
20.00:00:00
Note:
Note the format for retention periods. If you see an answer in the
examination that, for example, gives a deleted mailbox retention setting
of 15.00.00.00 or 30:00:00:00, that answer is wrong.