Creating Programs
Finally, it’s necessary to create at least one
program for each package. This program specifies how the package is to
be executed at the client. Many packages can have more than one program
associated with them. For example, a package might have different
installation methods such as Custom, Typical, Unattended, and Manual.
This is where you really have to know your package. The command-line
information you provide here will either make or break the package when
it’s run on the client.
To create a program, follow these steps:
1. | Navigate to the Packages folder, find your package entry, and expand it.
| 2. | Right-click
Programs, choose New from the context menu, and then choose Program to
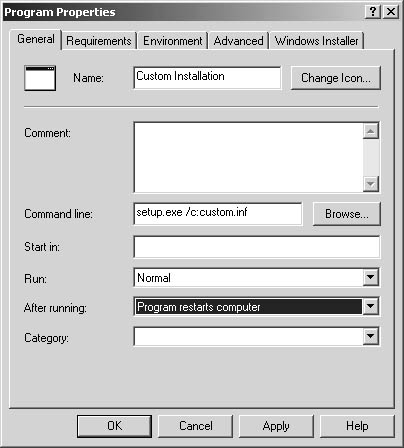
display the Program Properties dialog box, shown in Figure 19.
| 3. | In
the General tab, enter a descriptive name for the program—for example,
Custom Installation or Unattended Installation. Enter additional
descriptive information in the Comment text box.
| 4. | In
the Command Line text box, enter the command that should be executed at
the client. For example, this could be a Setup.exe file, a batch file,
or an .MSI file; however, you must include any and all command-line
arguments required for successful execution. For example, if you run the
Setup program, which uses a script file called Custom.inf, and the
Setup program invokes this script file through a “/c” command-line
switch, you must enter the full command as it references the script:
setup.exe /c:custom.inf.
| 5. | In
the Start In text box, enter the name and path of the directory in
which you want the program to start. This field is optional, and by
default the distribution folder on the distribution point is used.
| 6. | From
the Run drop-down list, select an option—Normal, Minimized, Maximized,
or Hidden—to specify how the program will be displayed to the user.
Hidden does mean that nothing will be displayed; this option is best
used with fully unattended, or silent, installations.
| 7. | From
the After Running drop-down list, select an option—No Action Required,
SMS Restarts Computer, Program Restarts Computer, or SMS Logs User
Off—to specify what action, if any, will be performed after the program
completes.
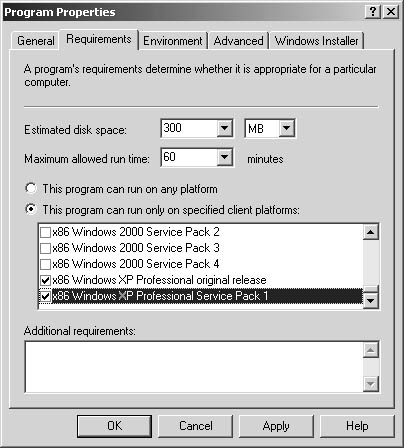
| 8. | Select the Requirements tab, shown in Figure 20.
This tab lets you specify descriptive elements regarding the program’s
estimated size and installation run time. More importantly, it allows
you to identify which operating system platforms the program can run on.
This enables you to filter out those clients on whose platform the
program can’t run.
| 9. | Select the Environment tab, shown in Figure 21.
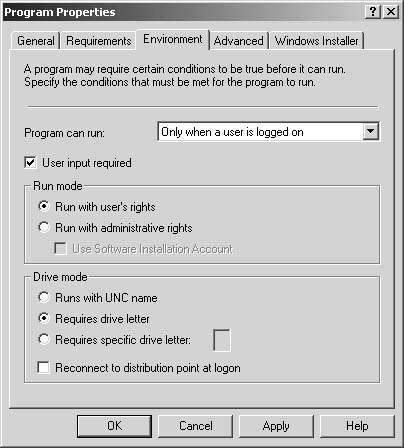
In
this tab, user level and drive mode requirements are defined. First
specify when the program can run. The drop-down list options are Only
When A User Is Logged On (which can apply to all clients, but Windows 98
clients in particular); Whether Or Not A User Is Logged On; and Only
When No User Is Logged On. These last two options are specific to
computers running Windows NT 4.0 and later. If either of these options
is selected, the User Input Required check box and the Run With User’s
Rights under Run Mode option are automatically disabled.
| 10. | If
the program requires the user to click even a single OK button, you
must select Only When A User Is Logged On from the Program Can Run
drop-down list and then select the User Input Required option. Clear
this option only if the program is fully scripted (that is, automated).
If the program must be run in the local administrative security context,
select the Run With Administrative Rights option in the Run Mode frame.
If you have specified a particular account to use on Windows computers
when running programs that require administrative privileges, select the
Use Software Installation Account check box. If you require that the
logged-on user also be able to interact with the program while it’s
running with administrative rights, select the Allow Users To Interact
With This Program check box.
Caution Selecting
the Allow Users To Interact With This Program check box allows any
connected user to interact with the program in an administrative
security context. This could provide an opportunity for a security
breach on that client. Choose this option only if absolutely necessary
for the successful execution of the program. |
| 11. | In
the Drive Mode frame, select the option that best fits the program. As
you have no doubt experienced, although most programs understand UNC
paths, some do not and require a drive letter mapping. If you need to
have the client reconnect to the distribution point each time the user
logs on, select the Reconnect To Distribution Point At Logon check box.
This option could be useful if the application needs to write
information back to the distribution folder on the distribution point,
retrieve startup files, and so on.
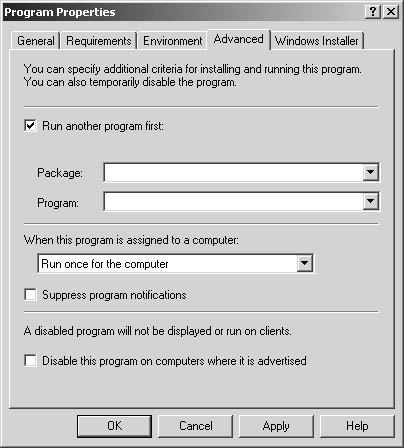
| 12. | Select the Advanced tab, shown in Figure 22,
which provides several additional options. If you need to run another
program before this one—for example, to install a service pack or a
patch, select the Run Another Program First check box and then select
the appropriate package and program. This assumes, of course, that you
have already created the other package and program. In this example you
won’t need to advertise the other program separately.
| 13. | If
you’ve assigned a program to run on a computer, you can either execute
it once for the computer or once for every user who logs on to the
computer by choosing one of two run time options in the When This
Program Is Assigned To A Computer section. Select Run Once For The
Computer, the default, to execute the program once for use by all users
on the computer. Select Run Once For Every User Who Logs On to execute
the program once for each user when the user logs on. Use the Suppress
Program Notifications check box to turn off notification and countdown
icons and messages for this program.
| 14. | To
temporarily disable the program from being run—even if it has been
assigned a specific time—select the Disable This Program On Clients
Where It Is Advertised check box. This option can be handy if you need
to update files, test an installation, and so on.
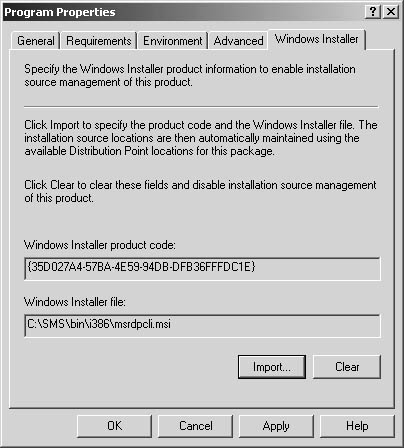
| 15. | Select the Windows Installer tab shown in Figure 23
to specify Windows Installer product information to enable SMS to
manage the location of source files for Windows Installer-based
programs. This feature is available only for Advanced Clients and is
valuable for determining the location of source files when Windows
Installer needs to initiate a repair. Click Import to locate and select
the Windows Installer package associated with the program and populate
the Windows Installer Product Code and Windows Installer File fields.
| 16. | Click OK to save the program.
|
If you decide to delete a program later,
right-click the program in the SMS Administrator Console and choose
Delete from the context menu to activate the Delete Program Wizard. This
wizard walks you through the process and helps you decide whether to
delete the program. Deleting a program does produce a ripple effect for
other SMS components. Any advertisements of the program will also be
deleted and will no longer be made available to the client. The wizard
displays all the affected advertisements and prompts you once more to
confirm the deletion.
When a new member joins
the collection, it automatically receives any advertisements made to
that collection. In general, you should leave programs advertised until
they’re no longer needed or until they should be retired.
|