Entering Leads and Lags
Entering leads and lags is done the same way whether
you use the Task Information dialog box mentioned previously or other
dialog boxes or forms. When entering lags and leads, bear in mind that
both are entered in the same Lag box; there is no separate Lead box.
Use positive numbers to represent lag time and negative numbers to
represent lead time.
You can enter a lag or lead as a number followed by
one of the regular or elapsed time code letters you use for entering
duration time: minutes=m or em, hours=h or eh, days=d or ed, weeks=w or
ew, and months=mo or emo. Lead time is entered as a negative lag. For
example, you enter 4d to define a four-day lag and -8h to define an eight-hour lead. You type 4ed
to schedule a lag of four elapsed days (four full, real-time days, as
opposed to four working days, which would not include weekends or
holidays). If you type a number without a time unit, Microsoft Project
attaches the default duration unit (which is days by default).
You can also express lag or lead time as a
percentage of the predecessor’s duration. If you want a task to start
when its predecessor is within 20% of being finished, you can enter a
Finish-to-Start link with a 20% lead, entered as FS-20%.
Microsoft Project schedules the task to start so that it overlaps the
last 20% of the predecessor task duration. Using percentage lags and
leads enables the amount of lag or lead to vary with changes in the
duration of the predecessor. Thus, the longer the duration of the
predecessor, the more time a percentage lag or lead would entail.
Tip
If changes in the schedule
occur as the project develops, a percentage would likely give you a
more preferred successor start date than a time duration, because the
time duration might not accurately reflect that changed schedule.
Creating this relationship works well in outlining company methods and
templates in which the scaling of the project is dependent on the
relationship delay or overlap, not a specified duration. |
When you use percentage lags and leads, Microsoft
Project uses the start or finish of the predecessor (as specified in
the link type) for the starting point, and offsets the start or finish
of the successor from that point by the lag percentage multiplied by
the duration of the predecessor. For example, if the predecessor has a
duration of eight days, a Start-to-Start lag of 25% causes the
successor’s start to be scheduled two days after the predecessor
starts. A Finish-to-Start lead of 75% produces the same start for the
successor—as long as the duration of the predecessor remains unchanged.
Changes in the duration of the predecessor, however, cause these two
links to result in a different start date for the successor.
Linking Summary Tasks
Summary tasks
roll up the information from the working tasks that are executed to
complete the summary tasks. Standard practice is to link subtasks and
not to link summary tasks. However, summary tasks can be linked to each
other, or to subtasks under other summary tasks. Project will not let
you establish an explicit link between a subtask and its summary task
because summary tasks are implicitly linked to their own subtasks.
Subtasks are bound to many of the same attributes as
their summary tasks. If the summary task is linked to a predecessor,
the predecessor relationship dictates when the summary task—and
therefore its subtasks—can begin. Likewise, if the summary task has a date constraint, its subtasks are
effectively constrained to that date also. If the summary task has no
link or date constraints, its start date is derived from the earliest
start date of any of its subtasks, and its finish date is derived from
the latest finish date of its subtasks.
Tip
Linking summary tasks is not a
good practice. This is because summary tasks do not define the
activities where work gets done; they summarize data from the component
tasks that are subordinate to the summary. For example, the summary
start date is the earliest start date in the summary’s subordinate
tasks. “Planning the Move” is a summary task, and “Calculate Moving
Expenses” is one of its subtasks. Links should generally reflect the
scheduling requirements of the tasks where work is done. But
there are always exceptions, and Project is a flexible application.
Linking summary tasks might be useful if a summary task represents a
self-contained group of tasks that have a logical relationship to
subtasks under another summary task. In that case, linking the summary
tasks has the advantage of enabling you to change the subtasks within
each group without worrying about redefining the link between the
summary tasks. |
If you create a task link that involves a summary
task as the dependent (or successor) task, you can only use the link
types Finish-to-Start and Start-to-Start. Microsoft Project does not
let you establish the other link types; it does not allow you to link
the summary task’s finish date as a dependent task. However, if the
link involves a summary task as the predecessor to a subtask, you can
use any of the four possible link types. These same rules apply in both
fixed start-date and fixed finish-date projects.
Note
If you select all tasks and
let Microsoft Project link the tasks in an outlined project, Microsoft
Project links all tasks at the first outline level to each other,
whether they are summary tasks or not. It then links the next level of
subtasks within any summary task to each other, and so forth, until all
outline levels in all summary tasks are linked at their own levels. All
links are the default Finish-to-Start link type. Linking tasks in this
manner is not recommended. |
The following sections describe the various methods
of linking tasks. Some processes are more complicated than others, but
might provide greater compatibility. It is recommended that you try all
the following methods as you read about them, and decide which method
you prefer.
Creating Links by Using the Menu or Toolbar
There are several ways to link tasks. One option is
to select the tasks and then click the Link Tasks button in the
Schedule group on the Task tab. Another way is to select the tasks and
press Ctrl+F2. These links are always the default Finish-to-Start
links, without lag or lead. You have to edit the links if you want a
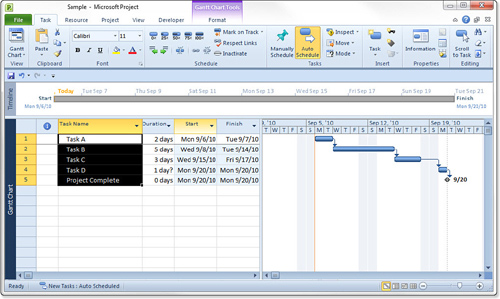
different link type or if you want to add lag or lead. In Figure 6, four tasks are selected and have been linked in series with the Link Tasks button on the Task tab.
There is no limit to the number of tasks you can
select for linking with the Link Tasks tool. You can link just one
predecessor and one successor at a time, or you can link all the tasks
in the project with the same operation.
If you select adjacent tasks by dragging the mouse
pointer or by using the Shift+down arrow or Shift+up arrow key
combination, Microsoft Project links the selected tasks from the top
down. In other words, tasks higher on the list (that have lower ID
numbers) are predecessors for the tasks below them (that have higher ID
numbers). The same concept applies if you select all tasks by clicking
one of the column headings, such as Task Name.
Tip
You have the same options to
remove a task link as you have to create links. To remove a link,
select the linked tasks and either click the Unlink Tasks tool or press
Ctrl+Shift+F2. To remove all links to a task, including all the task’s
predecessors and successors, select just the task itself and use the
Unlink Tasks toolbar button or command. |
If you build the selection by using
Ctrl+click (holding down Ctrl and clicking on the tasks you want to
link) to add tasks, Microsoft Project links the tasks in the order in
which you added them to the selection. The first selected task is the
predecessor to the second, and so forth.
